This guide provides information on how to integrate Zendesk Support, a customer service and ticket software, with the Binadox SaaS and IaaS usage monitoring and cost optimization platform to be able to receive utilization insights, spend analysis, and individual user data of this application across an entire organization.
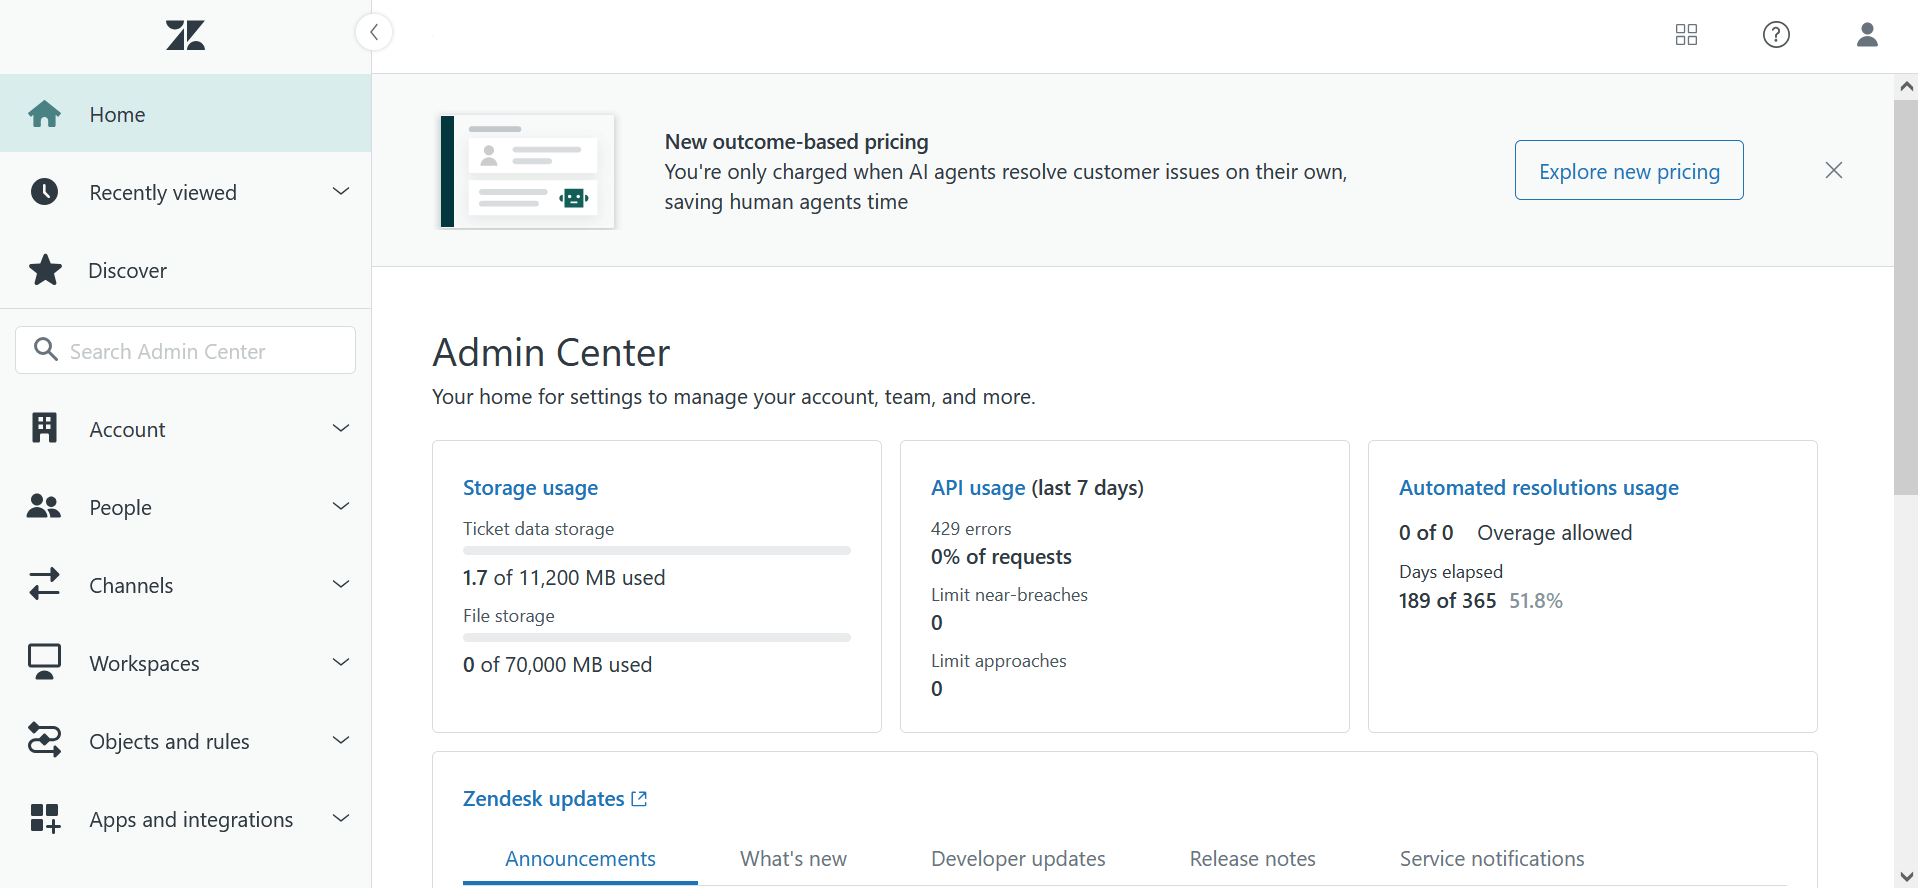
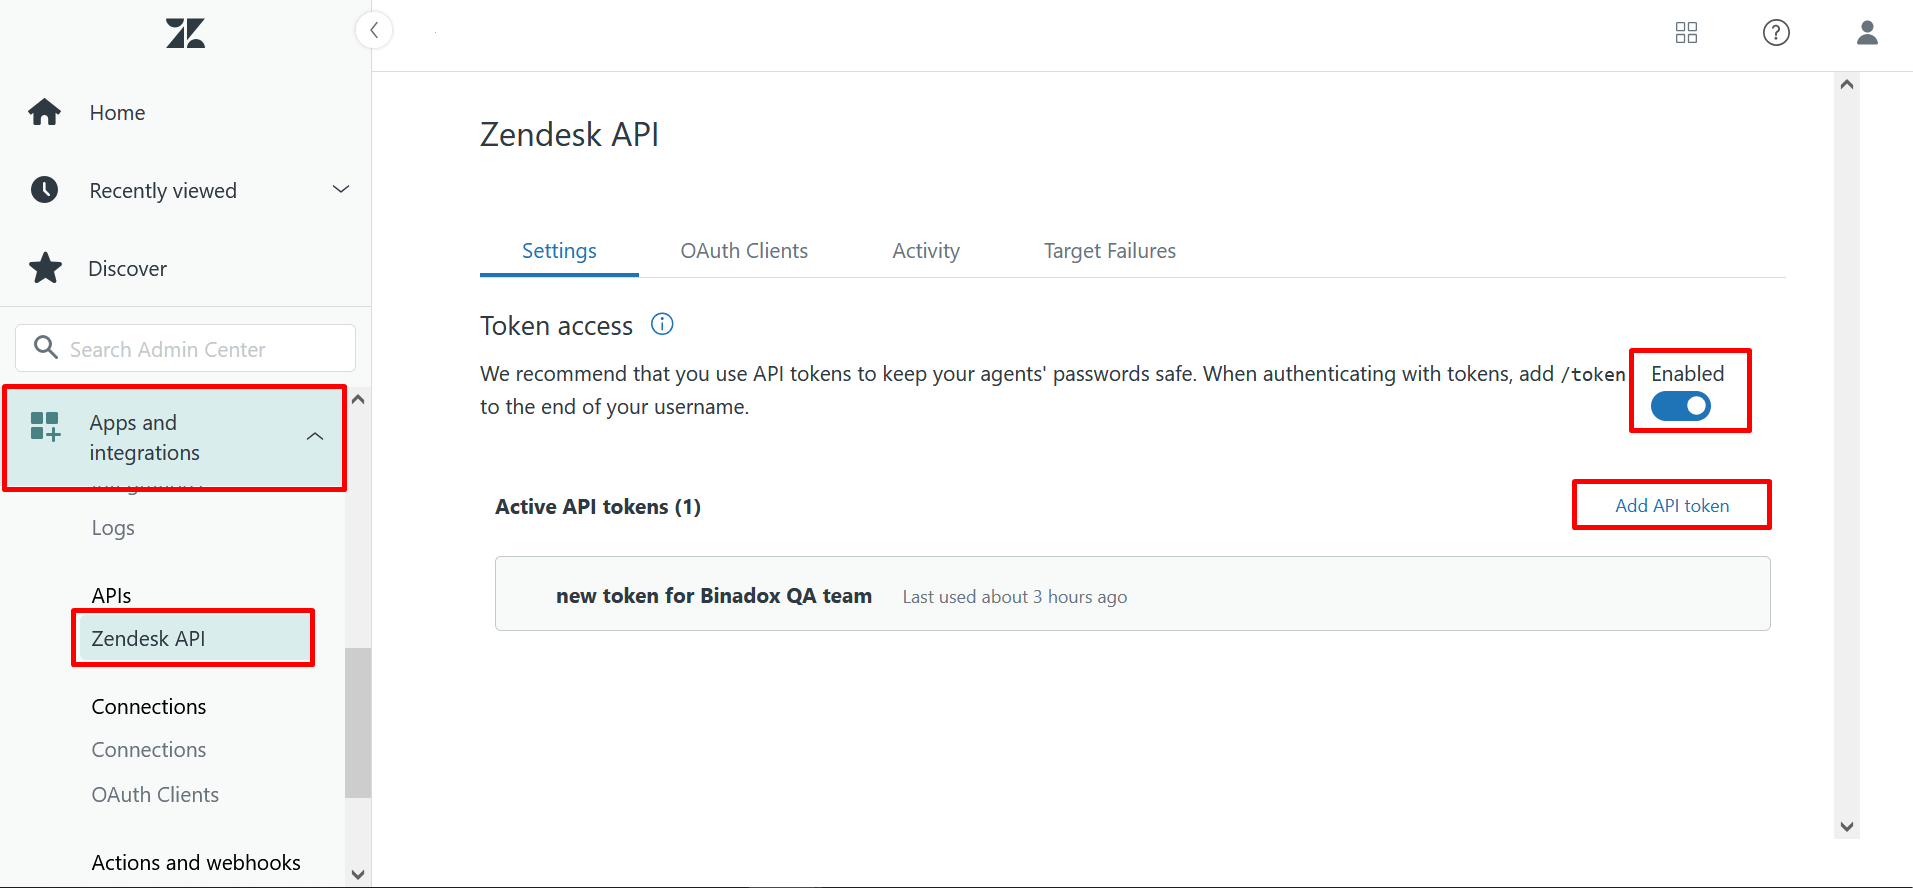
2. In the sidebar of the Admin panel, select APIs in the Apps and integrations section. On the Settings tab of the Zendesk API view, enable Token Access using the toggle button. Click the Add API token button icon in the Active API Tokens section to generate a new API token.
Token Access Zendesk
3. Provide a description for a new token for further identification in the API Token Description (optional) field. Click the Copy button to copy the token to the clipboard. Note that you won’t be able to see it again. Make sure to keep this value safe. Click Save.
New API Token Zendesk
2. Configure Zendesk Support in Binadox
1. Log into your Binadox account.
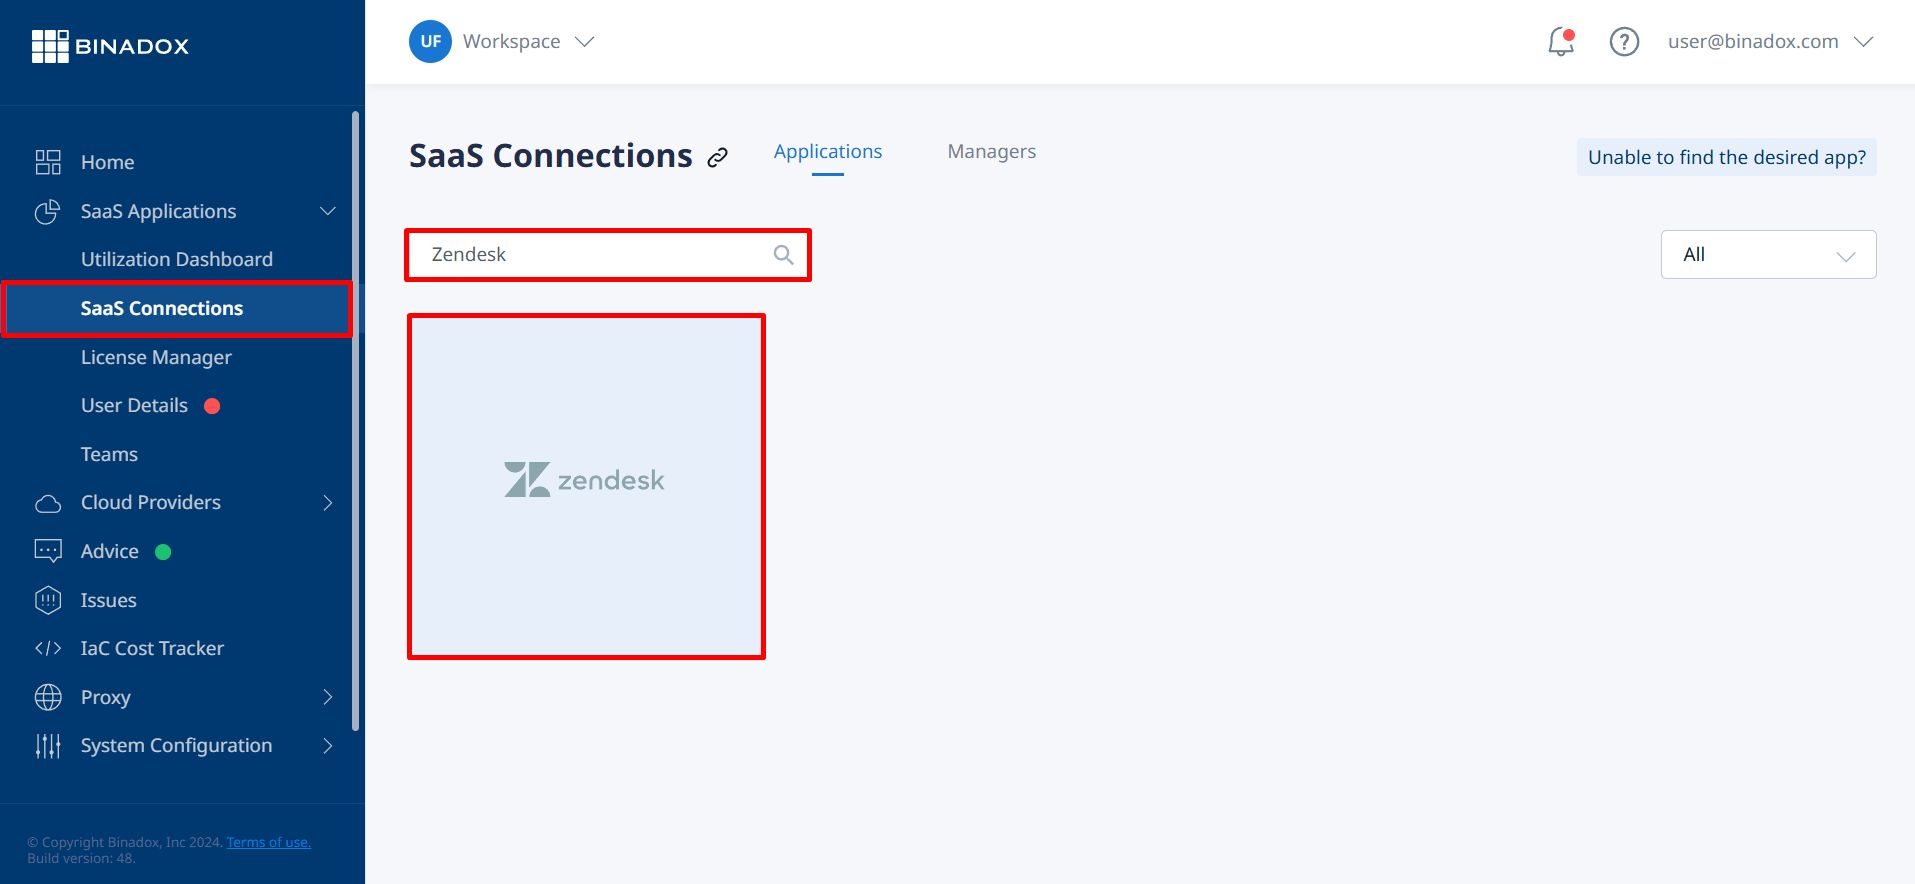
2. In the navigation pane on the left, click Integrations. Proceed to the SaaS tab. Click on the Zendesk icon. To quickly locate the Zendesk software in the list of supported applications, type in its name in the search bar or use an alphabetical filter by clicking on the first letter of an application name, i.e. Z.
Integrations Zendesk Binadox
3. Create a meaningful connection instance name. Click Continue.
Connection Instance Name Zendesk
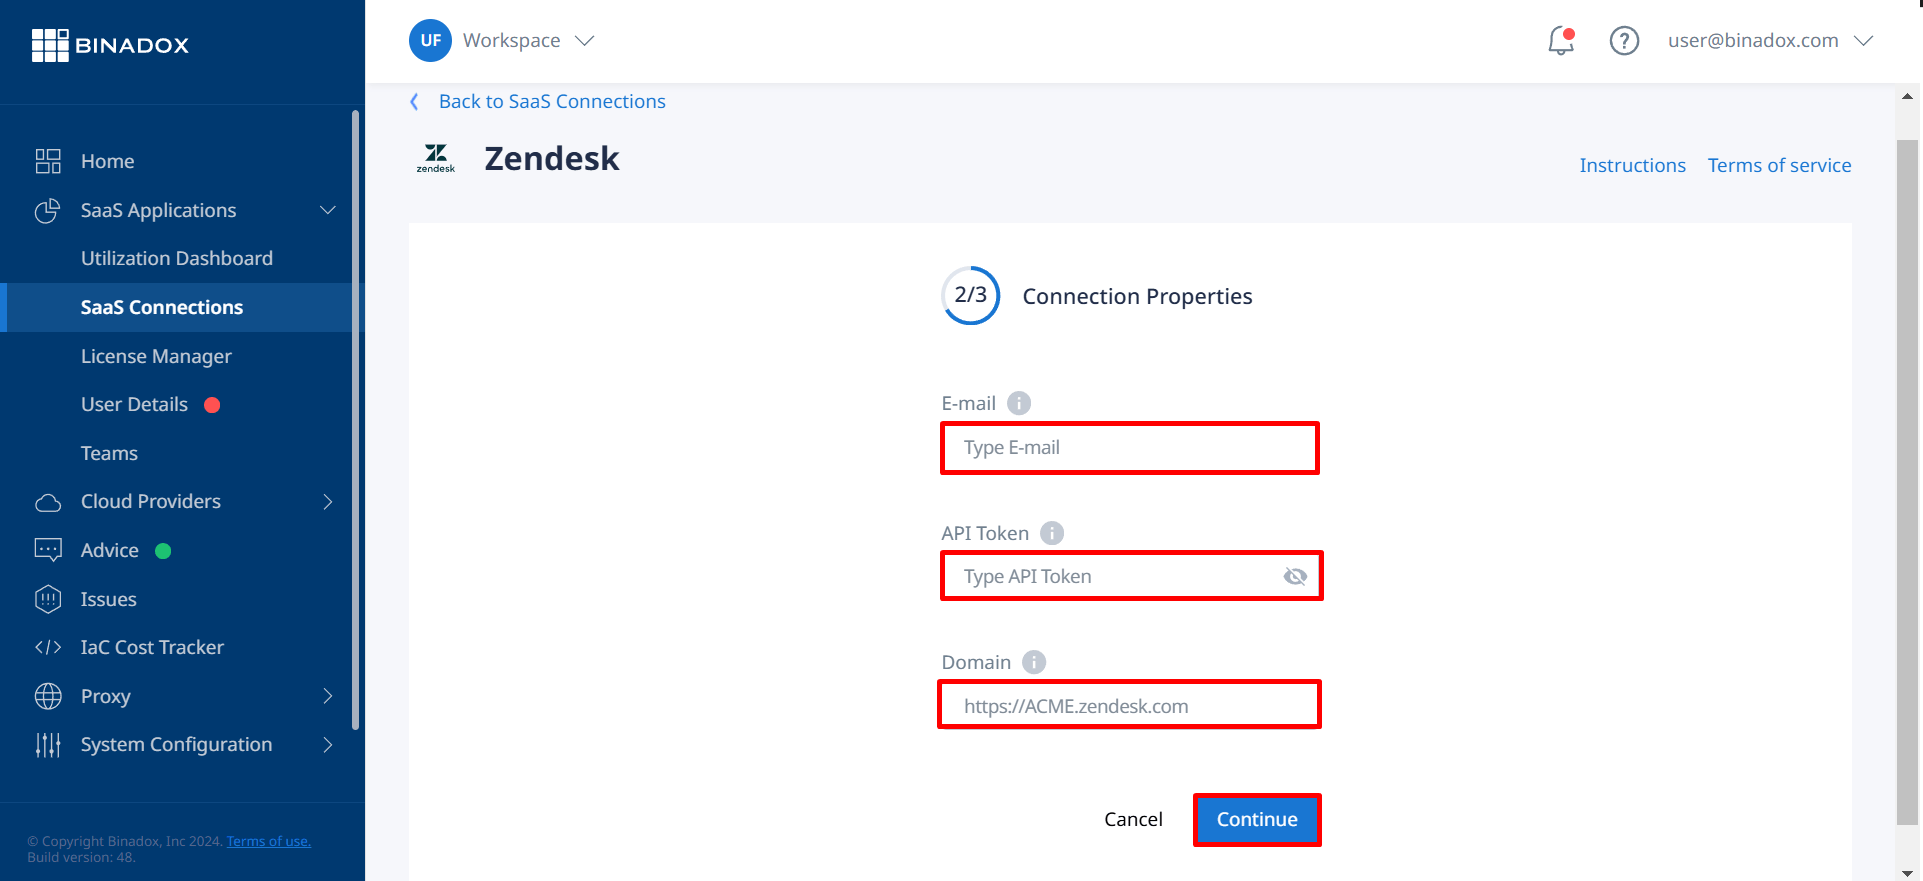
4. Fill in the connection properties. Enter an email address of the Zendesk Support admin account into the Email field. Paste the API token into the API Token field (see Clause 1 on how to generate an API token). Indicate your Zendesk domain name in the Domain field (e.g. https://your_subdomain.zendesk.com). Click Continue.
Connection Properties Zendesk
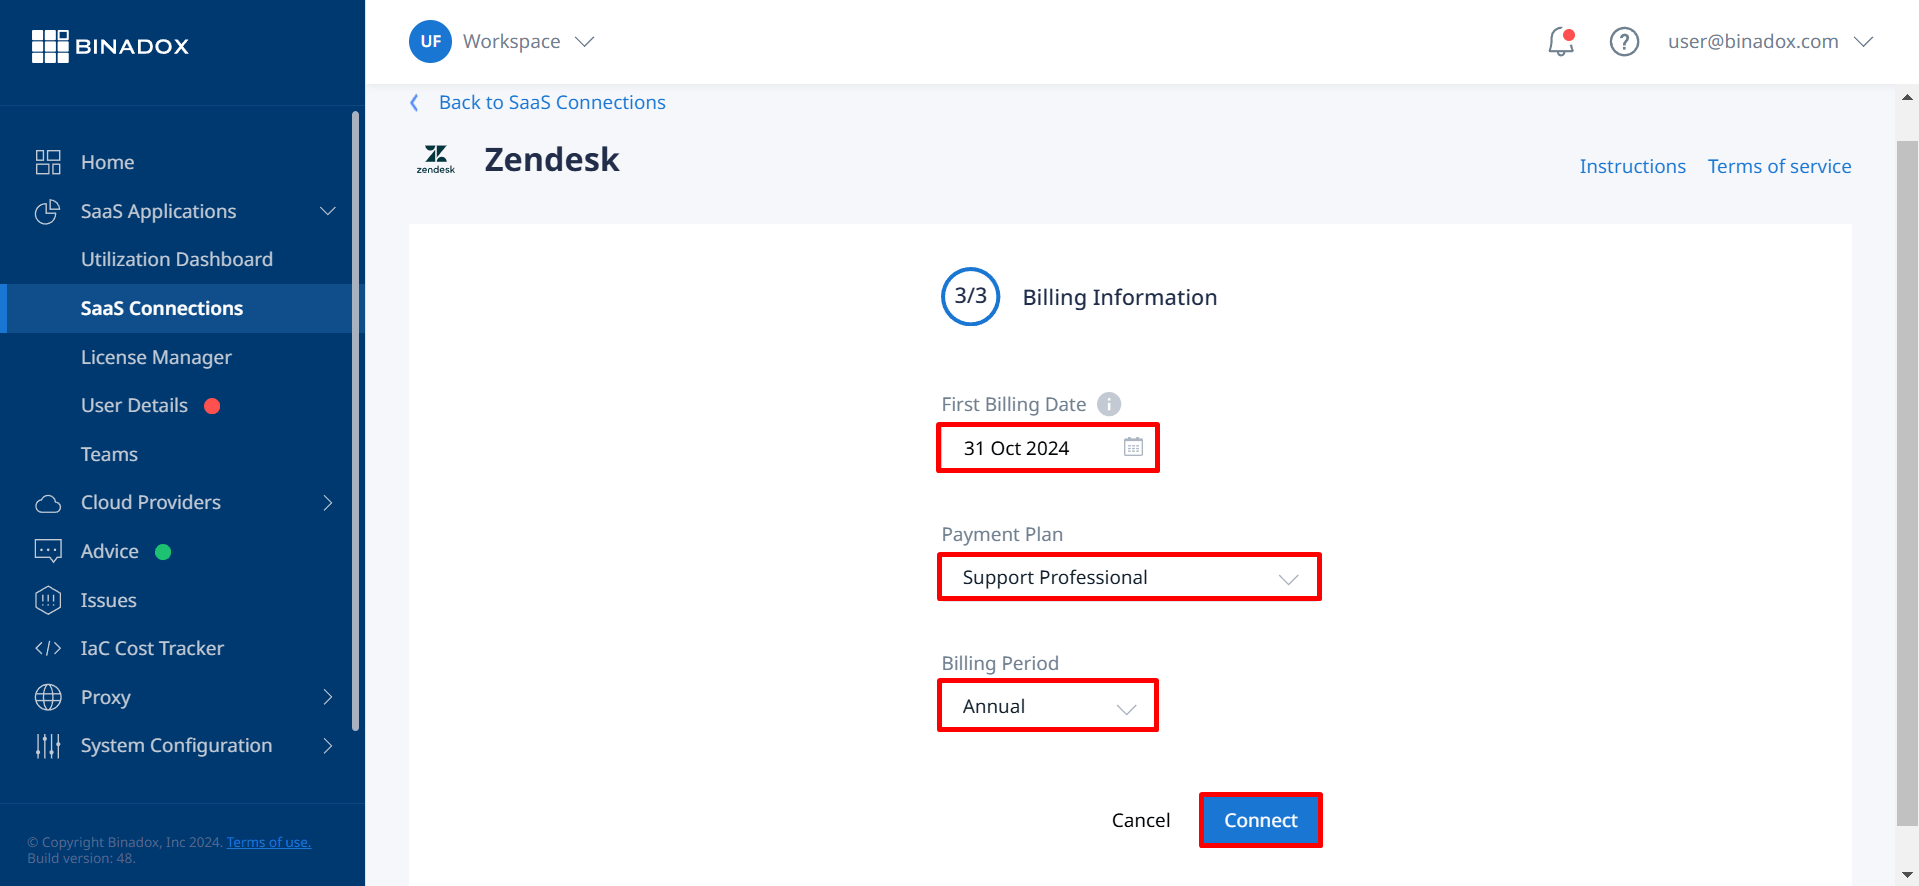
5. Fill in the billing information. Click on the calendar icon to specify the date the bill for application services is issued. Select your Zendesk Support payment plan and billing period in the corresponding drop-down lists. Click Connect.
Billing Information Zendesk
6. Upon successful Zendesk Support integration with Binadox, the connection status will switch into Connected.
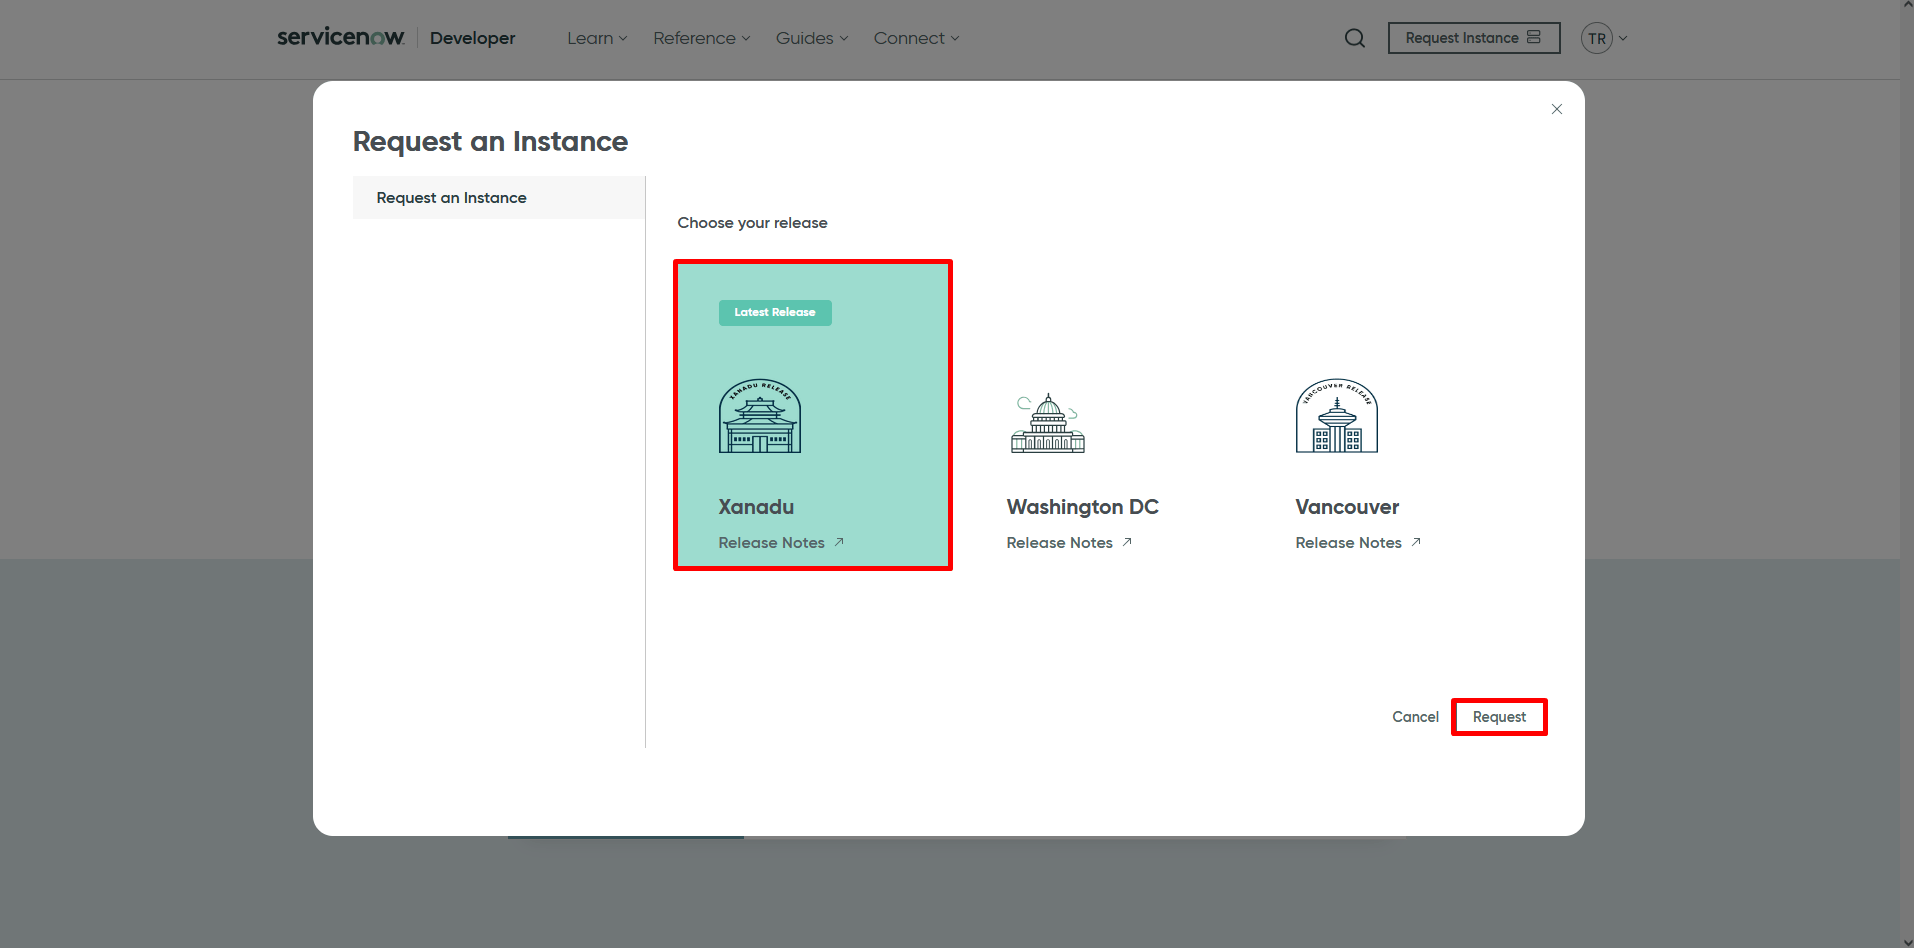
Still struggling to configure Zendesk Support? Check out the Zendesk Support video manual on the Binadox Tutorials channel:
This guide provides information on how to integrate ServiceNow with the Binadox multi-cloud SaaS and IaaS usage monitoring and cost optimization platform as a ticketing system to be proactively notified of overspend on SaaS applications or IaaS services, budget excess or any other unusual expenses detected by Binadox.
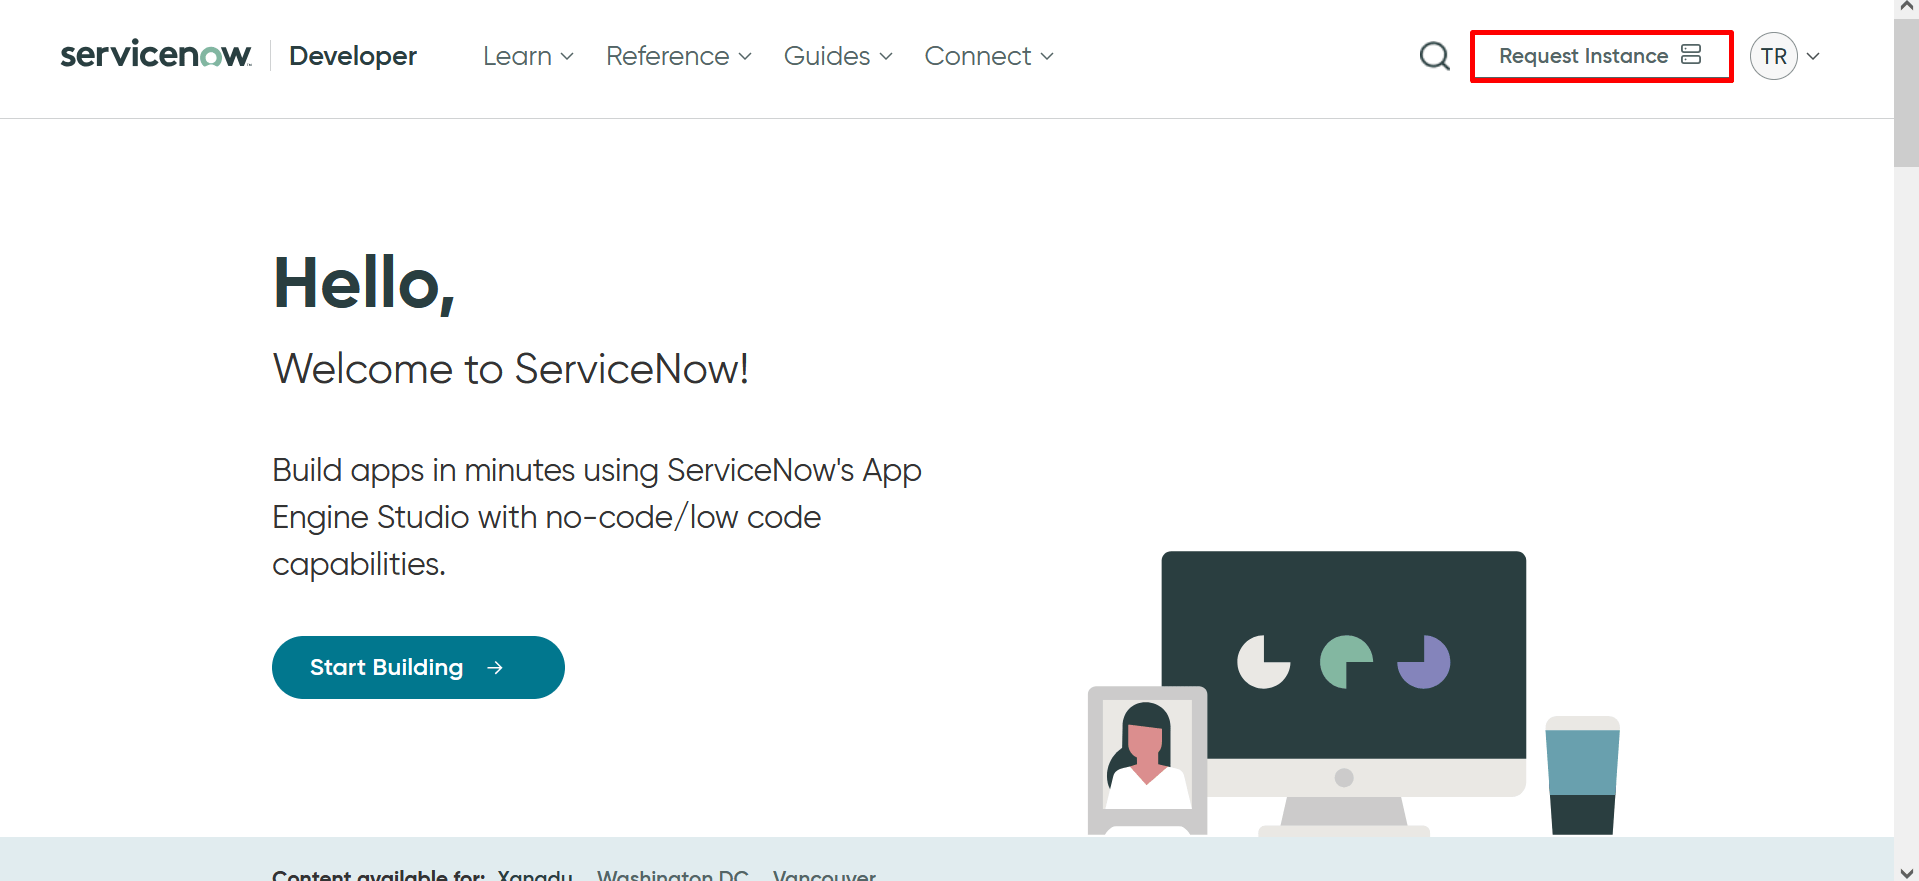
3. Select your preferred ServiceNow version from the available options. Click Request.
Versions ServiceNow
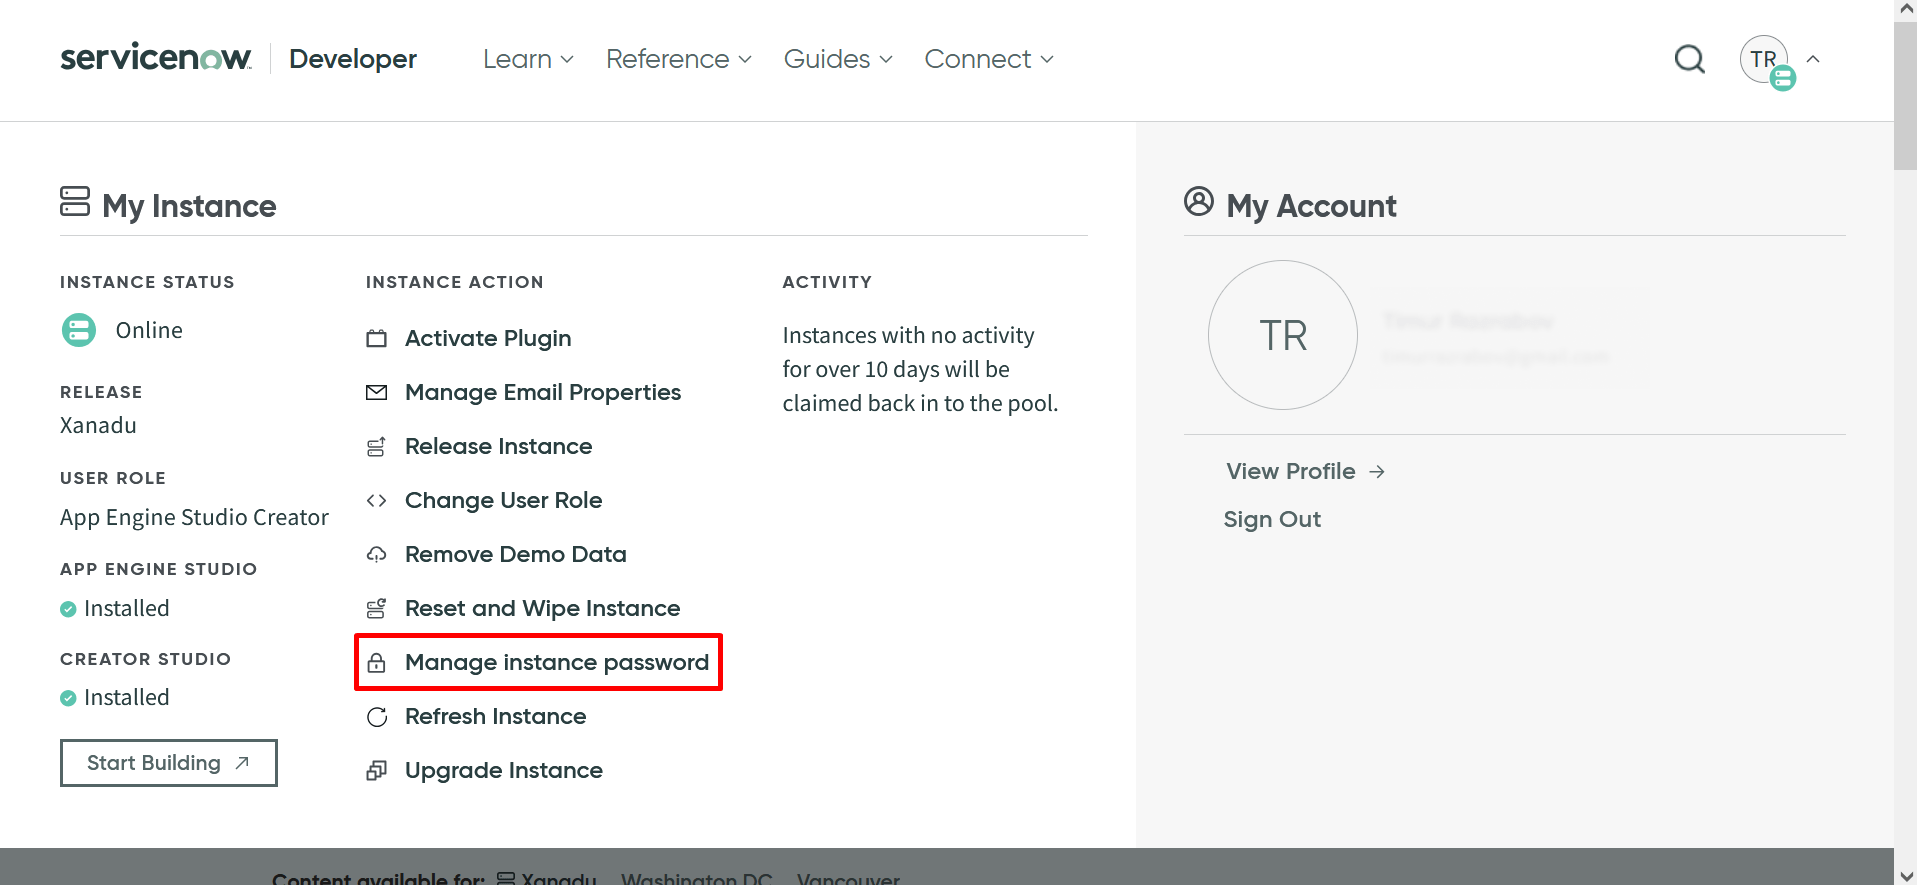
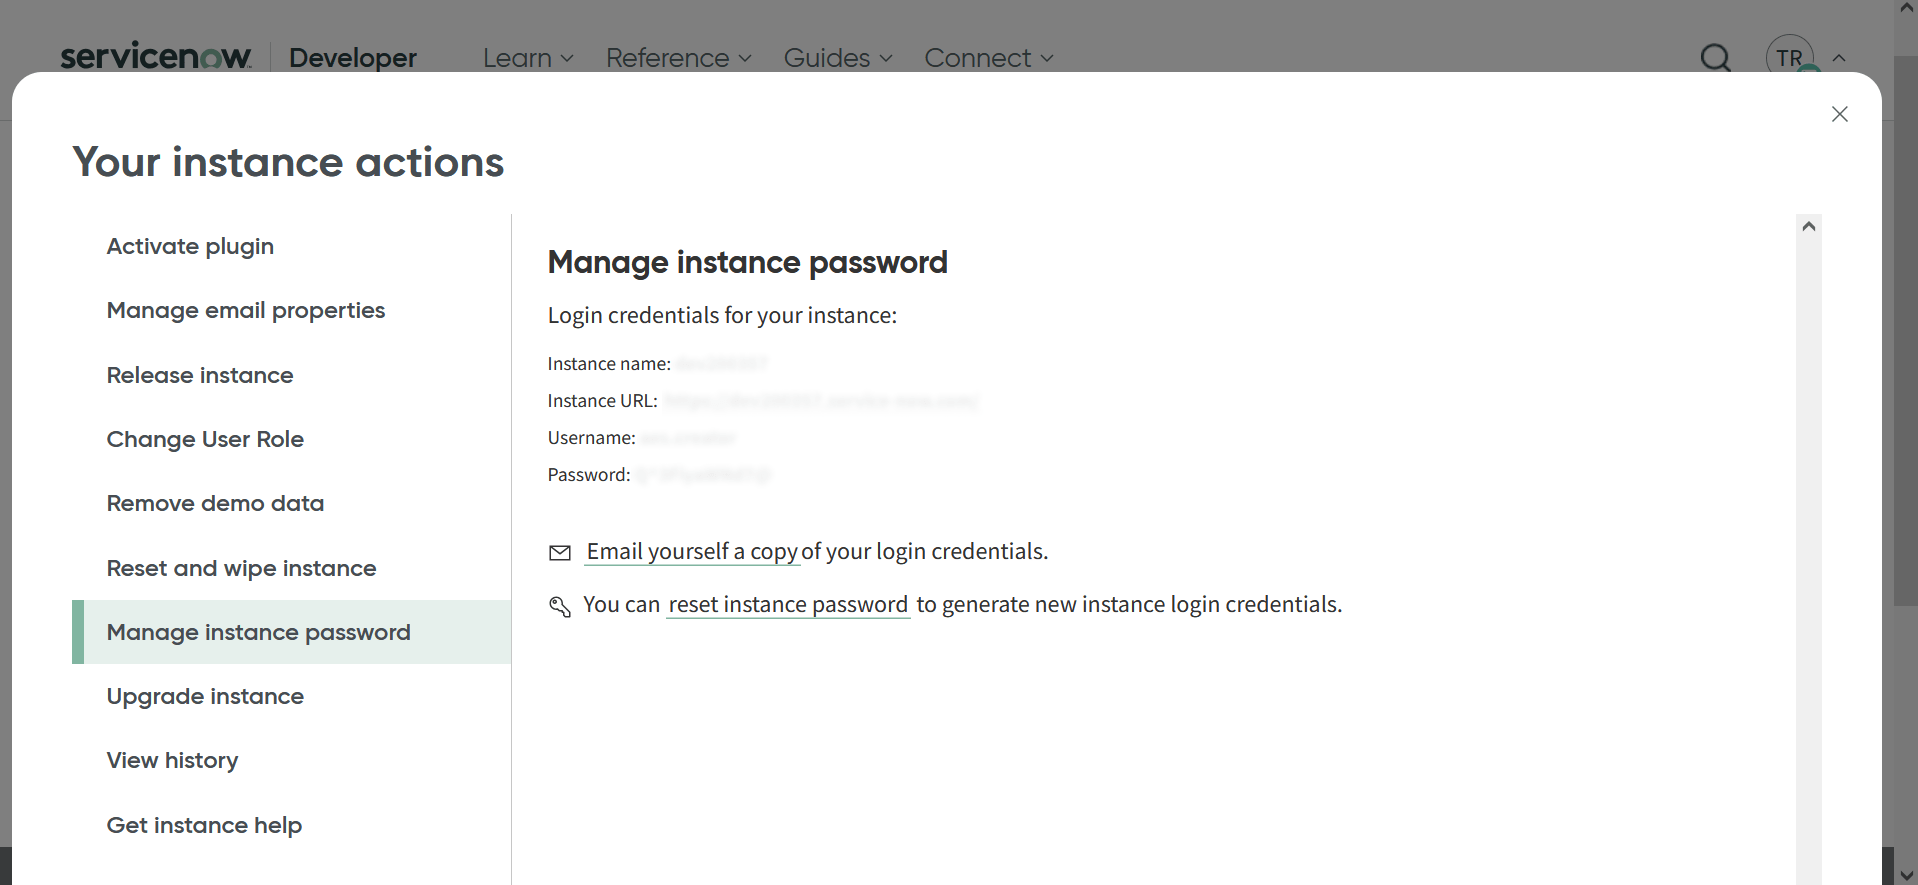
4. In the My Instance view, click Manage instance password.
Manage instance password
5. Copy the Instance URL, as well as a username and a password to log into the instance. This information is required to integrate ServiceNow with Binadox as a ticketing system.
Your instance actions
2. ServiceNow Integration with Binadox
1. Log in to your Binadox account
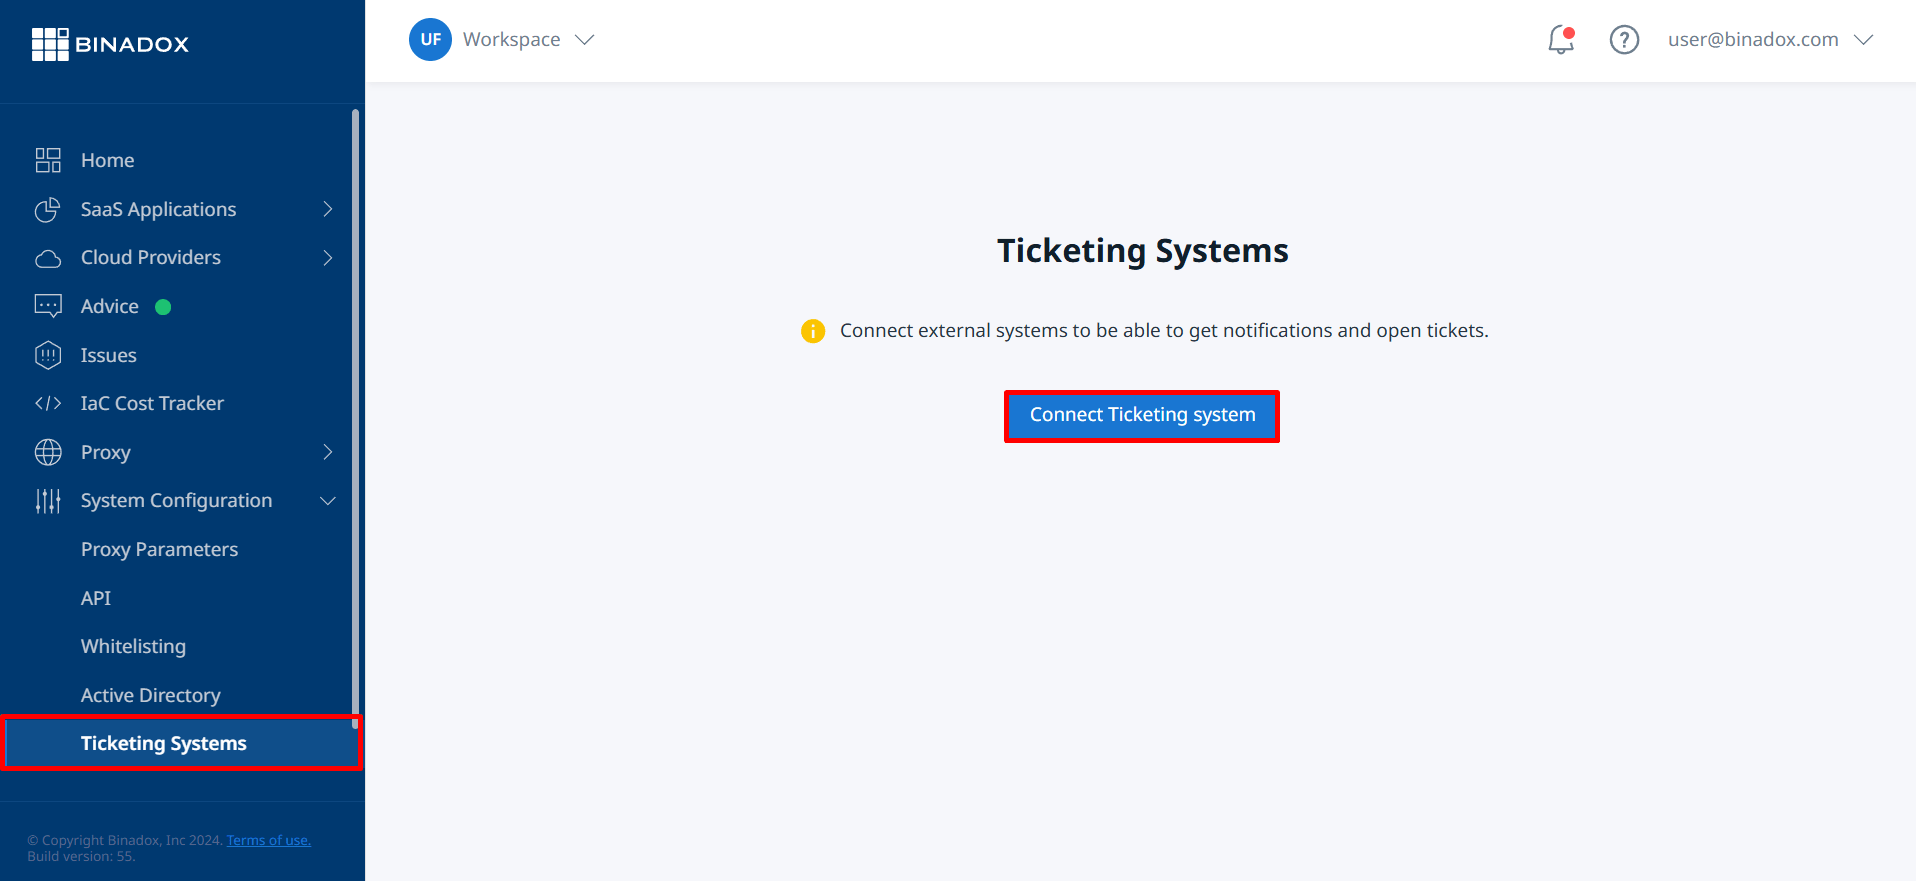
2. In the navigation pane on the left, click System Configuration > Ticketing Systems. Click the Connect Ticketing system button.
Ticketing Systems
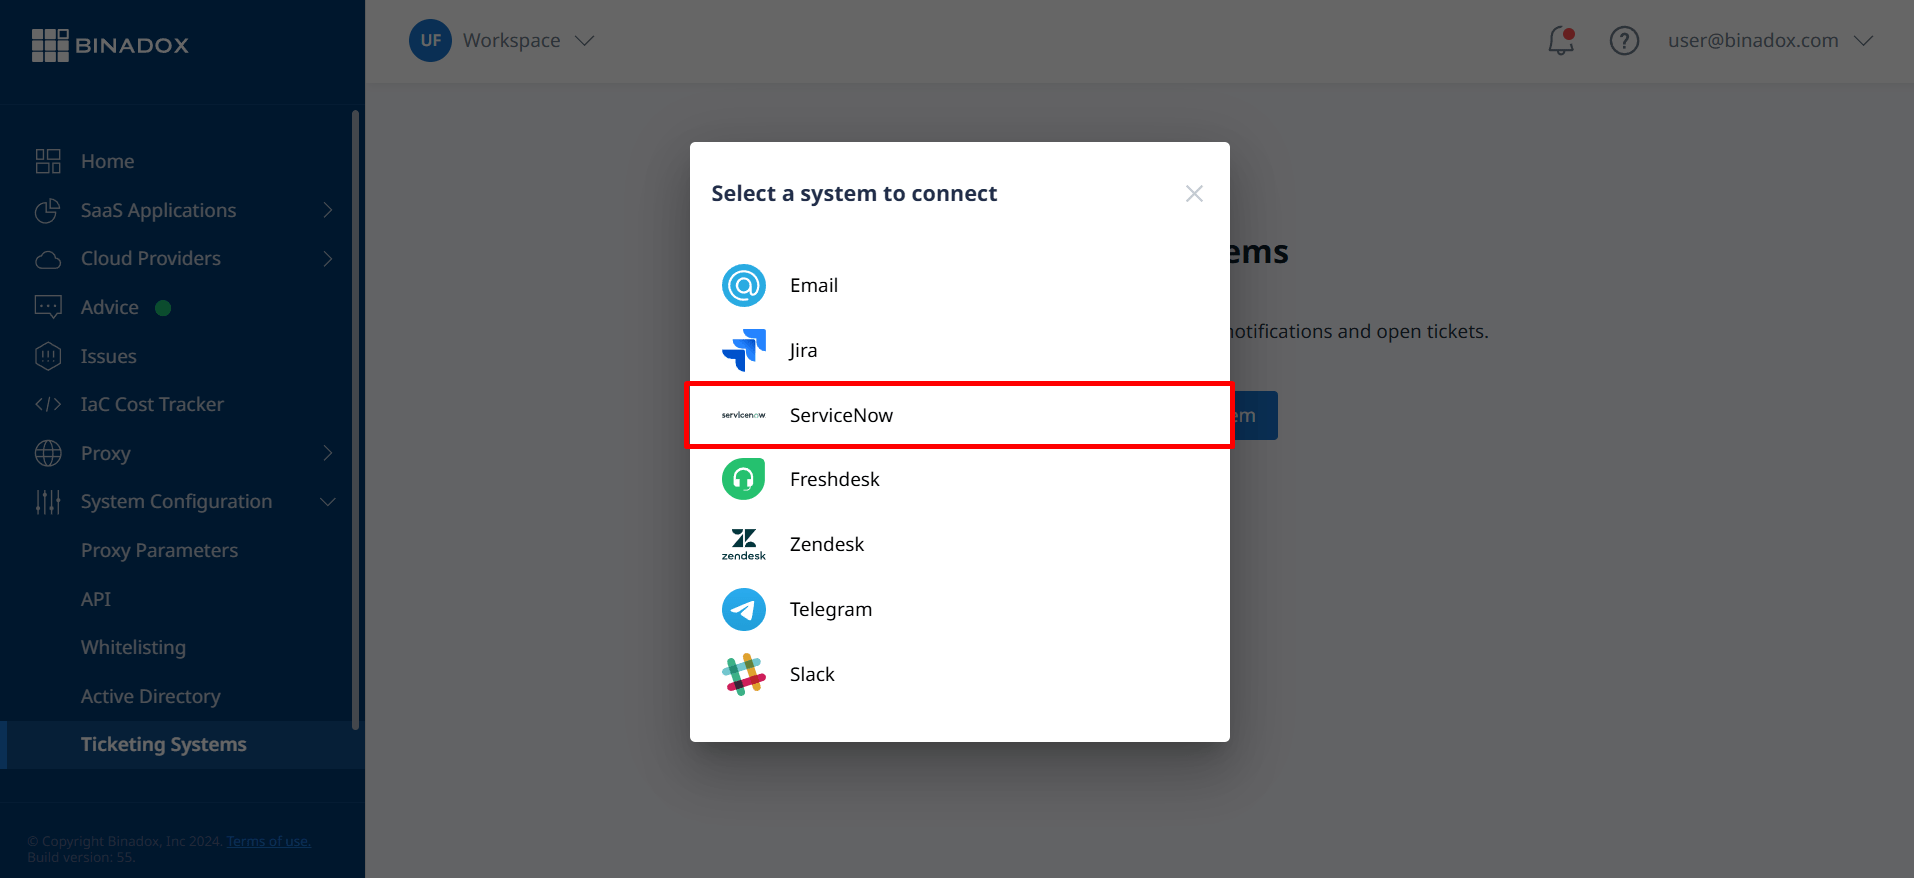
3. Select ServiceNow from the available ticketing systems.
Select a system to connect
4. Create a connection name for further reference. Click Continue.
Connection name
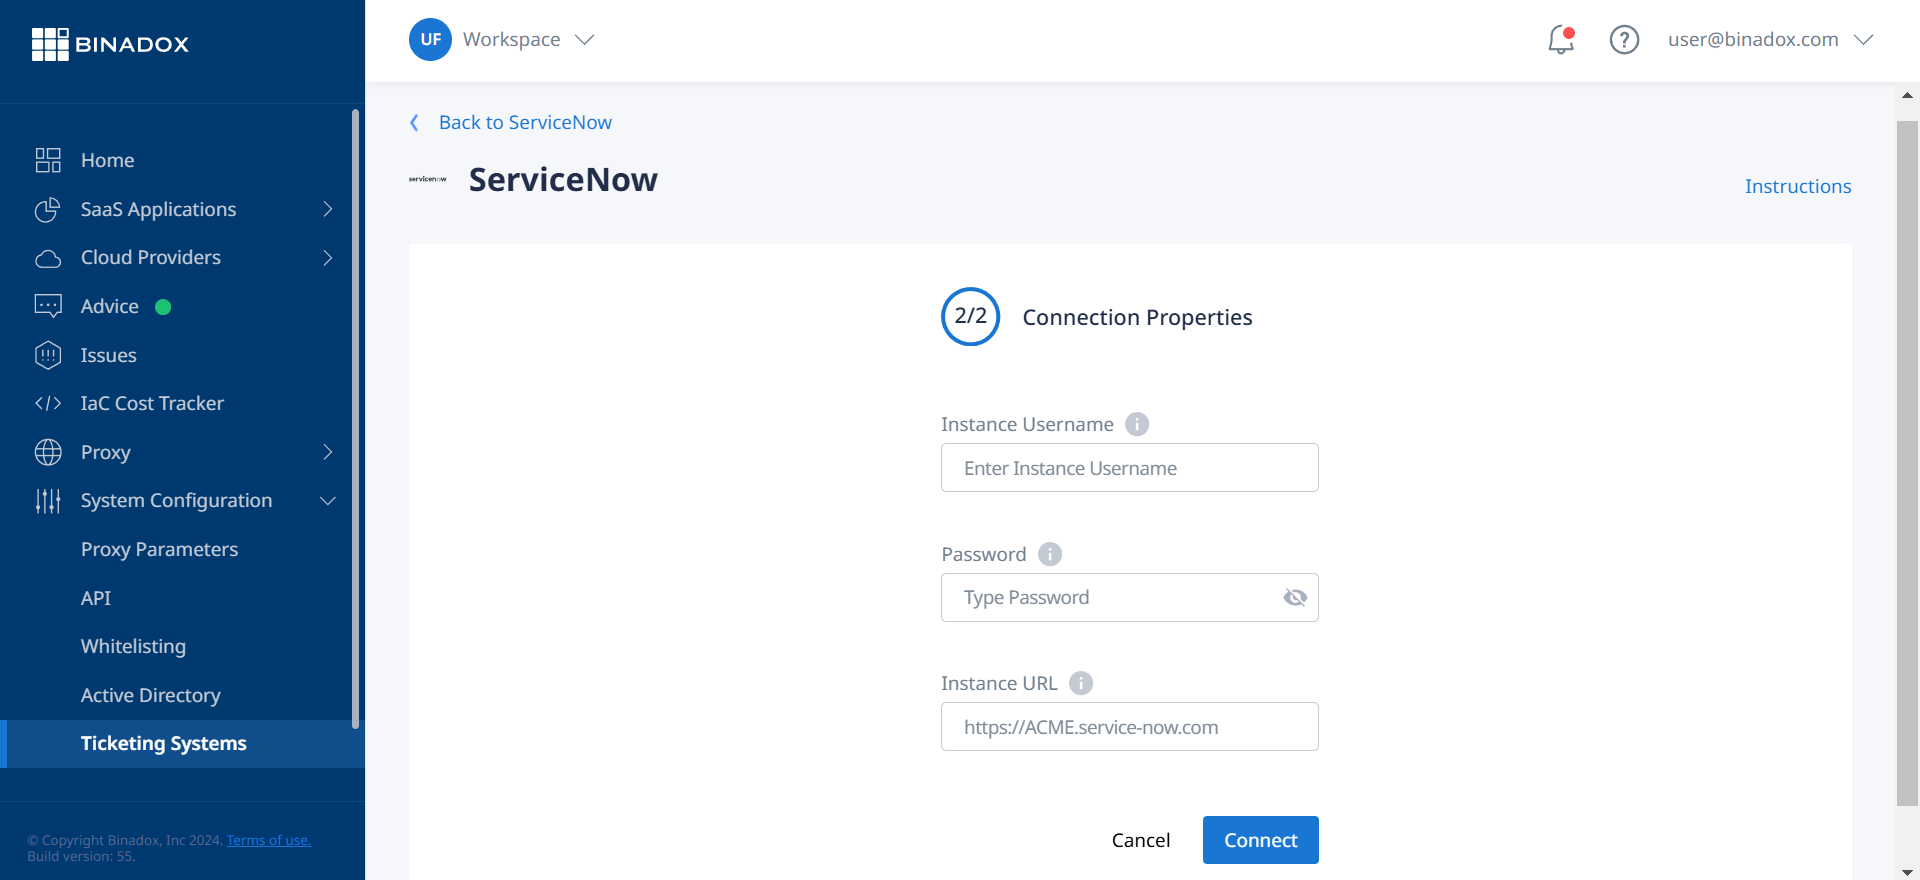
5. Fill in the following fields:
InstanceUsername: Your ServiceNow instance username;
Password: Your ServiceNow instance password;
Instance URL: The URL of your ServiceNow developer instance.
Click Connect.
Connection properties ServiceNow
5. Upon successful ServiceNow ticketing configuration, the connection status will switch into Connected.
This guide provides step-by-step instructions on how to successfully integrate Zoom with Binadox. Integration of the Zoom cloud-based video conferencing platform with the cloud monitoring and cost optimization platform Binadox allows to receive usage, spend, and user data of the Zoom software.
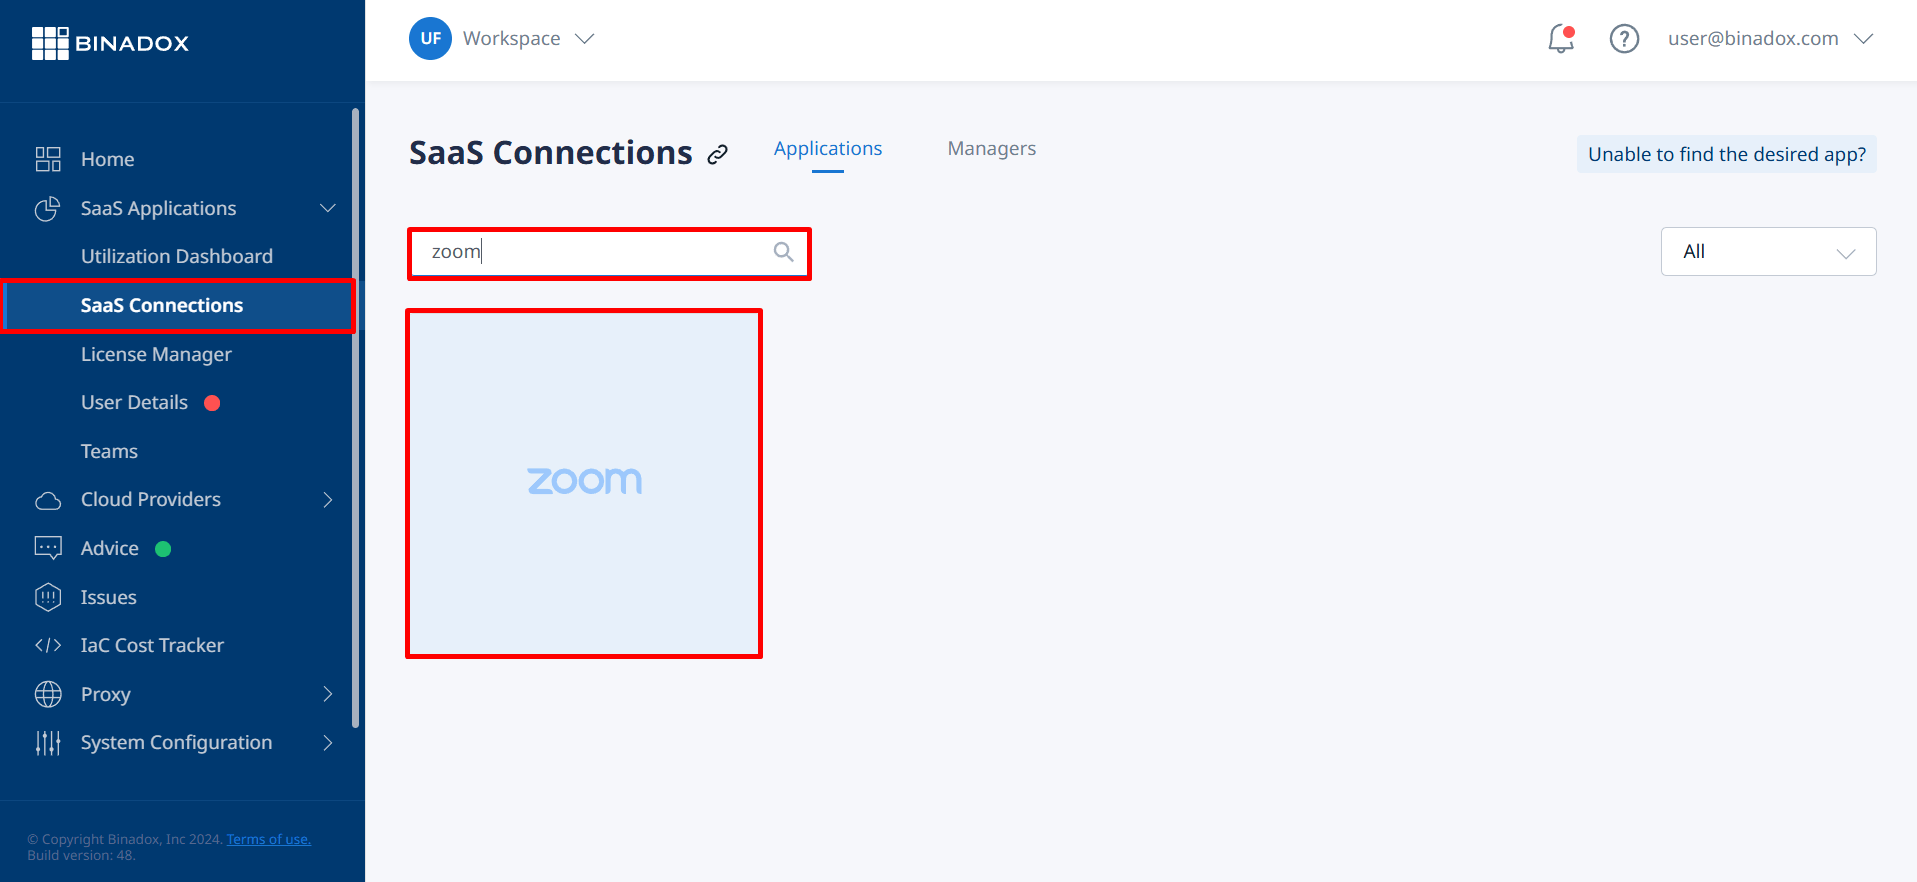
1. Log into your Binadox account.
2. In the navigation pane on the left, click SaaS Connections. Click on the Zoom icon. To quickly locate the Zoom software in the list of supported applications, type in its name in the search bar.
SaaS Connections
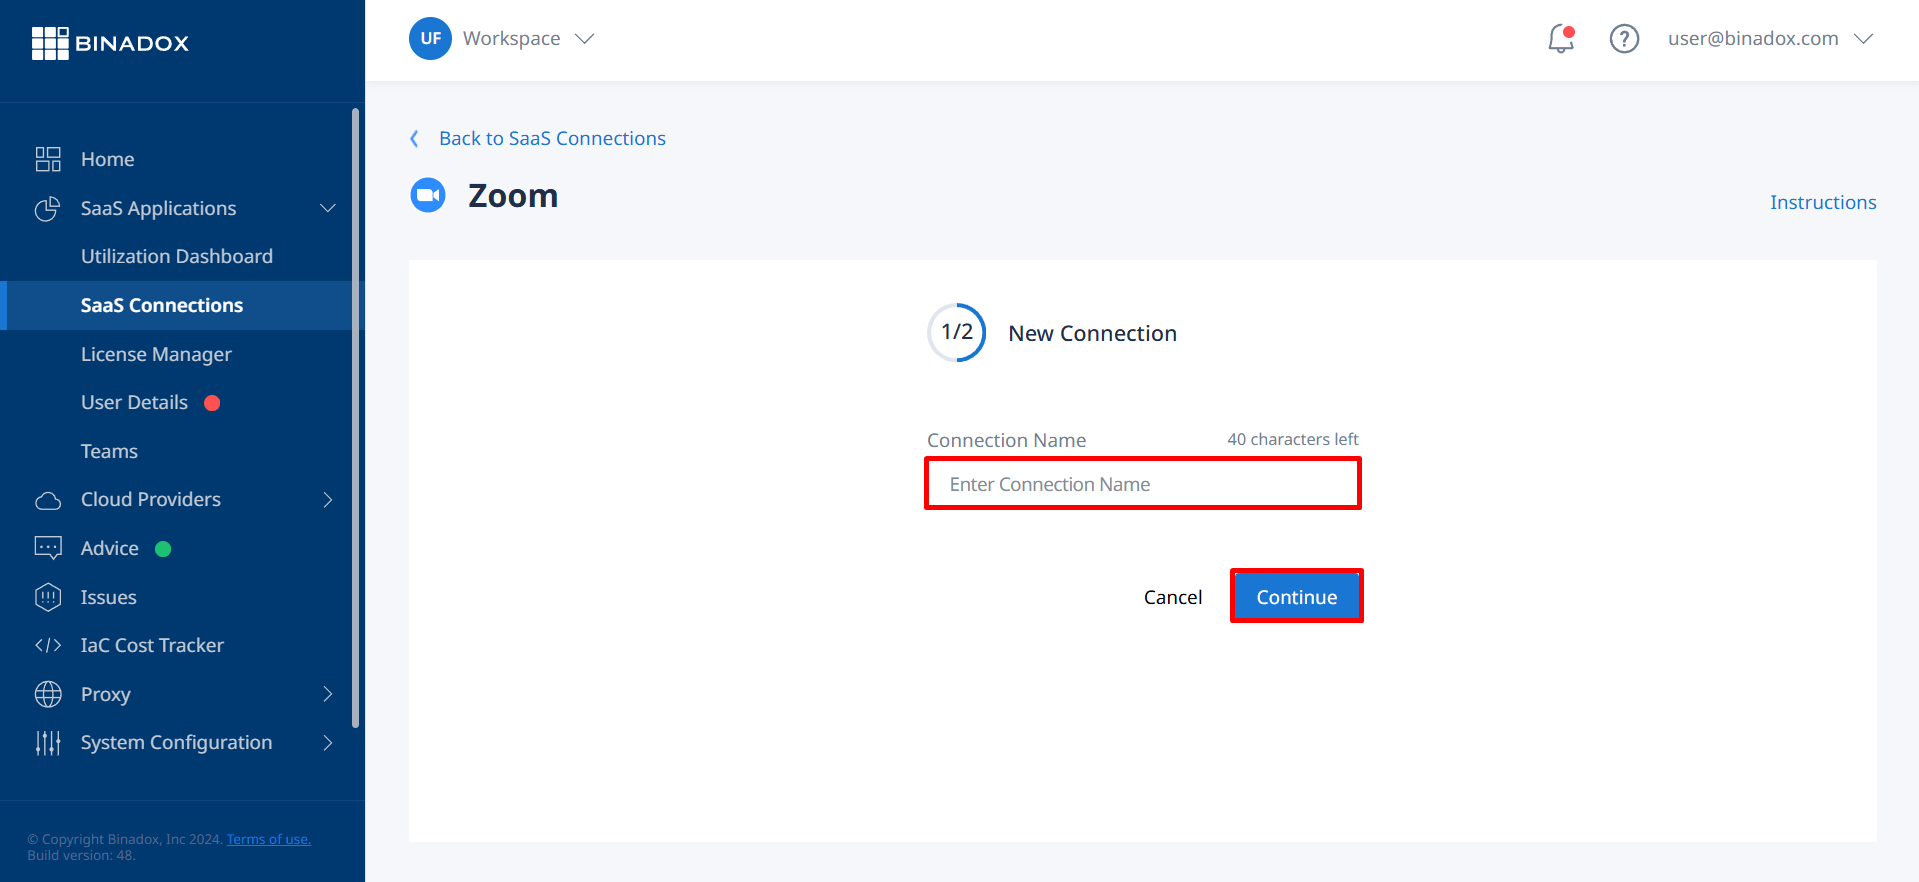
3. Indicate a connection name for further reference. Click Continue.
Connection name
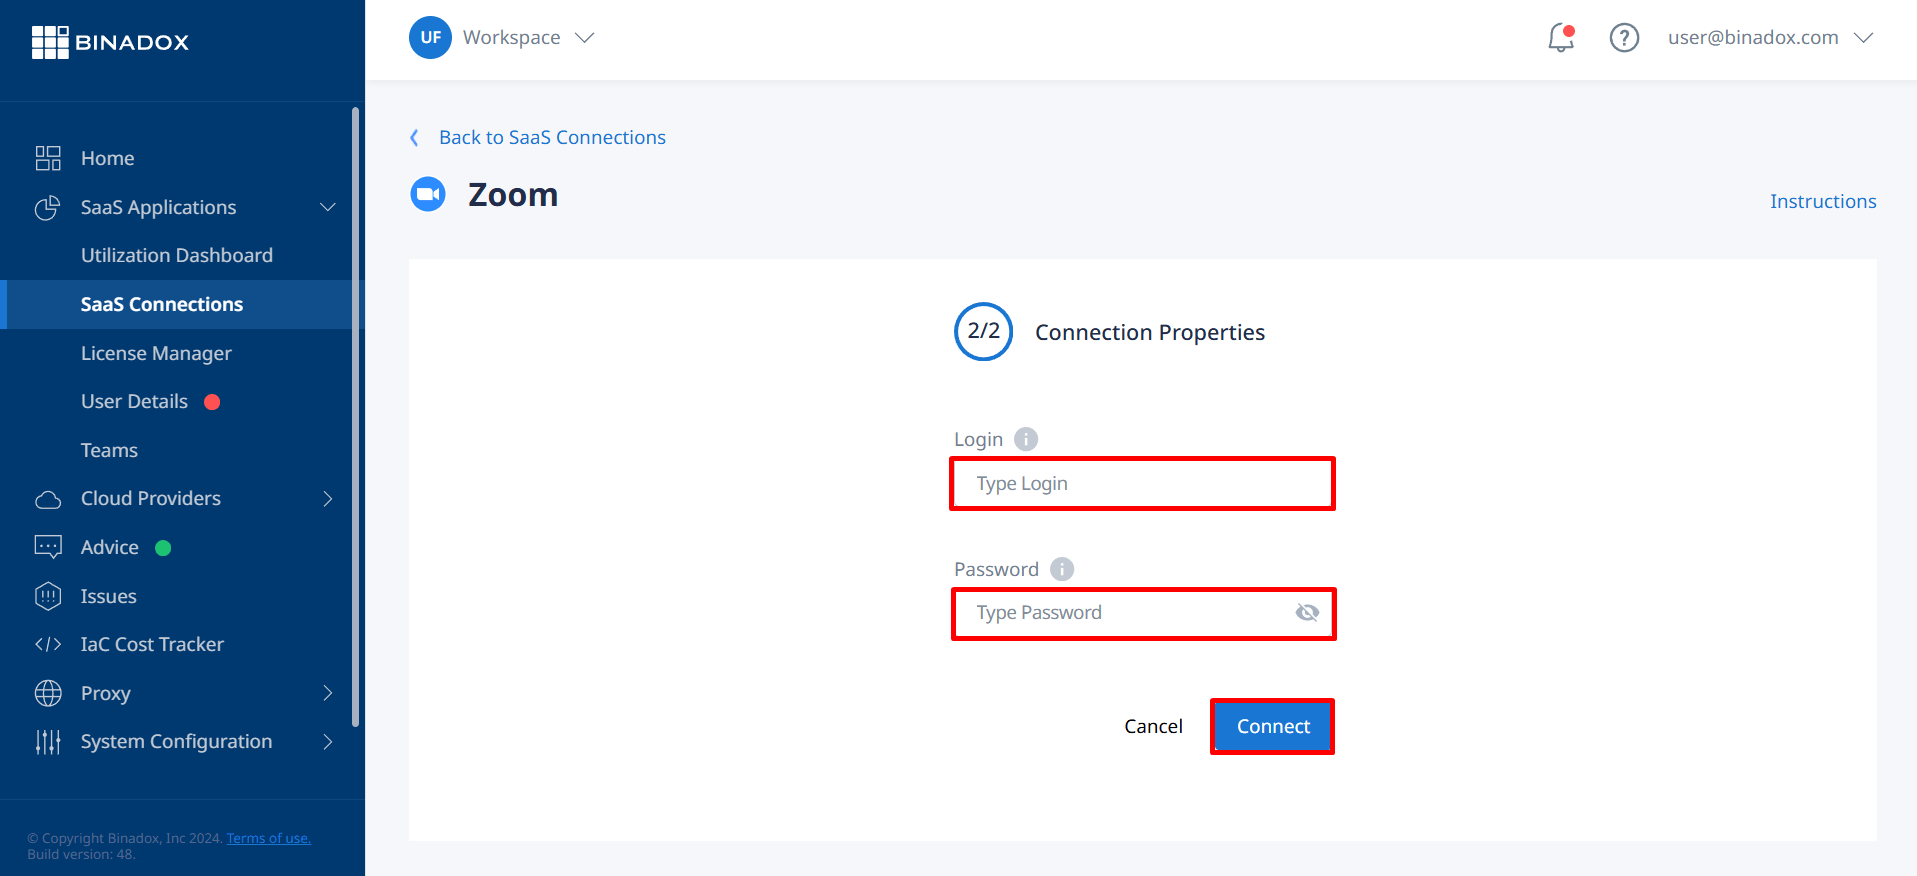
4. Fill in the connection properties. Enter login and a password of an admin account. Click Connect.
Connection properties
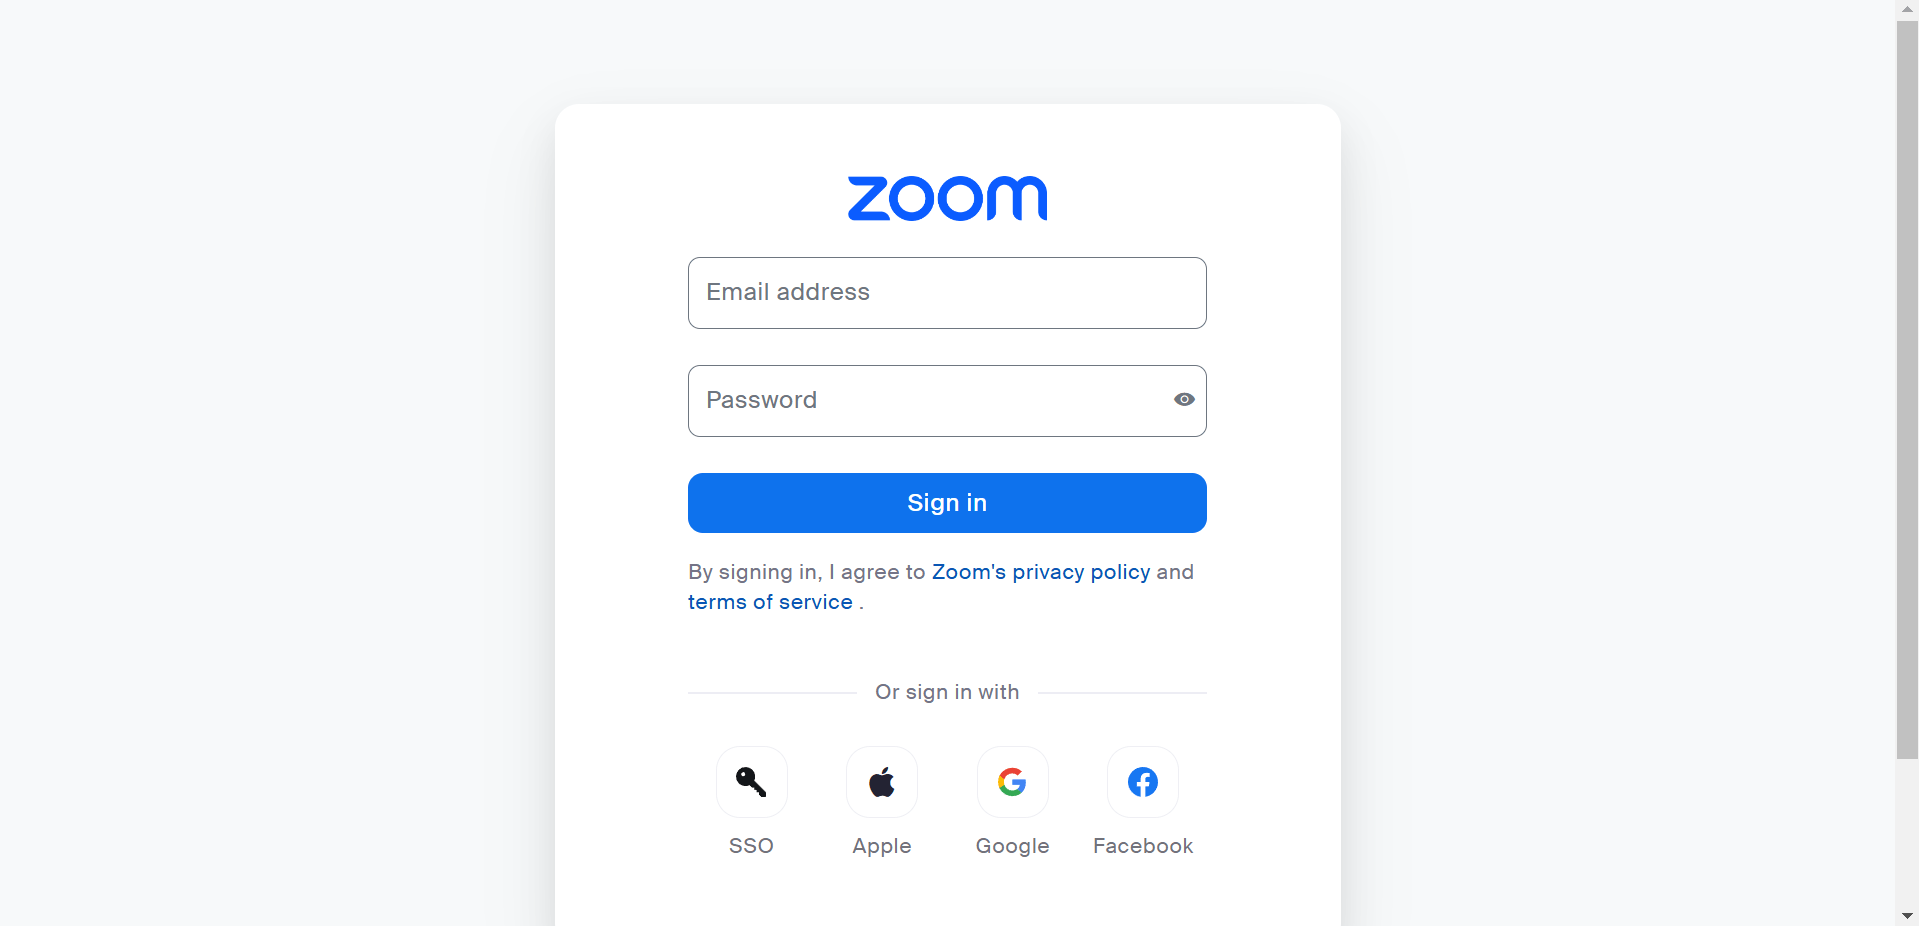
5. You will be redirected to the Zoom login page if you are not logged in to the account. Enter your credentials and click Sign In.
The Binadox multi-cloud SaaS and IaaS usage monitoring and cost optimization platform features Slack ticketing that allows you to access Binadox notifications from your Slack channel. This guide provides instructions on how to configure Slack ticketing on the Binadox platform.
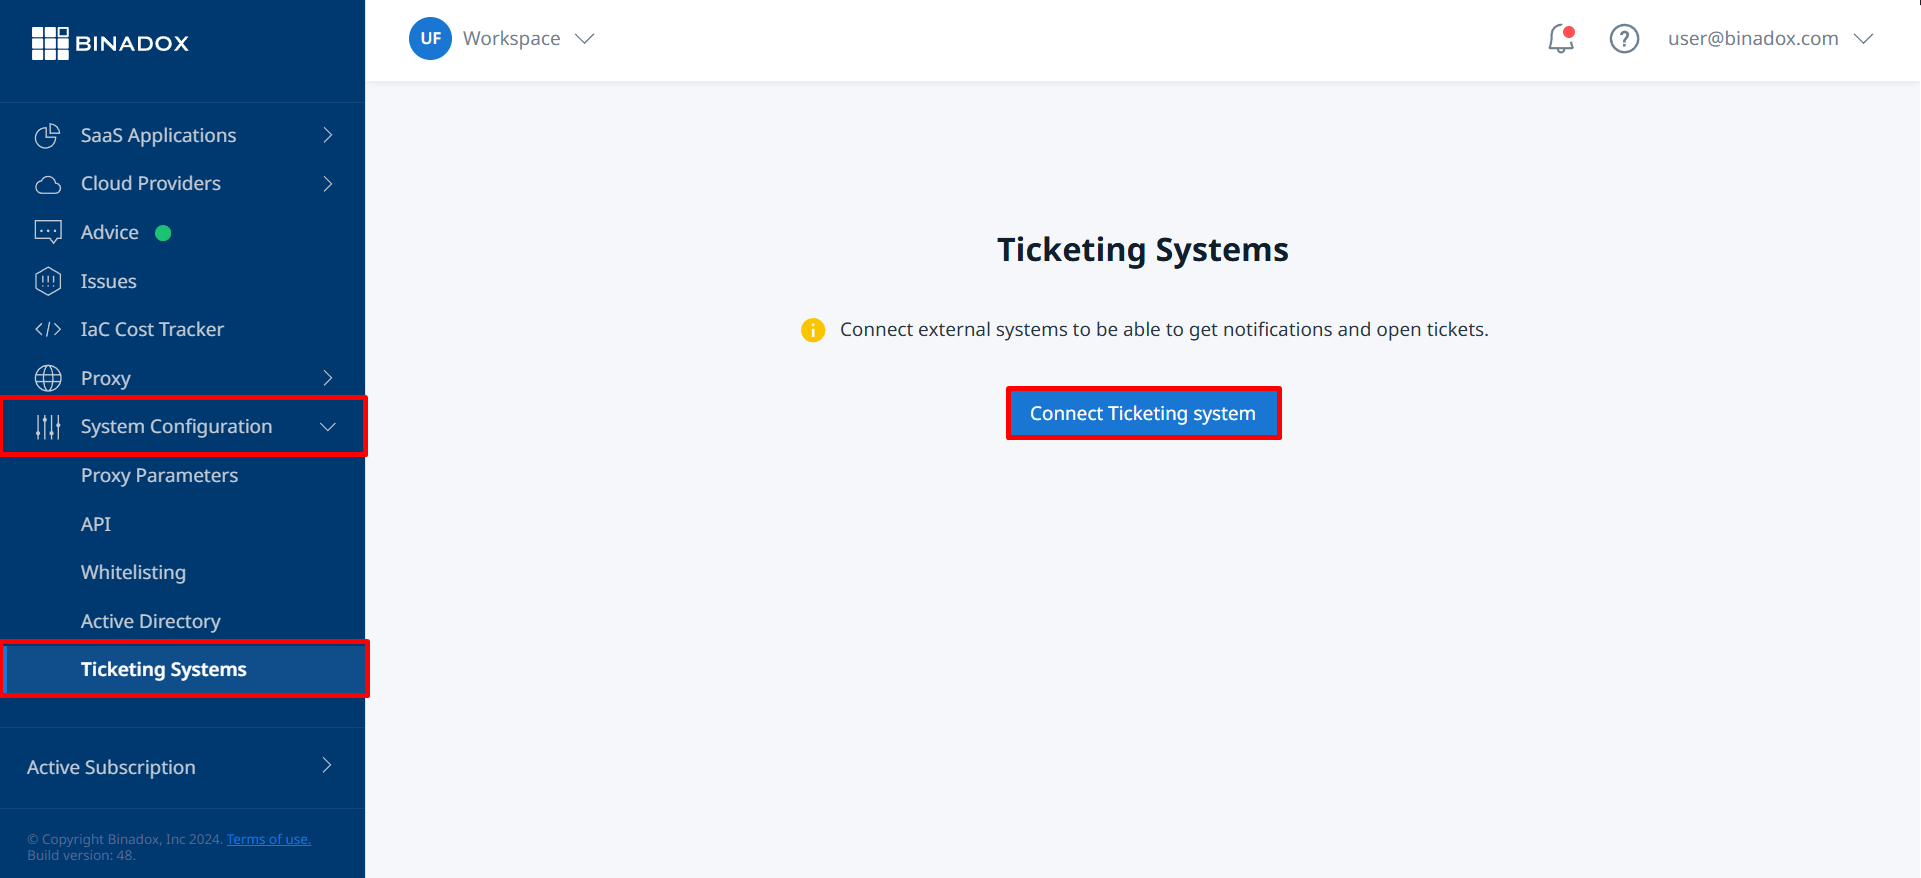
1. Log into your Binadox account.
2. In the navigation pane on the left, click System Configuration > Ticketing Sytems. Click Connect Ticketing system.
Connect Ticketing system
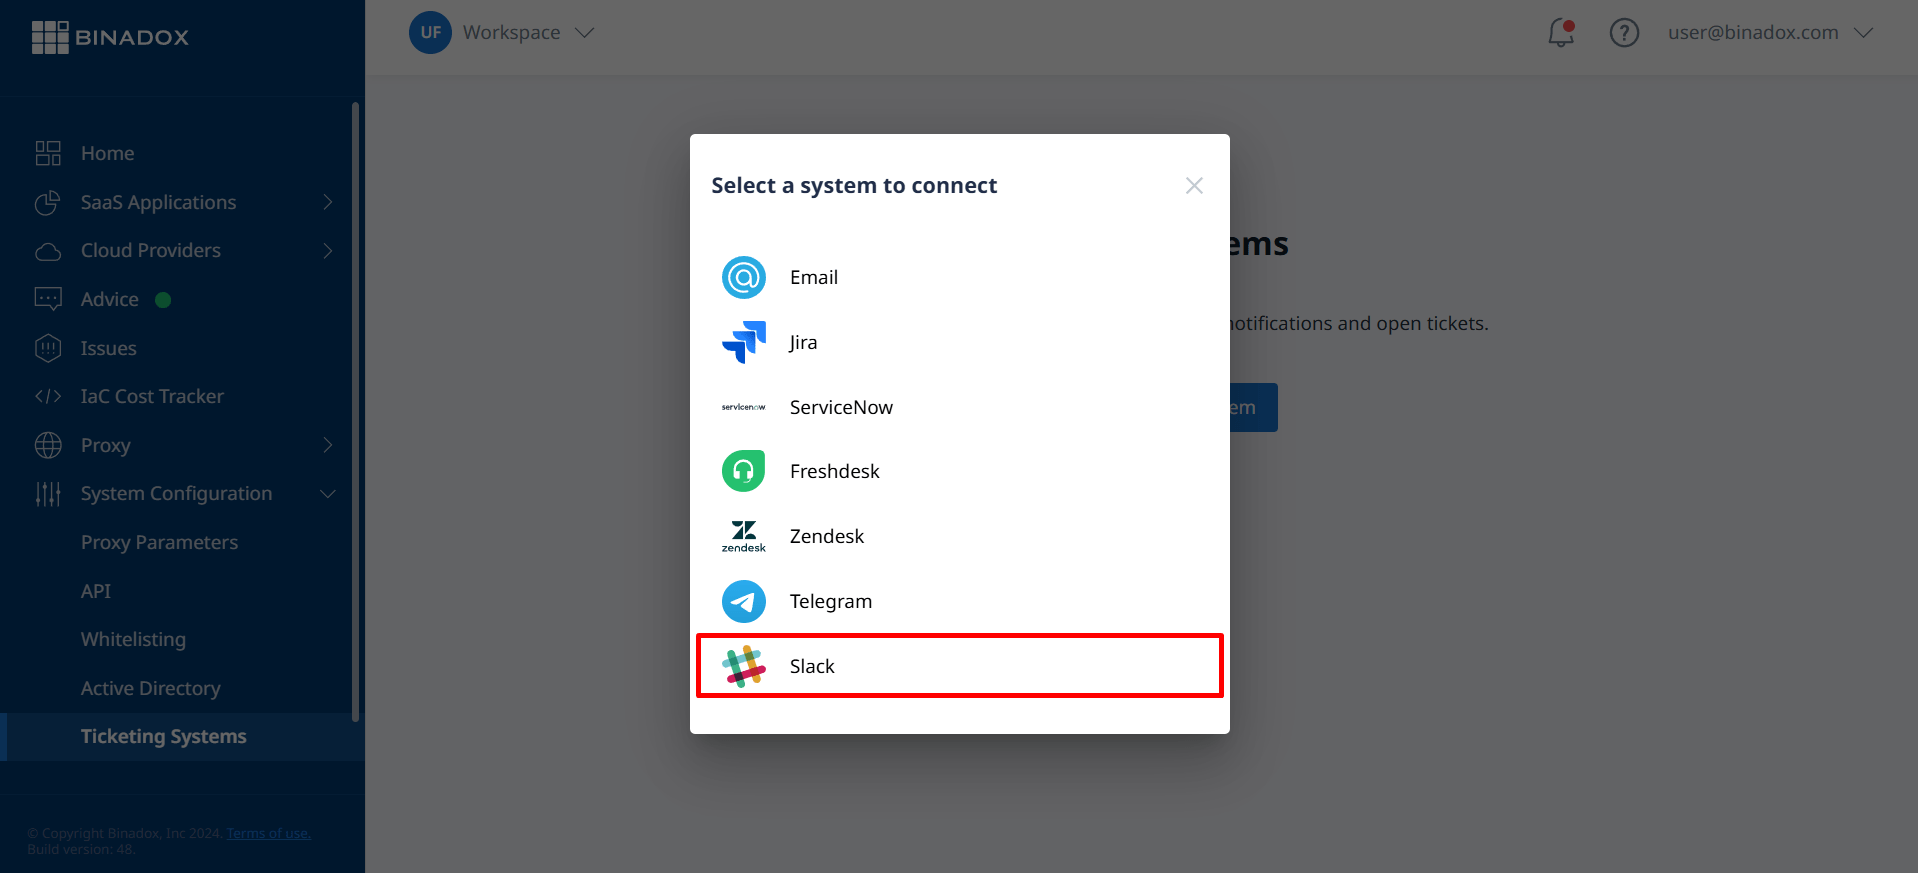
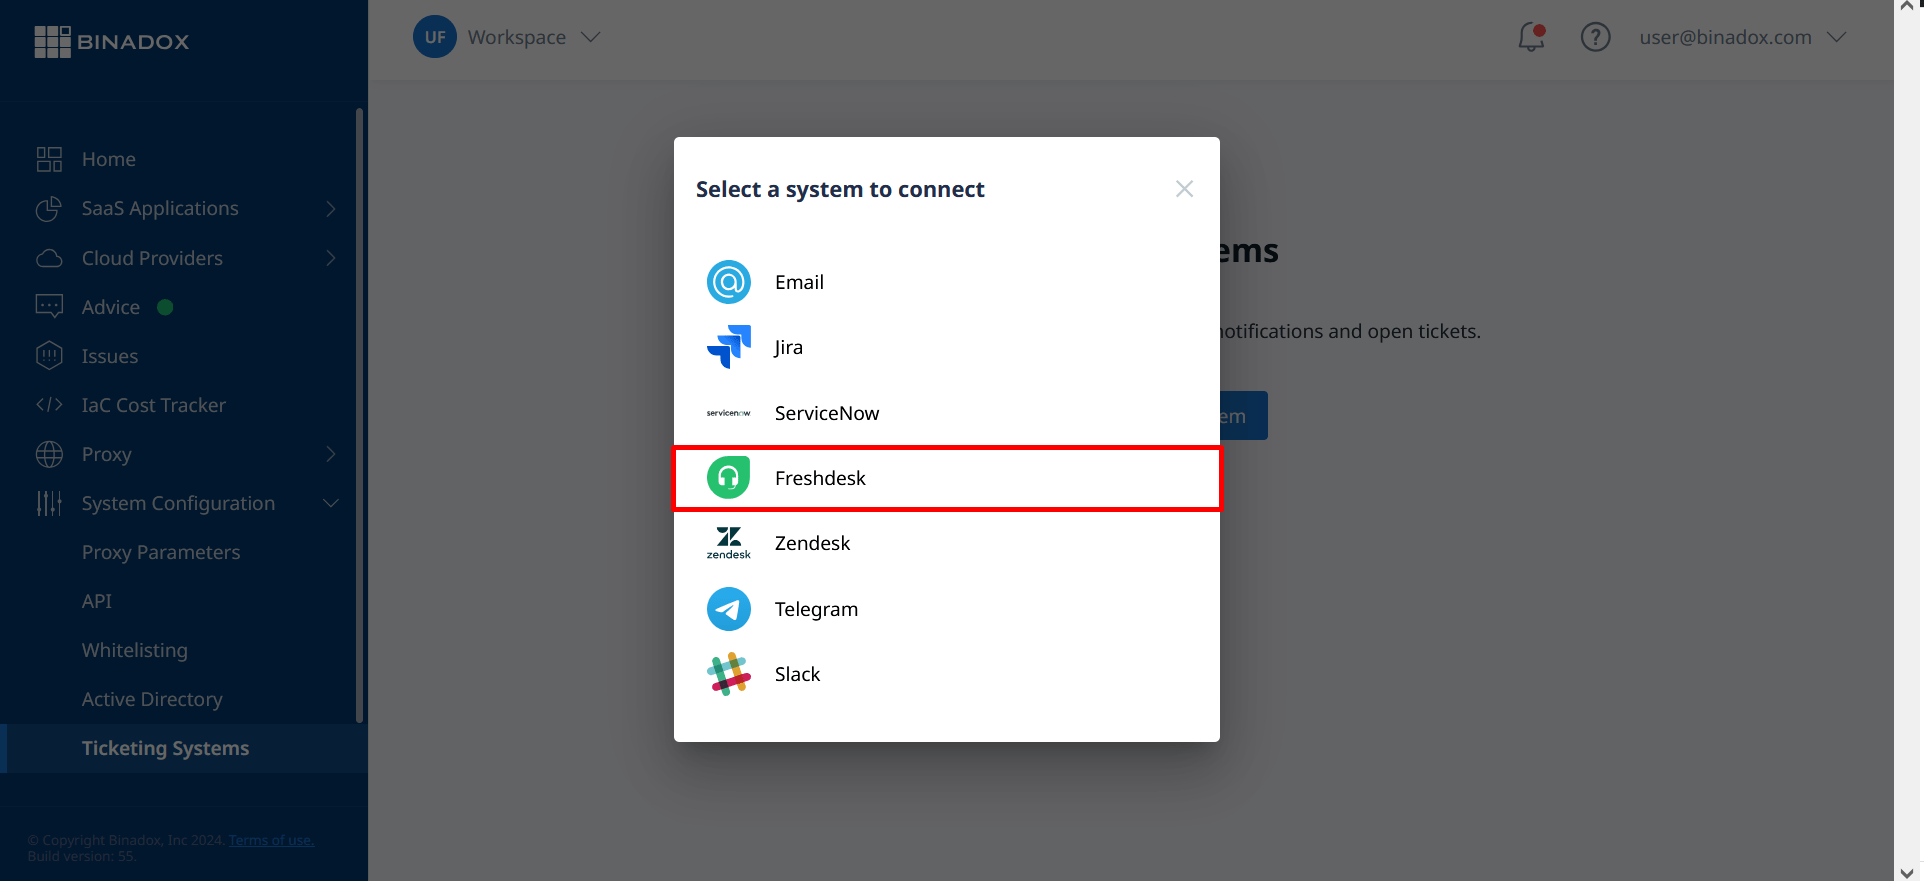
3. Select Slack from the list.
Select a system to connect
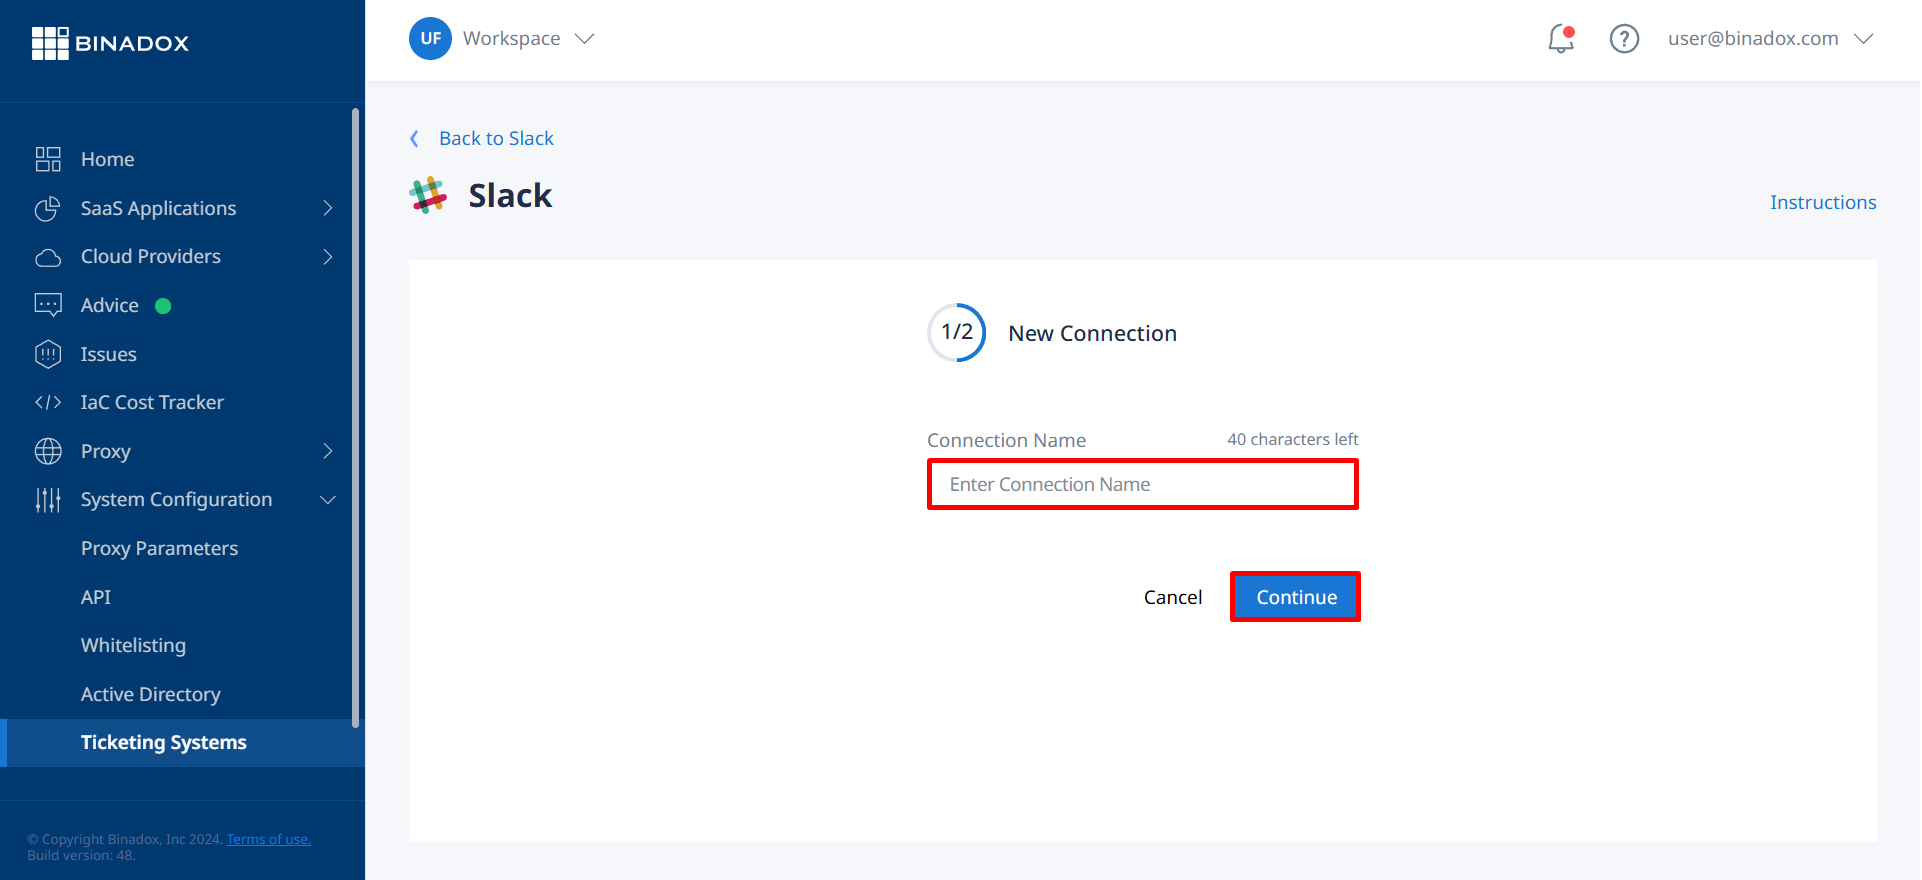
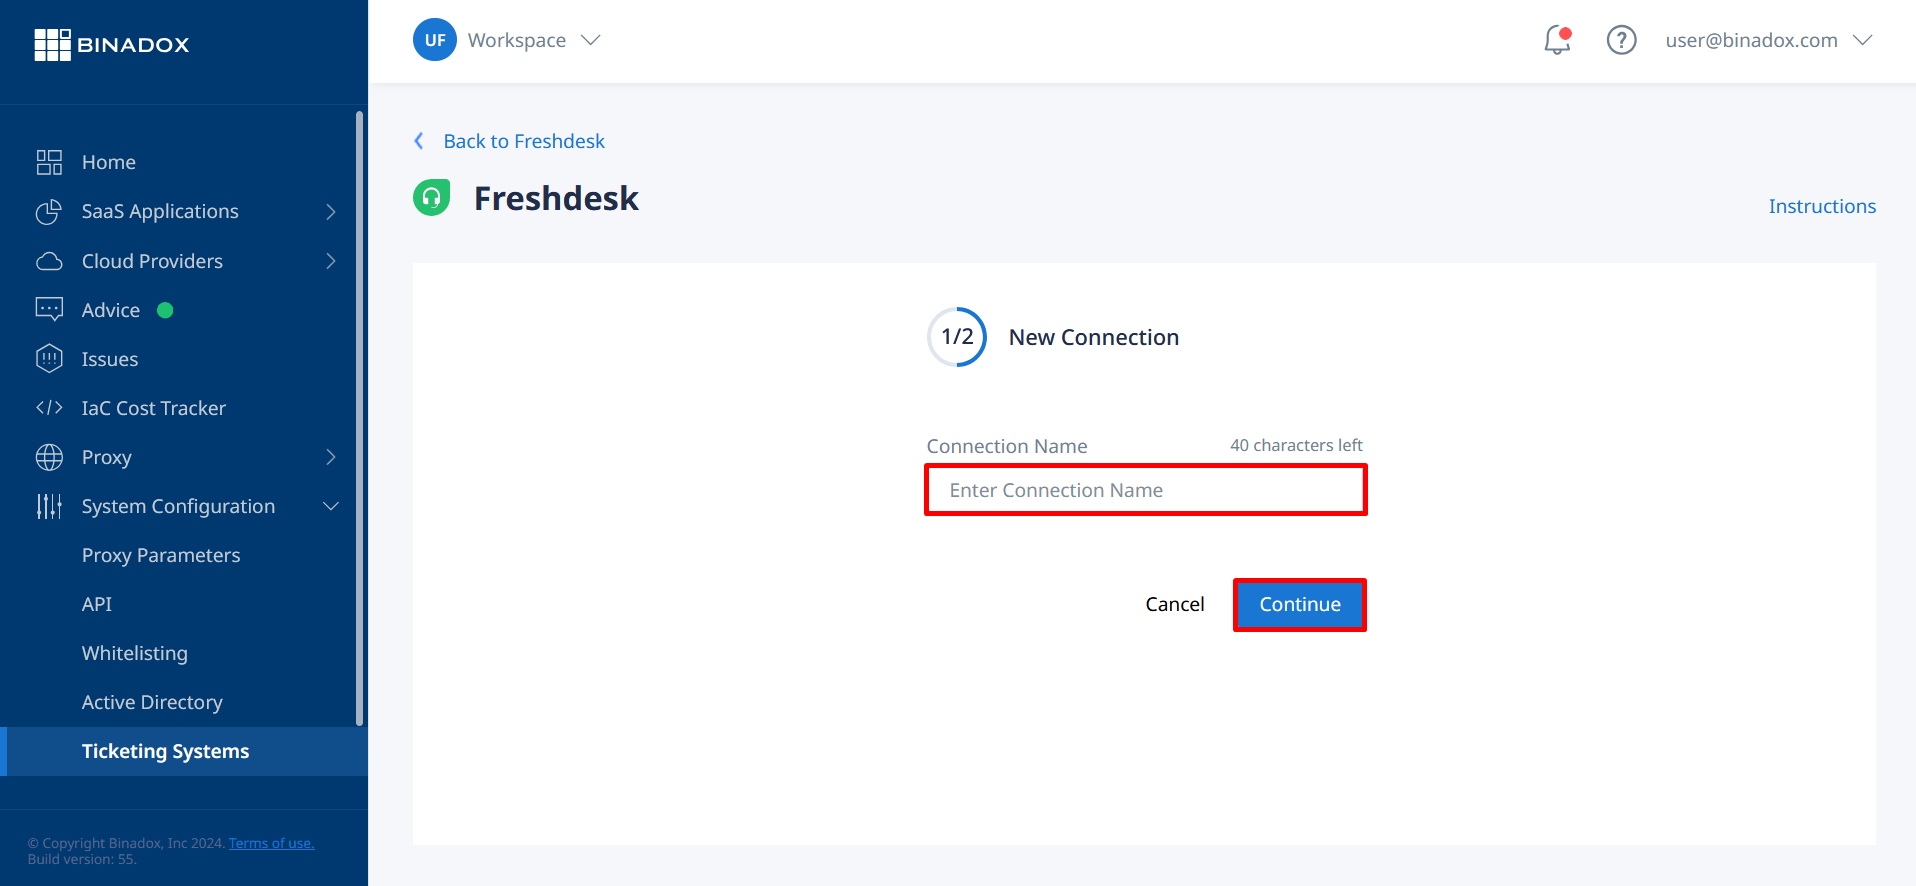
4. Indicate a unique connection name. Click Continue.
Connection Name
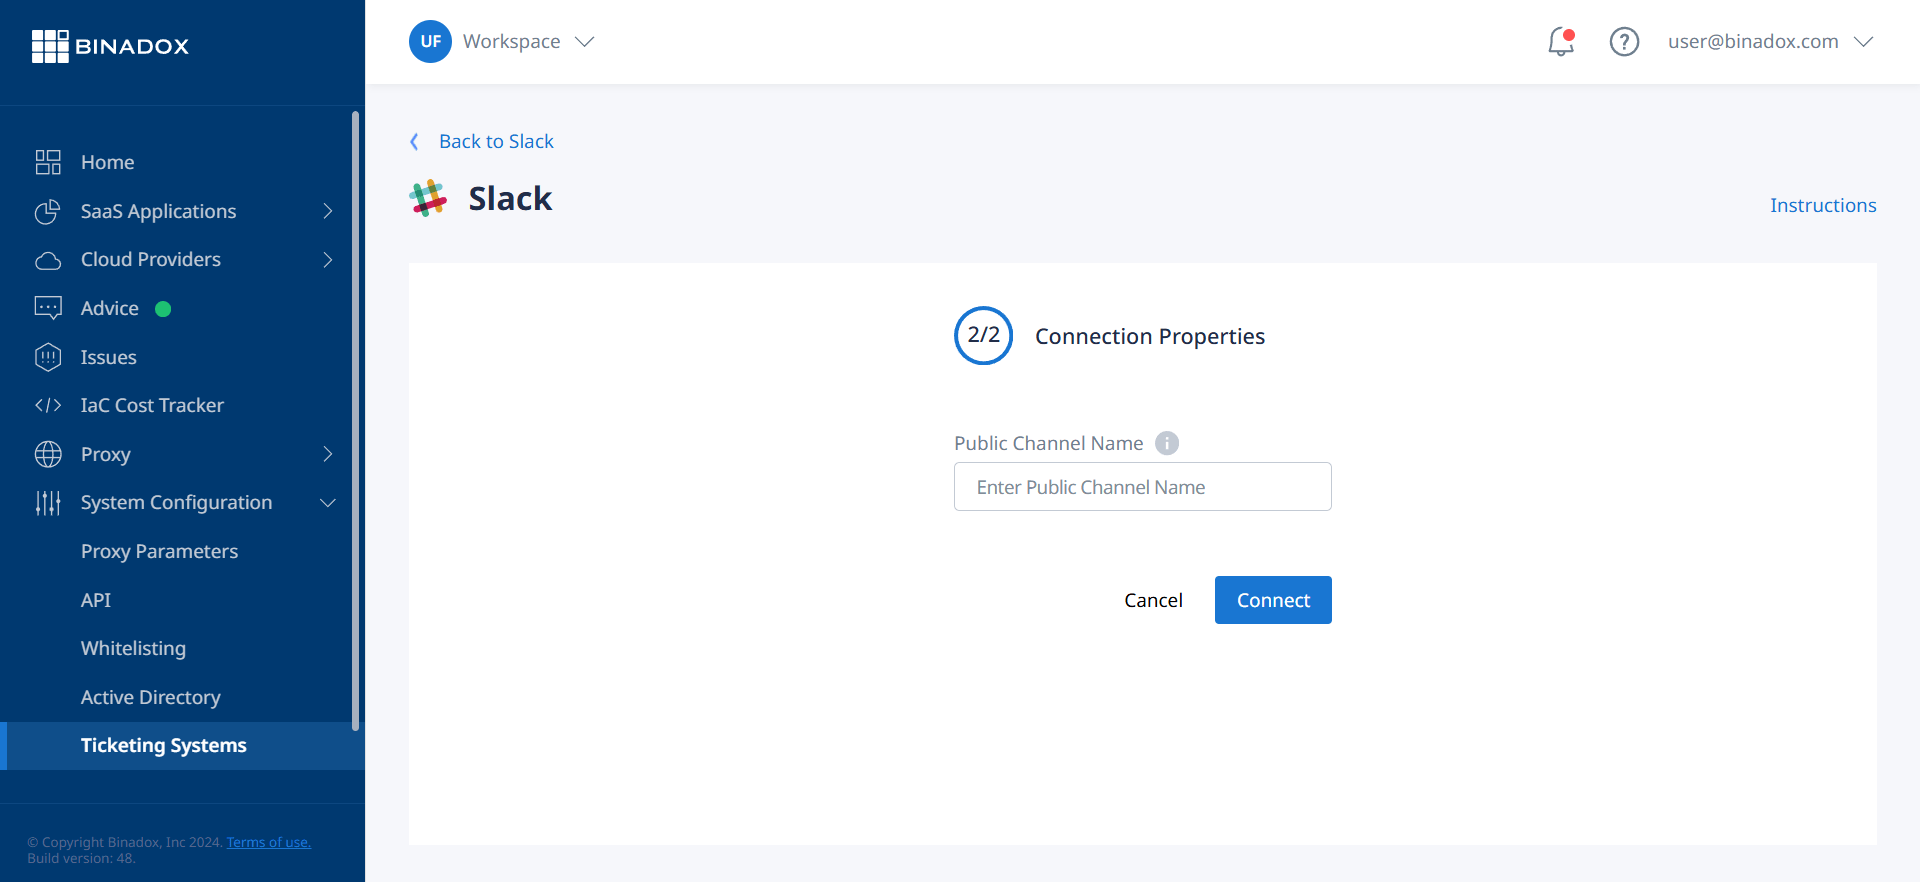
5. Indicate a channel name to which Binadox will send notifications. Click Connect.
Channel Name Slack
6. You will be redirected to the Slack workspace connection screen, if you are not in the system. Enter a workspace URL and click Continue.
7. Enter your credentials and click Sign In to sign into the workspace.
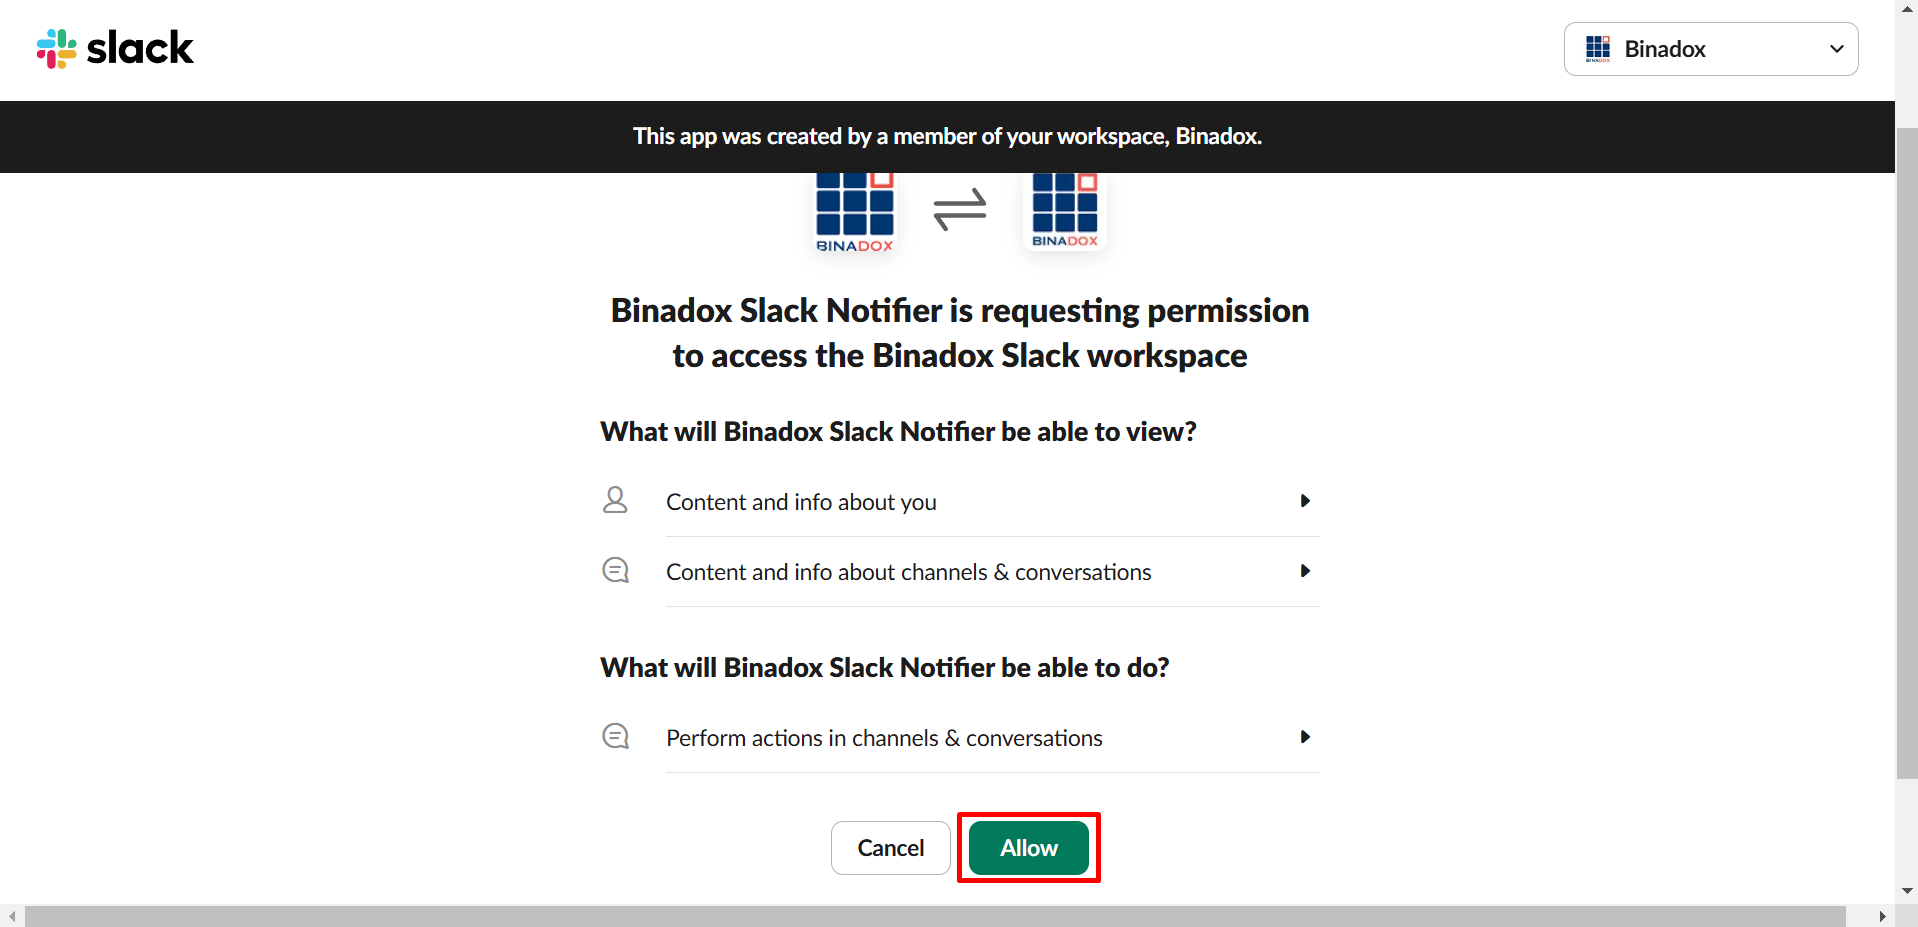
8. To give Binadox access to send usage and spend optimization notifications to the indicated channel, click Allow.
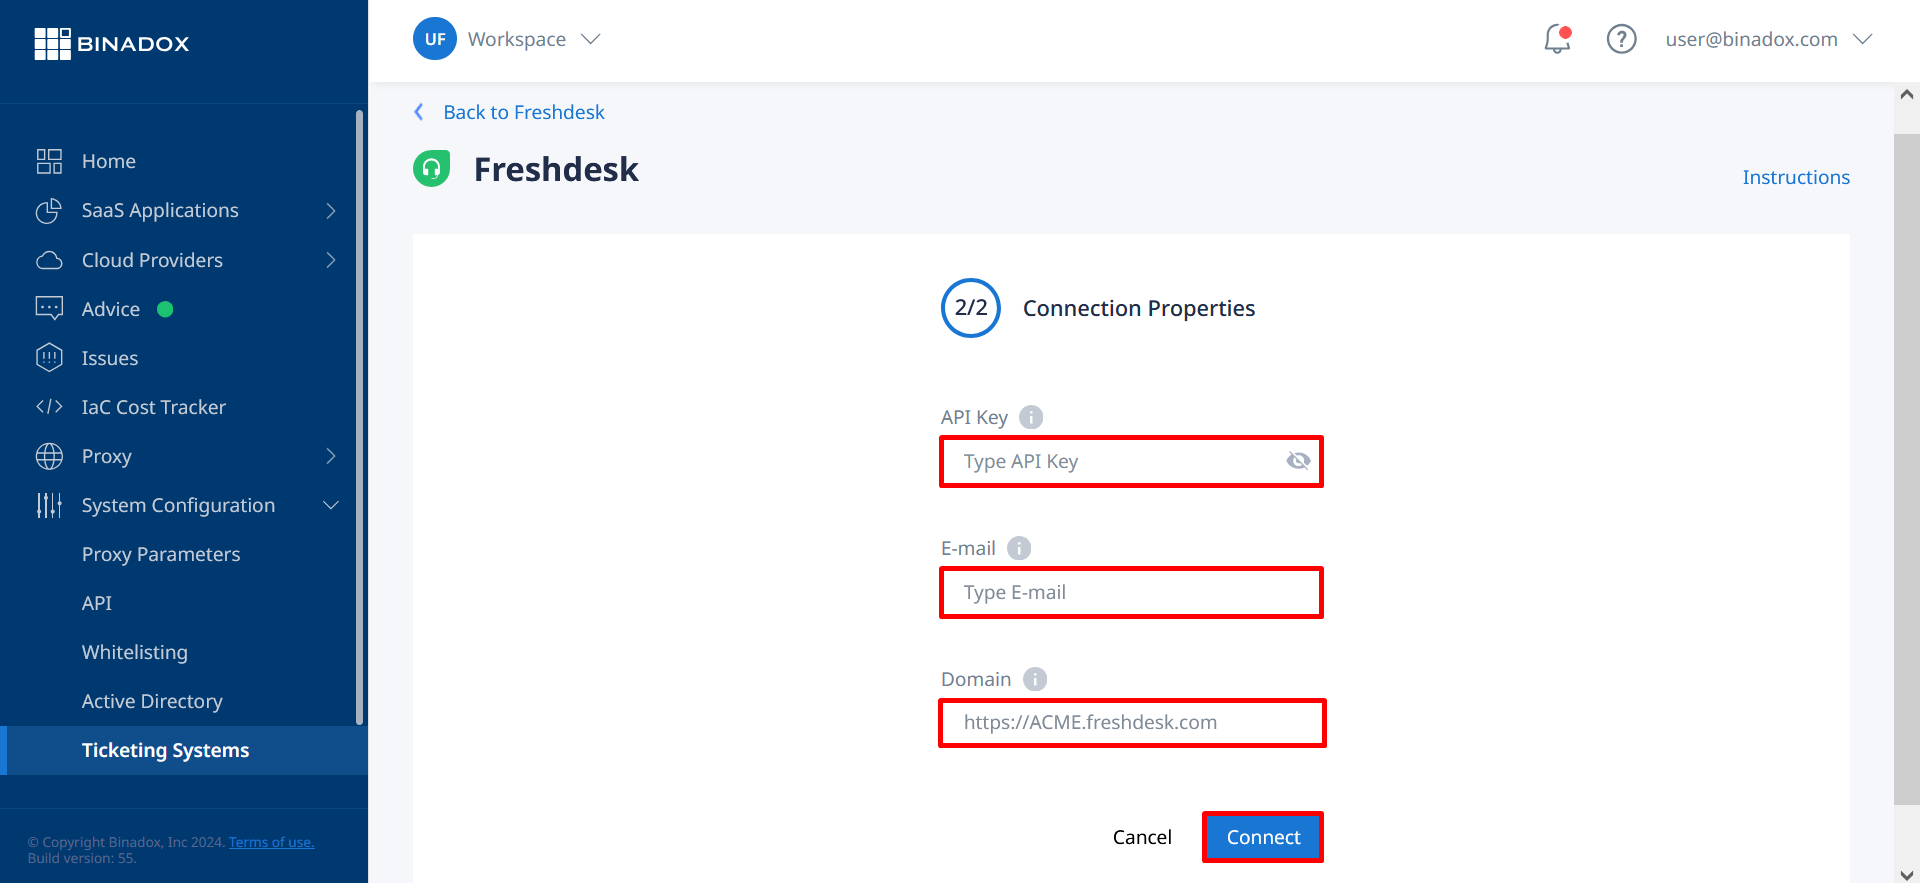
The Binadox multi-cloud SaaS and IaaS usage monitoring and cost optimization platform provides Freshdesk ticketing feature that enables administrators to access Binadox notifications via Freshdesk, a cloud-based customer support software. The following steps demonstrate how to successfully configure Freshdesk ticketing on the Binadox platform.
Important: Admin or standard permissions are required to create tickets and connect ticketing and notification systems.
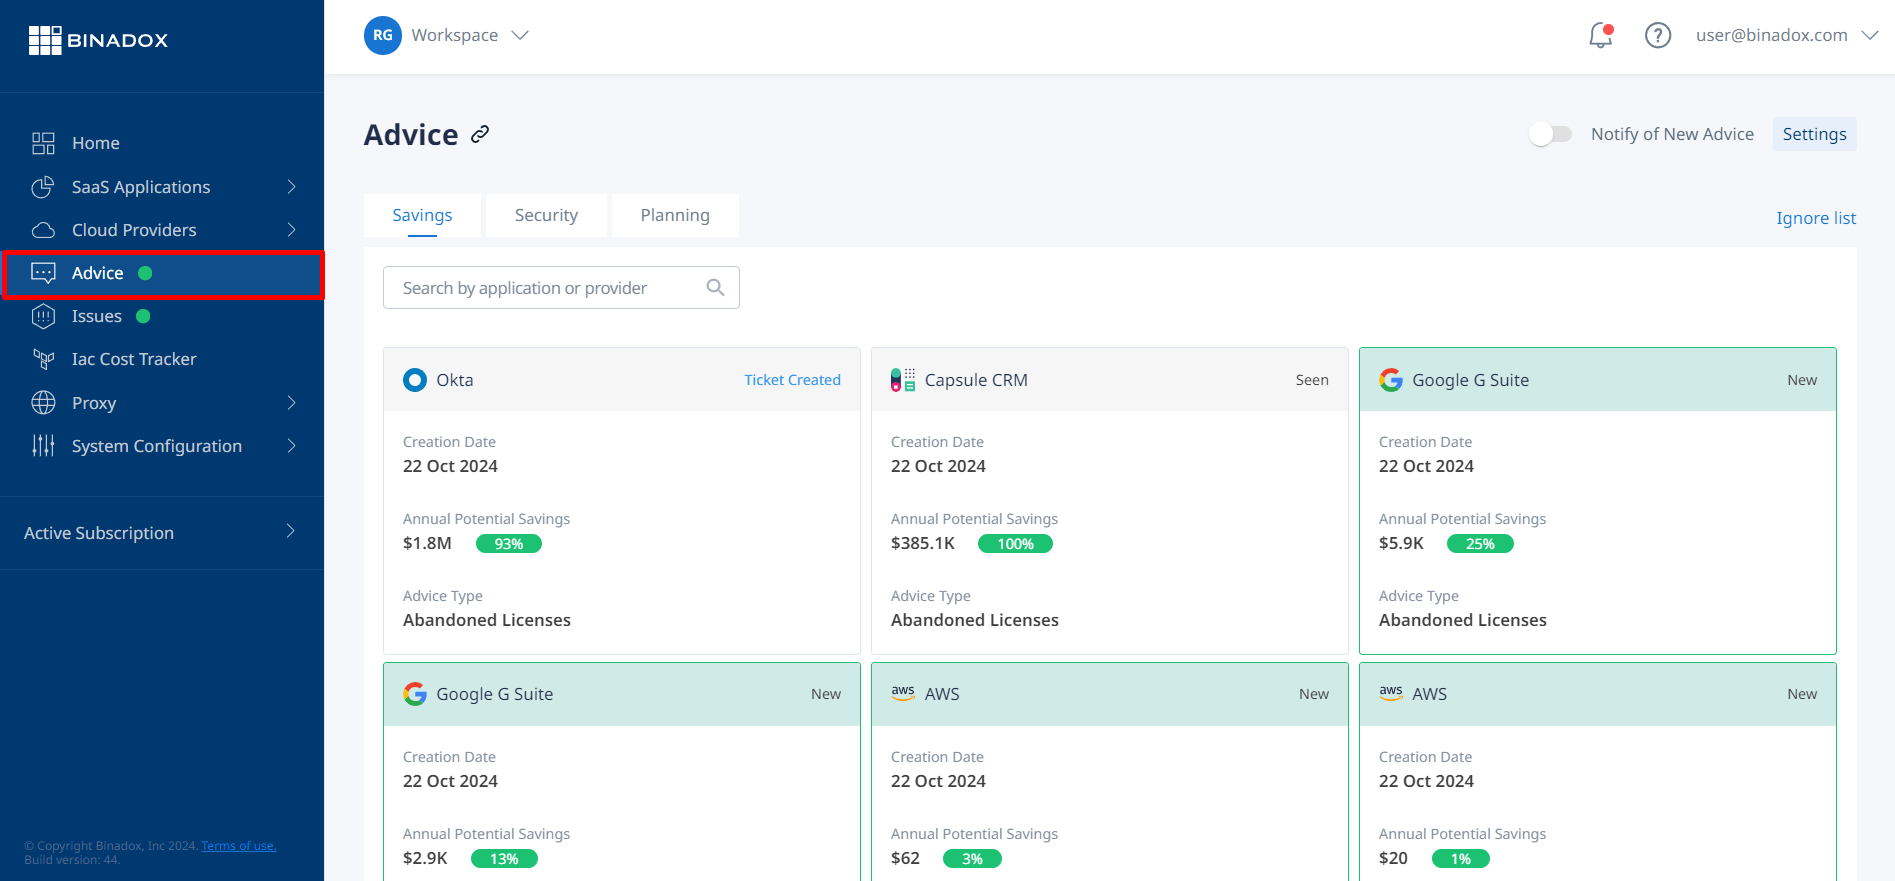
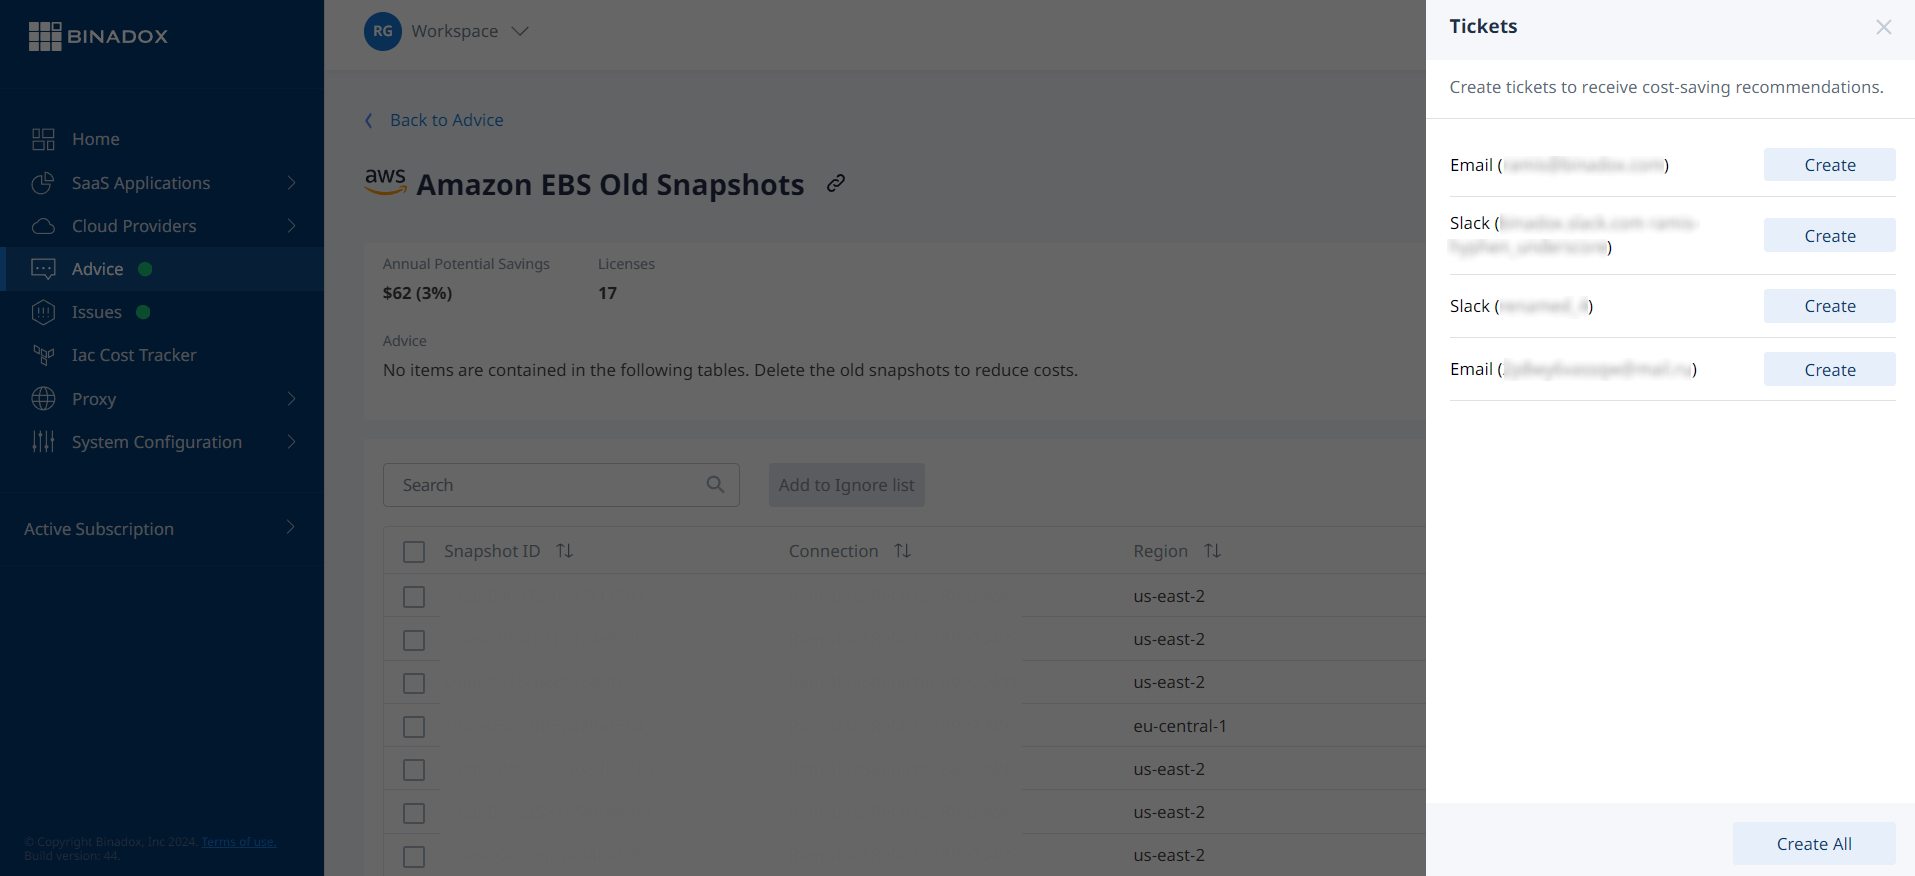
Binadox provides not only in-app notifications to keep users aware of any newly generated Advice while they are in the system but also the possibility to connect external alerting and ticketing systems.
Integration with ticketing and notification systems allows forwarding a ticket on generated advice to external systems you use in your workflow, so you can assign it to the person who should work on an issue.
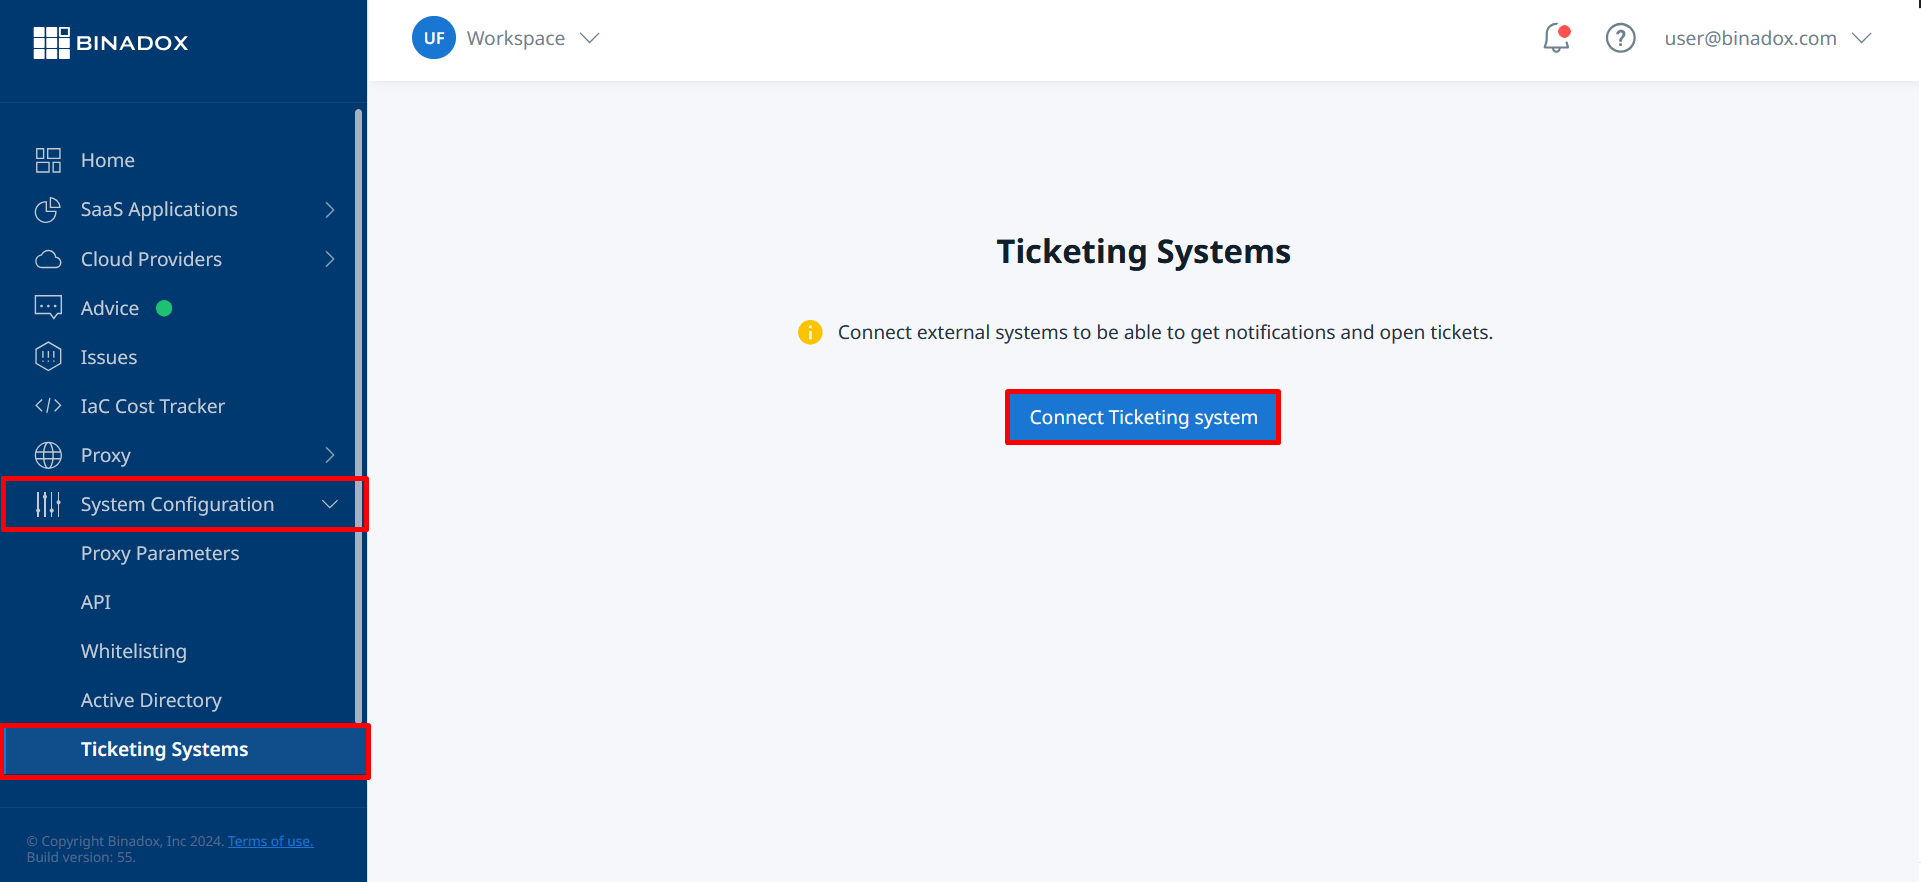
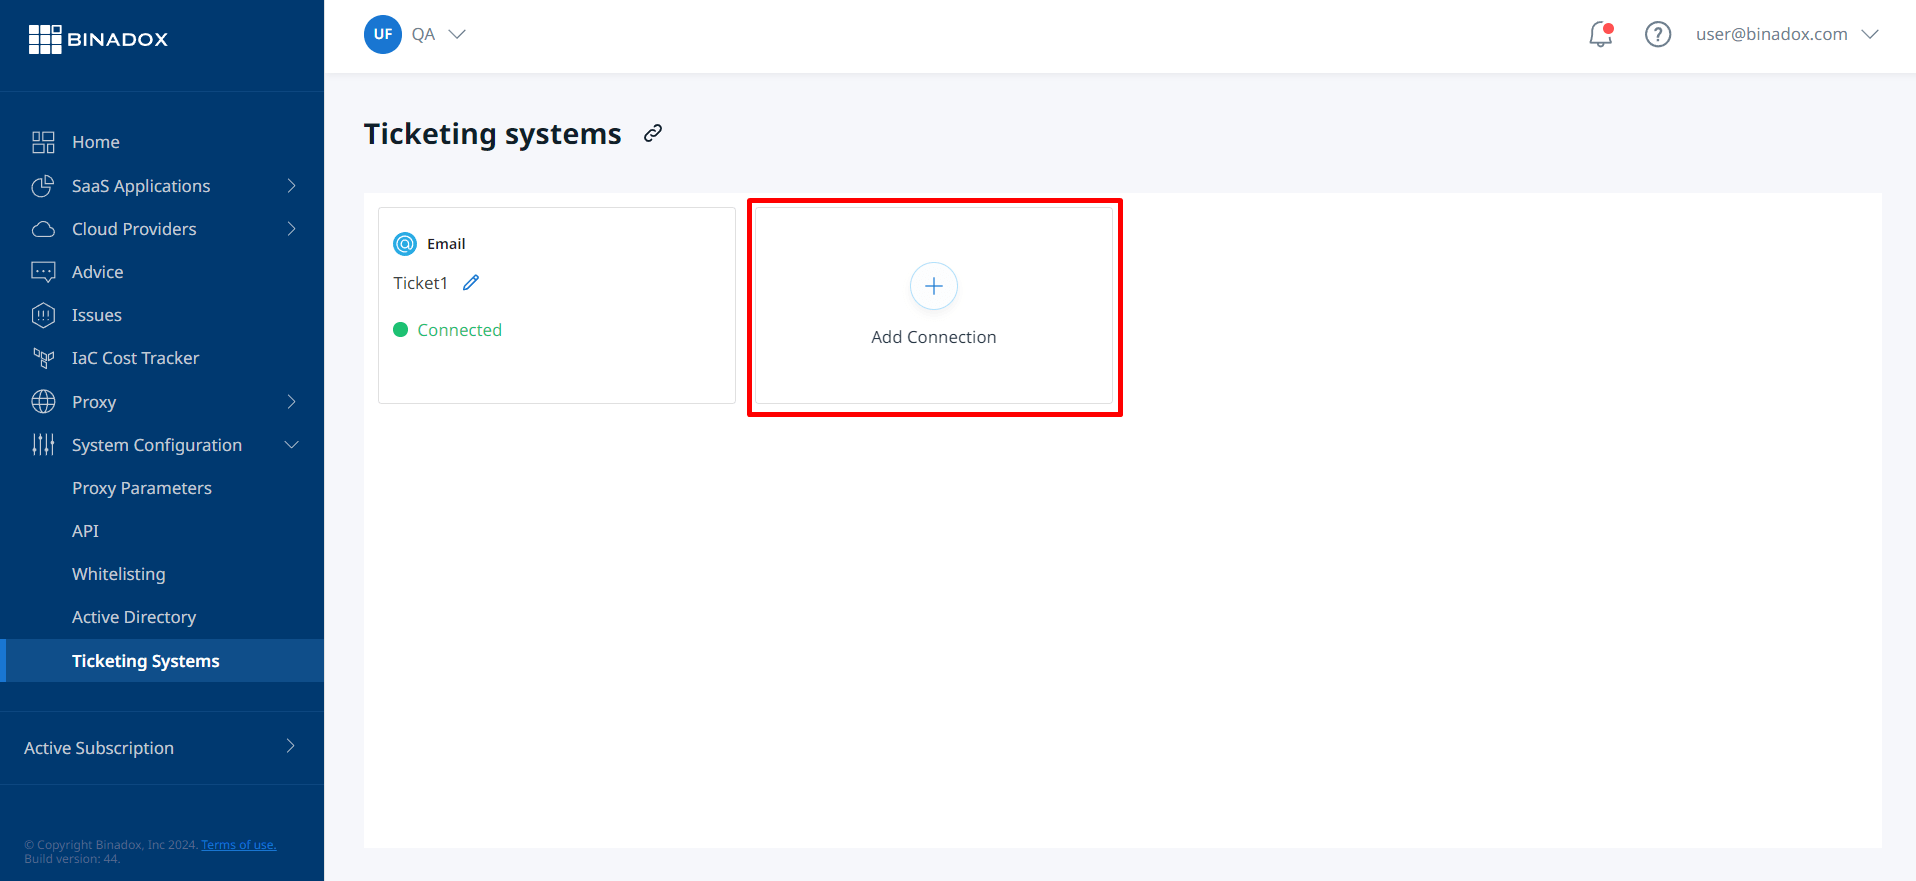
To connect alerting and ticketing systems proceed to the System configuration section in the navigation menu, then choose Ticketing Systems.
Once you click on the green Add Connection button, the list of supported systems will appear. Choose the system you find the most convenient for you or your team.
Add new system
After ticketing and notification systems have been connected, click Advice in the navigation menu on the left. Find the advice you want to act on and click on it.
Technical Requirements: Before starting deployment, make sure you have all the prerequisites below installed: – 64-bit Linux – Docker and Docker Compose – jq – awscli package* * For AWS CLI credentials, please contact our representatives or email us at support@binadox.com.
This guide describes how to deploy a proxy server using the deploy script. With the proxy server configured, you will be able to monitor employees’ website and application activity in your organization.
Note: Proxy settings configuration in an enterprise network is not covered in this guide. Please, refer to the corresponding documentation. Note that port 8080 is used as the default port.
2. Run the Deploy Script
Prerequisites: Install the awscli package on your Linux machine. For AWS CLI credentials, please contact our representatives or email us at support@binadox.com.
1. To locate proxy parameters, log into your account, choose a workspace and go to System Configuration > Proxy Parameters.
2. On a remote machine, create the binadox-proxy folder.
3. Download and unzip the proxy-deploy.sh file. Save it into the binadox-proxy folder.
4. From the /binadox-proxy directory, run the downloaded proxy-deploy.sh script and include the proxy parameters into the command below (replace the replaceable text by the corresponding TAG, URL and Workspace parameters):
5. Upon completion, run the binadox.run.sh script. Type binadox-run.sh at the command prompt and press Enter:
$ ./binadox-run.sh
6. Now you can verify and see the list of running containers:
$ docker ps
3. Install a Trusted Root Certificate
Install the root certificate for the proxy server. The root certificate file is contained in the root_ca folder compressed into the root_ca.tar.bz2 archive file.
4. Configure Proxy Settings
Note: Port 8080 is used as the default port.
Once the proxy deployment is up and running, configure proxy settings on all domain-joined computers. For this purpose, your system administrator can use Active Directory Group Policy features. Proxy settings configuration in an enterprise network is not covered in this guide. Please, refer to the corresponding documentation.
Integration of Microsoft Office 365 with the Binadox (SaaS and IaaS usage monitoring and cost optimization platform) allows you to get Office 365 spend and utilization insights and usage analysis of Office 365 features on a per-user basis, as well as to receive cost optimization recommendations.
Additionally, if you have a single sign-on (SSO) method enabled, Binadox will discover applications used by employees in your enterprise that are authenticated via SSO. The system will notify you of discovered applications available for integration with Binadox to receive their usage and spend data.
Note: For Application Discovery with Office 365, you require Azure Active Directory Premium P1 or P2 licenses.
This guide provides step-by-step instructions on how to integrate Microsoft Office 365 with Binadox. To successfully connect Binadox with your Office 365 account, the following parameters are required: a Tenant domain, an Application ID and a Client Secret of an application registered with Azure Active Directory, and login credentials. For safety reasons, create a new user and assign him a restricted role with limited access to your Microsoft tenant.
There is an option to generate the required parameters – on the Microsoft Azure portal and register the Binadox application. In the Microsoft 365 admin center, create a new user to represent Binadox and assign him a restricted role with limited access to your Microsoft tenant.
Note: Cost optimization and usage monitoring are available only for paid Office 365 subscriptions.
1. Register Binadox with Azure AD
To register Binadox with Azure Active Directory, you need a subscription to Office 365 and a subscription to Azure associated with the Office 365 subscription.
1. Sign in to the Microsoft Azure portal as a global administrator using the credentials of your Microsoft tenant that has the subscription to Office 365 you wish to use for Binadox spend and usage optimization.
2. In the navigation pane on the left, click All services > Identity. Use the search bar, if necessary.
Advice:
For your convenience, click on the star icon near the Azure Active Directory service name to add it to the Favorites category in the navigation pane.
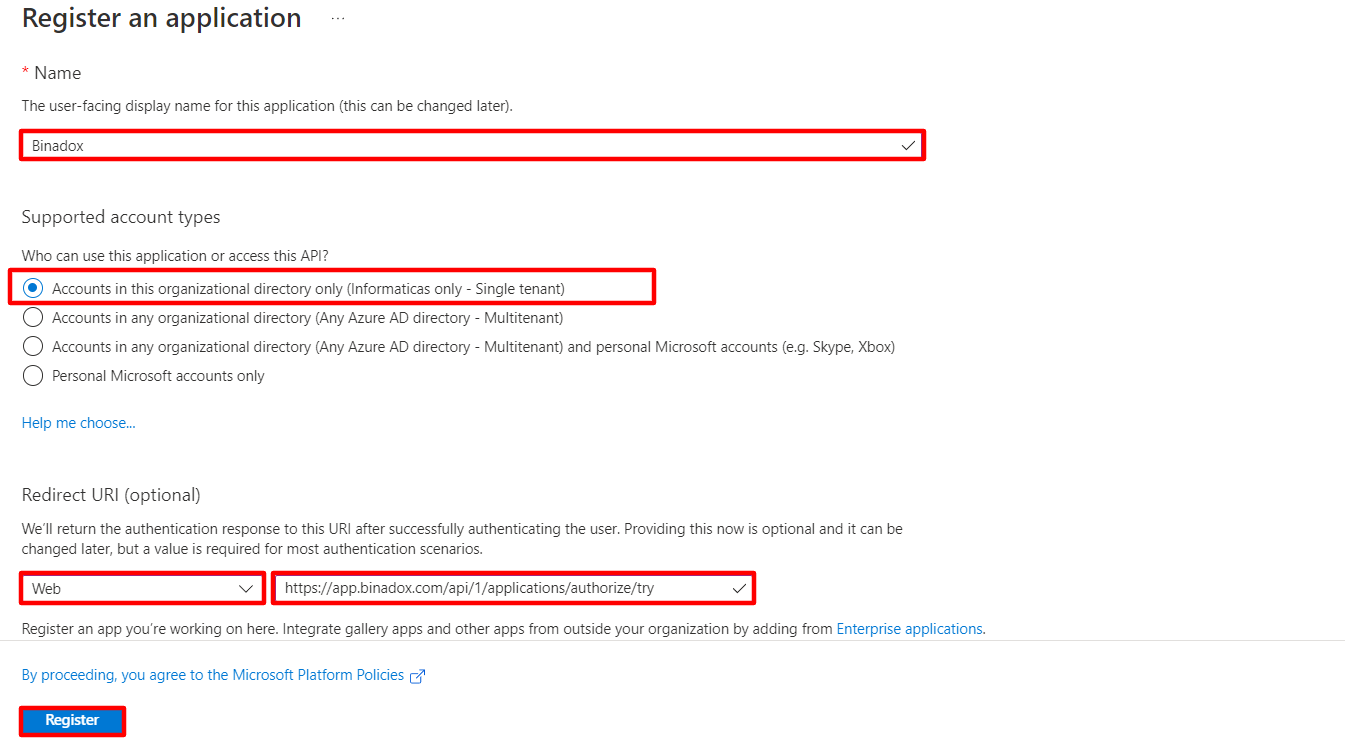
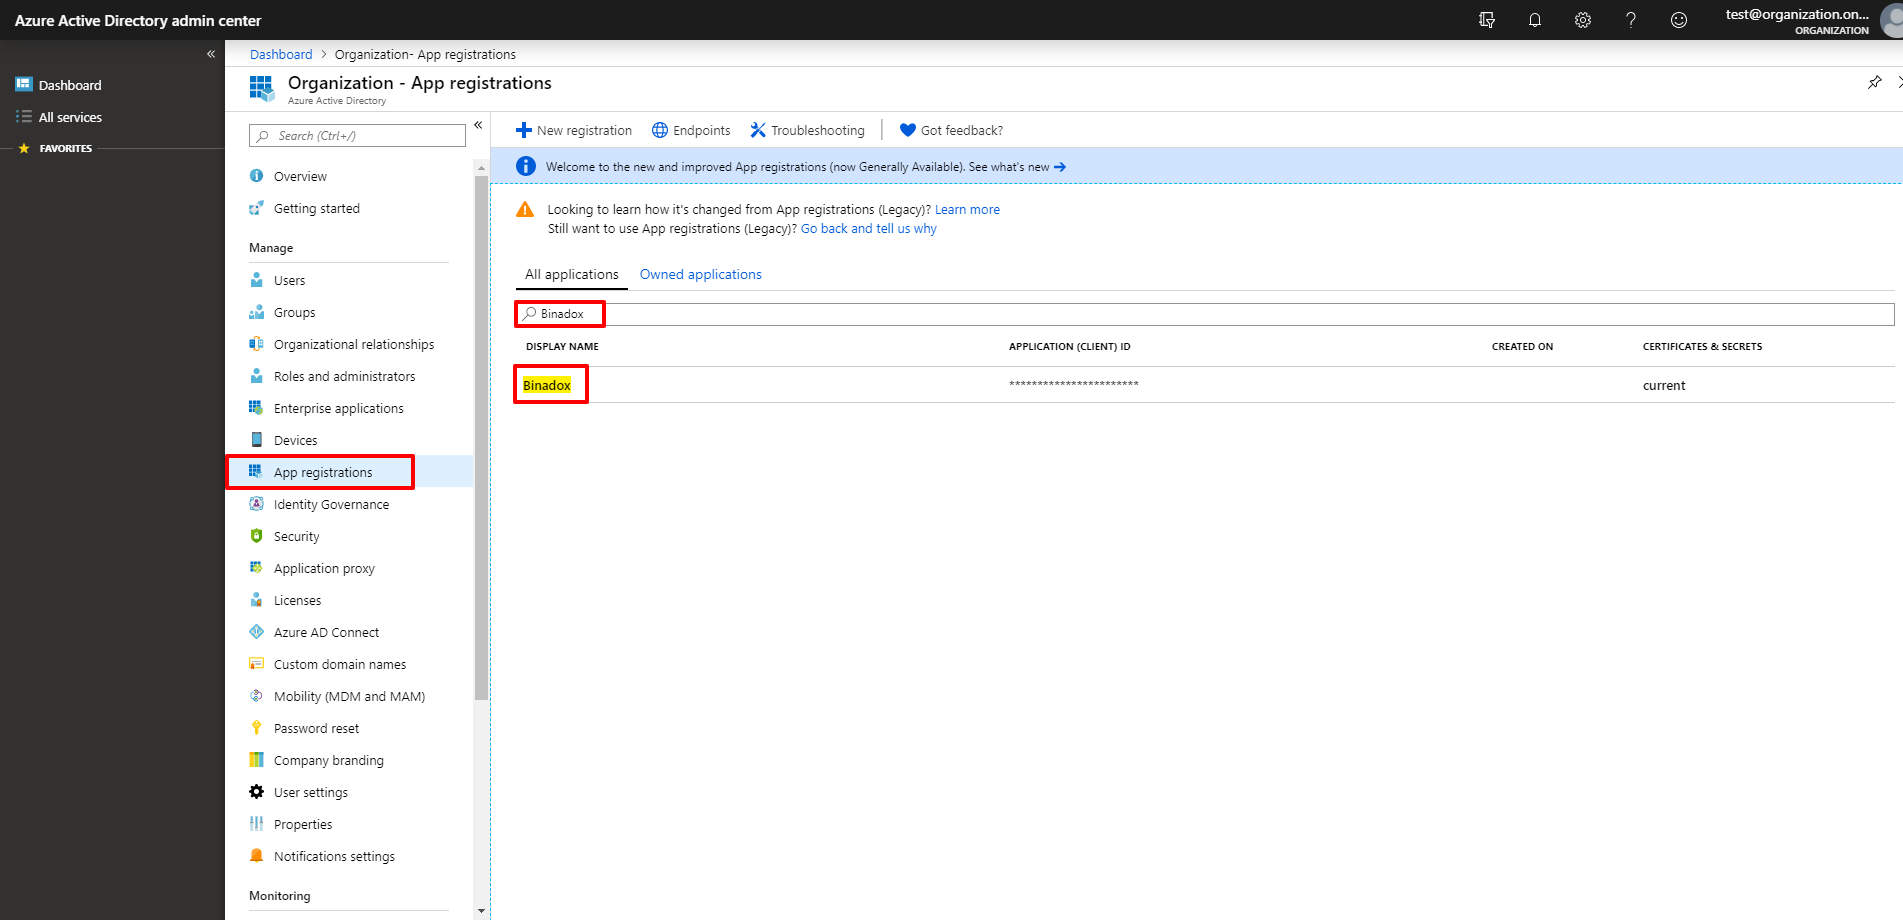
3. Go to the Applications > App registrations section and click the New registration button.
4. Fill in the following fields in the registration form:
Enter an application name in the Name field (e.g. Binadox).
Check the Accounts in this organizational directory only checkbox in the Supported account types field.
In the Redirect URI (optional) section, select Web in the drop-down list. Enter the following URL: https://app.binadox.com/api/1/applications/authorize/try
Click the Register button to complete the registration.
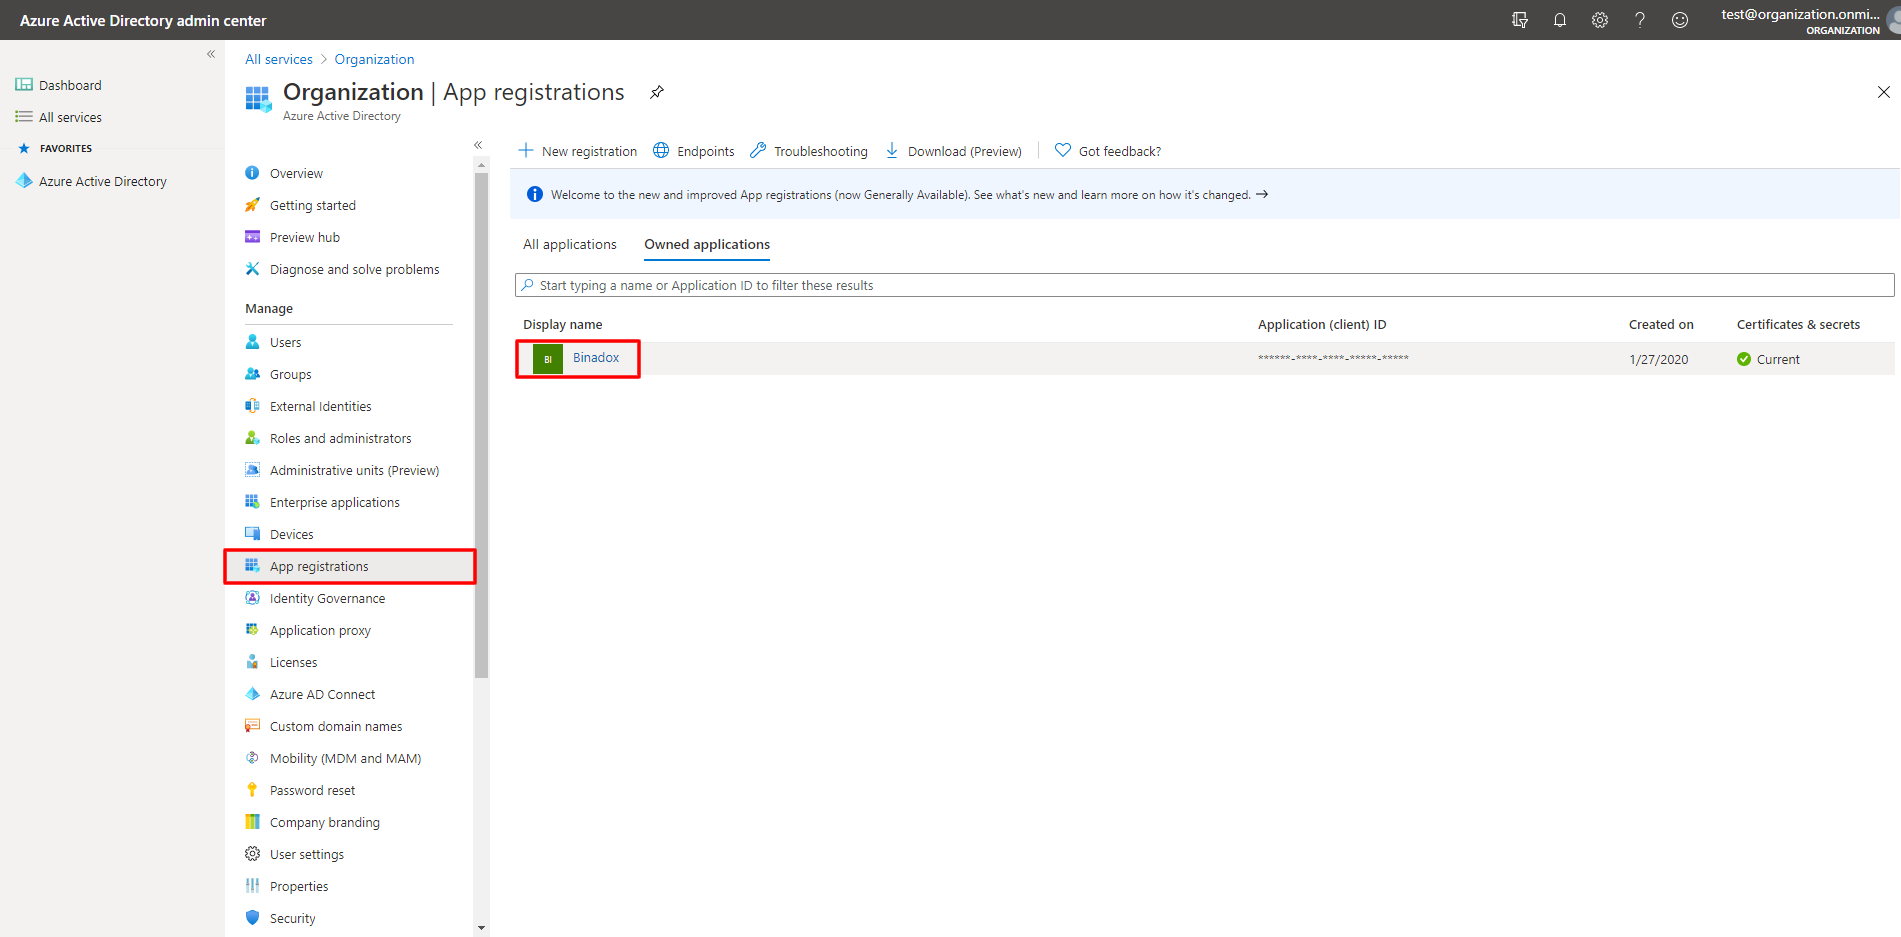
5. On the App registrations page, click on the name of a newly registered application.
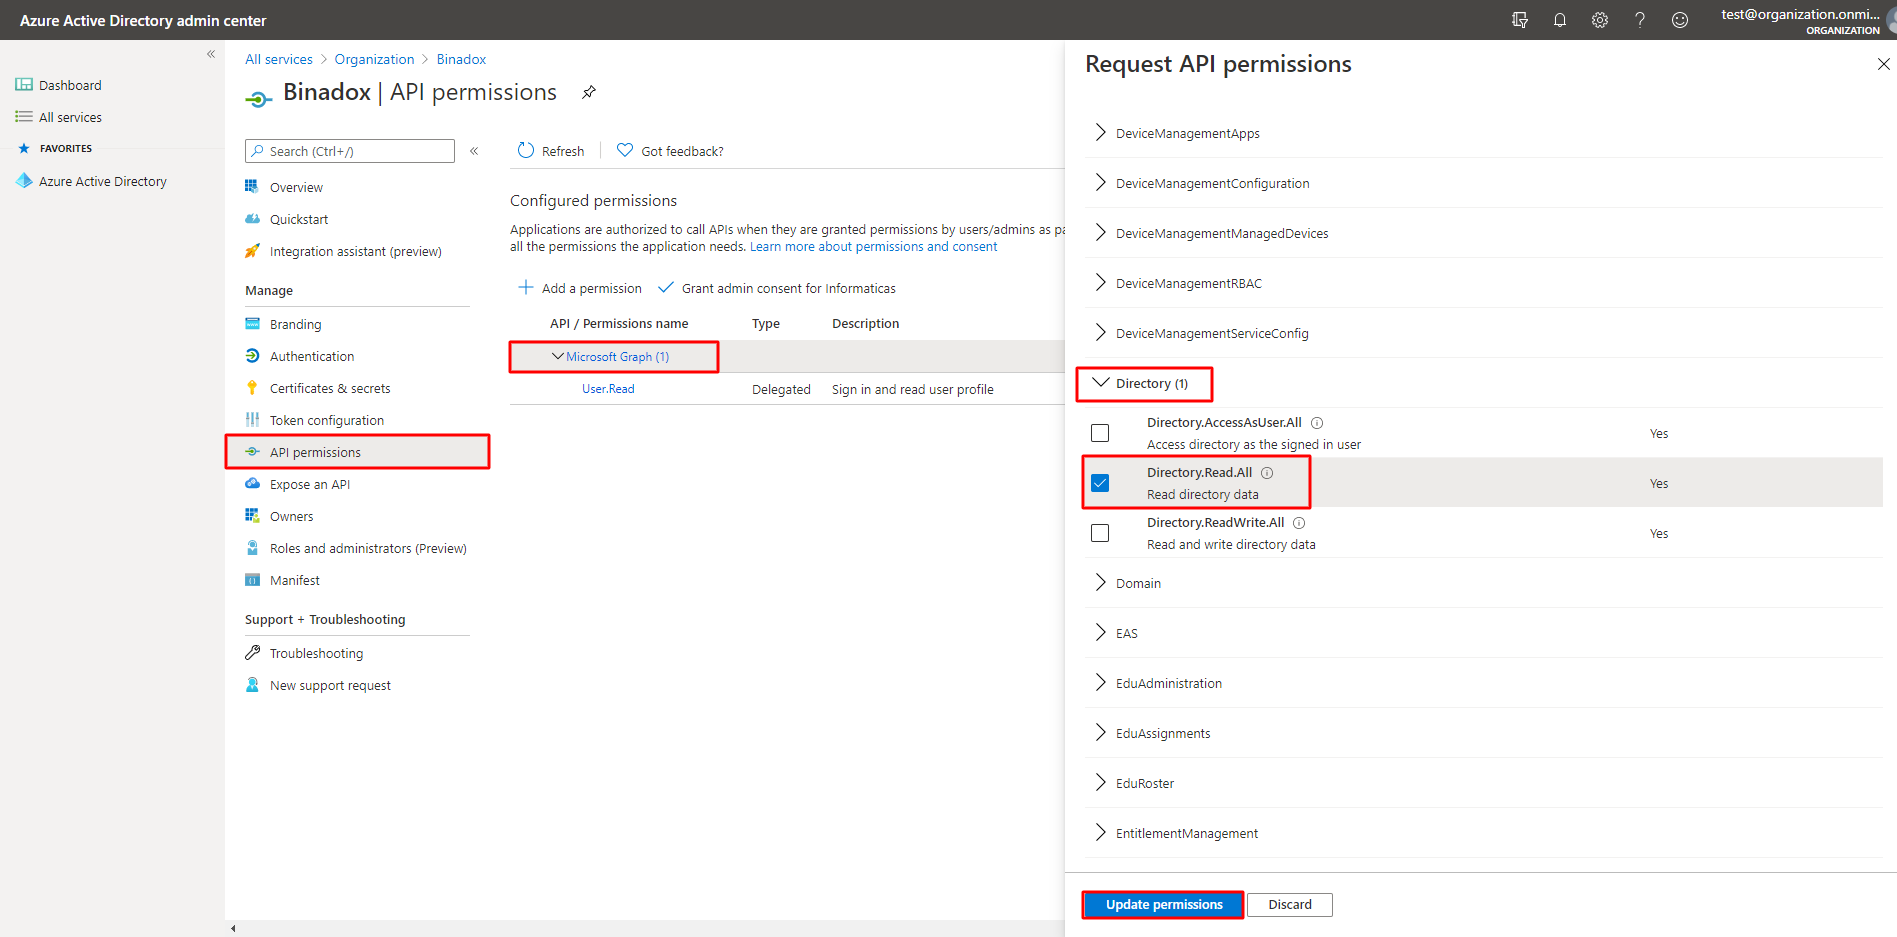
6. In the navigation pane, choose API permissions. Under API/Permissions name, click Microsoft Graph. On the Request API permissions page that opens, scroll down the permissions list and choose AuditLog. Select the AuditLog.Read.All checkbox. Then scroll down, choose Directory and select the Directory.Read.All checkbox. Choose User and select User.Read. Click Update permissions.
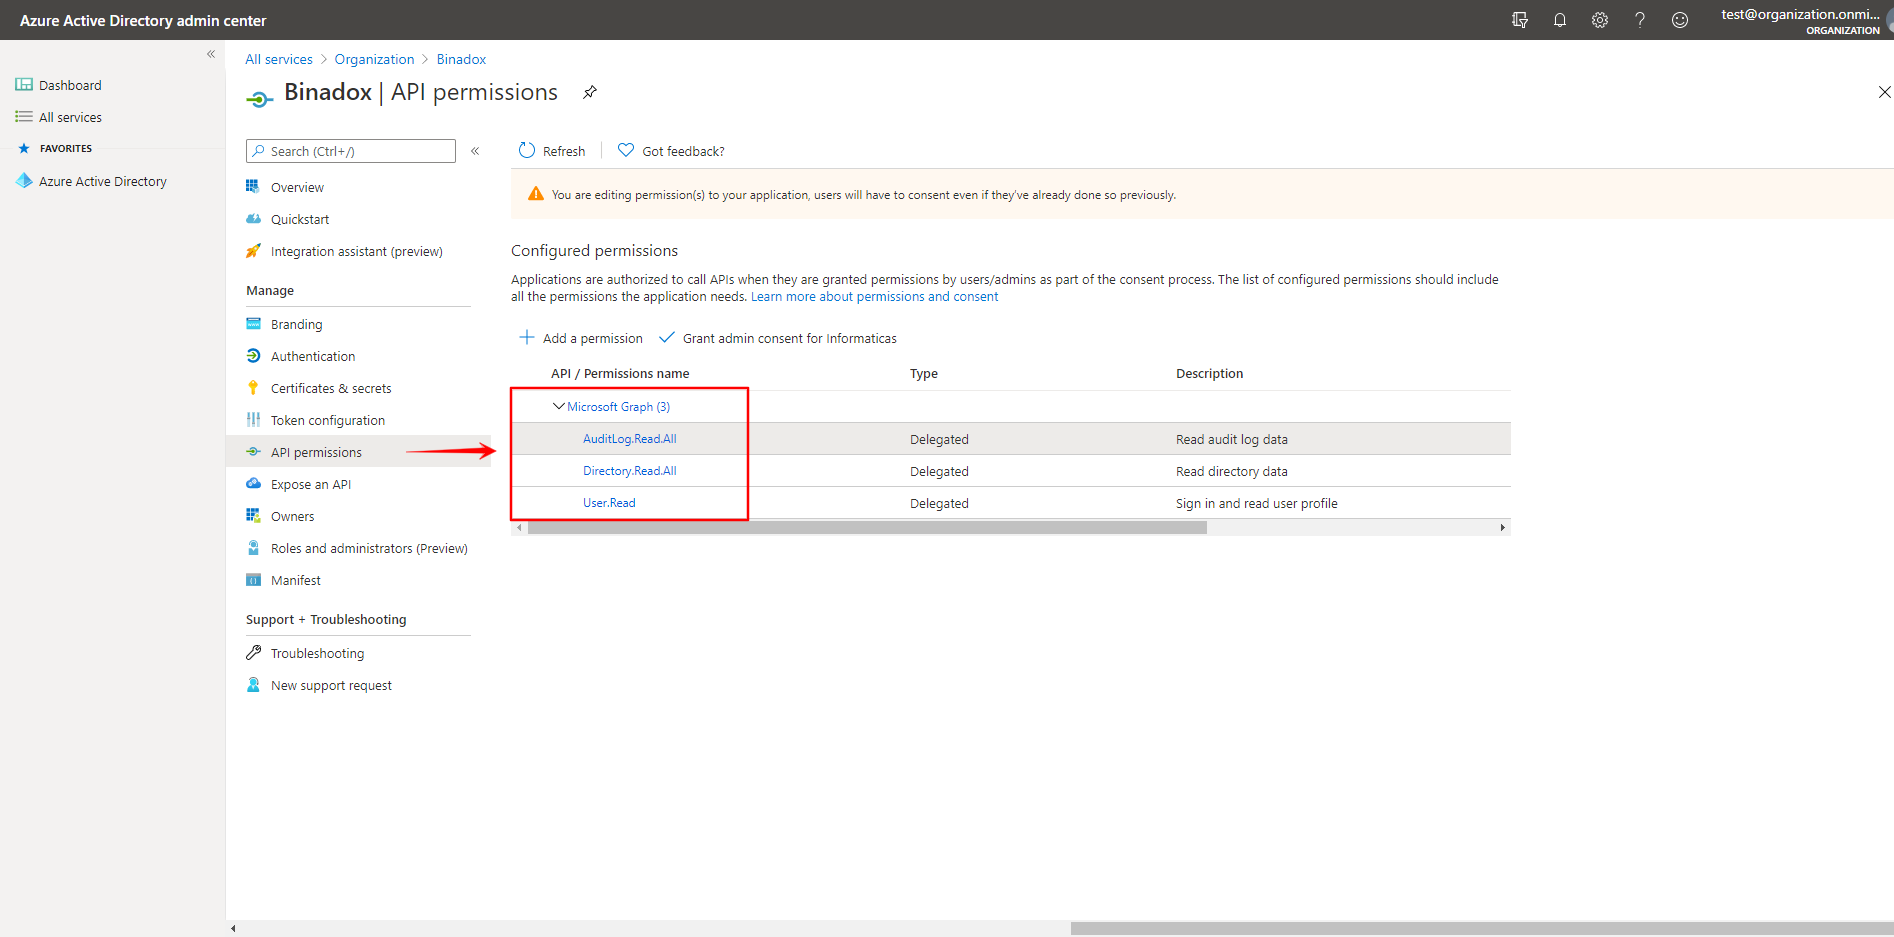
7. Under the API/Permissions name, check you configured all the required API permissions:
AuditLog.Read.All
Directory.Read.All
User.Read
Reports.Read.All
2. Add a New Office 365 User with Security Reader Permissions
For safety reasons, you may create a new user in the Microsoft 365 admin center and assign him a restricted role with limited access to your Microsoft tenant.
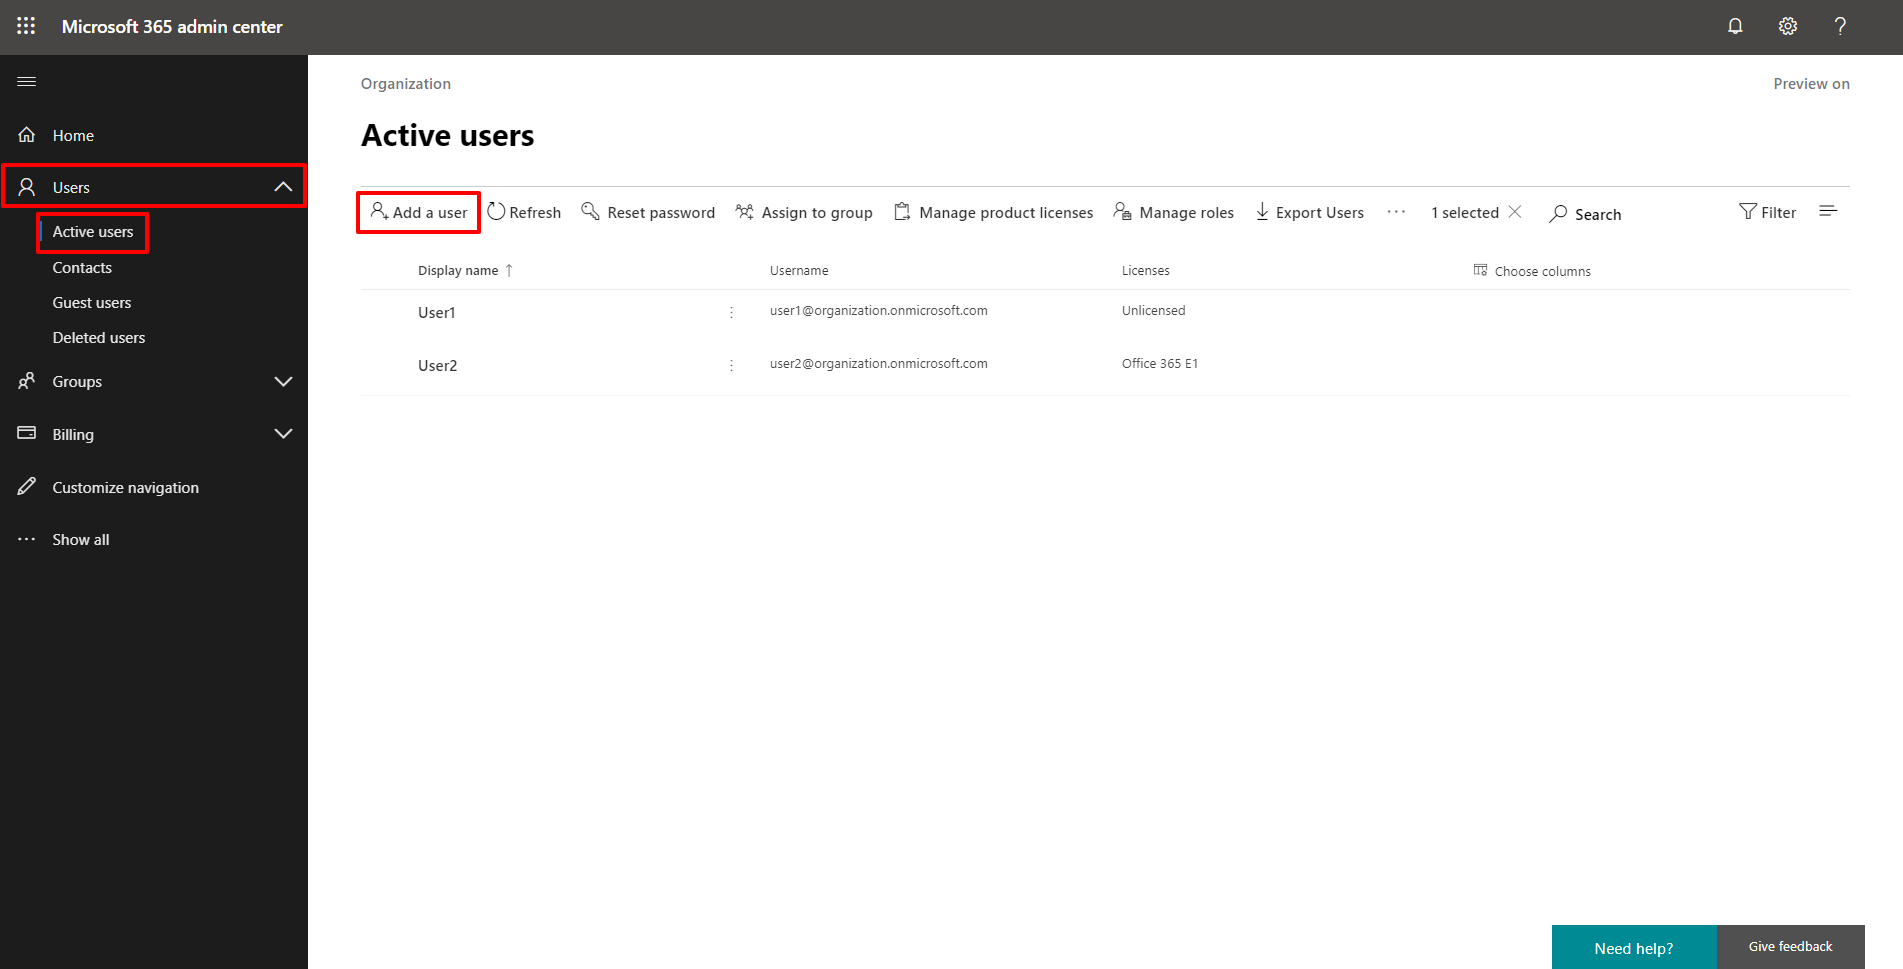
2. In the navigation pane on the left, navigate to Users > Active users. Click on the Add a user button.
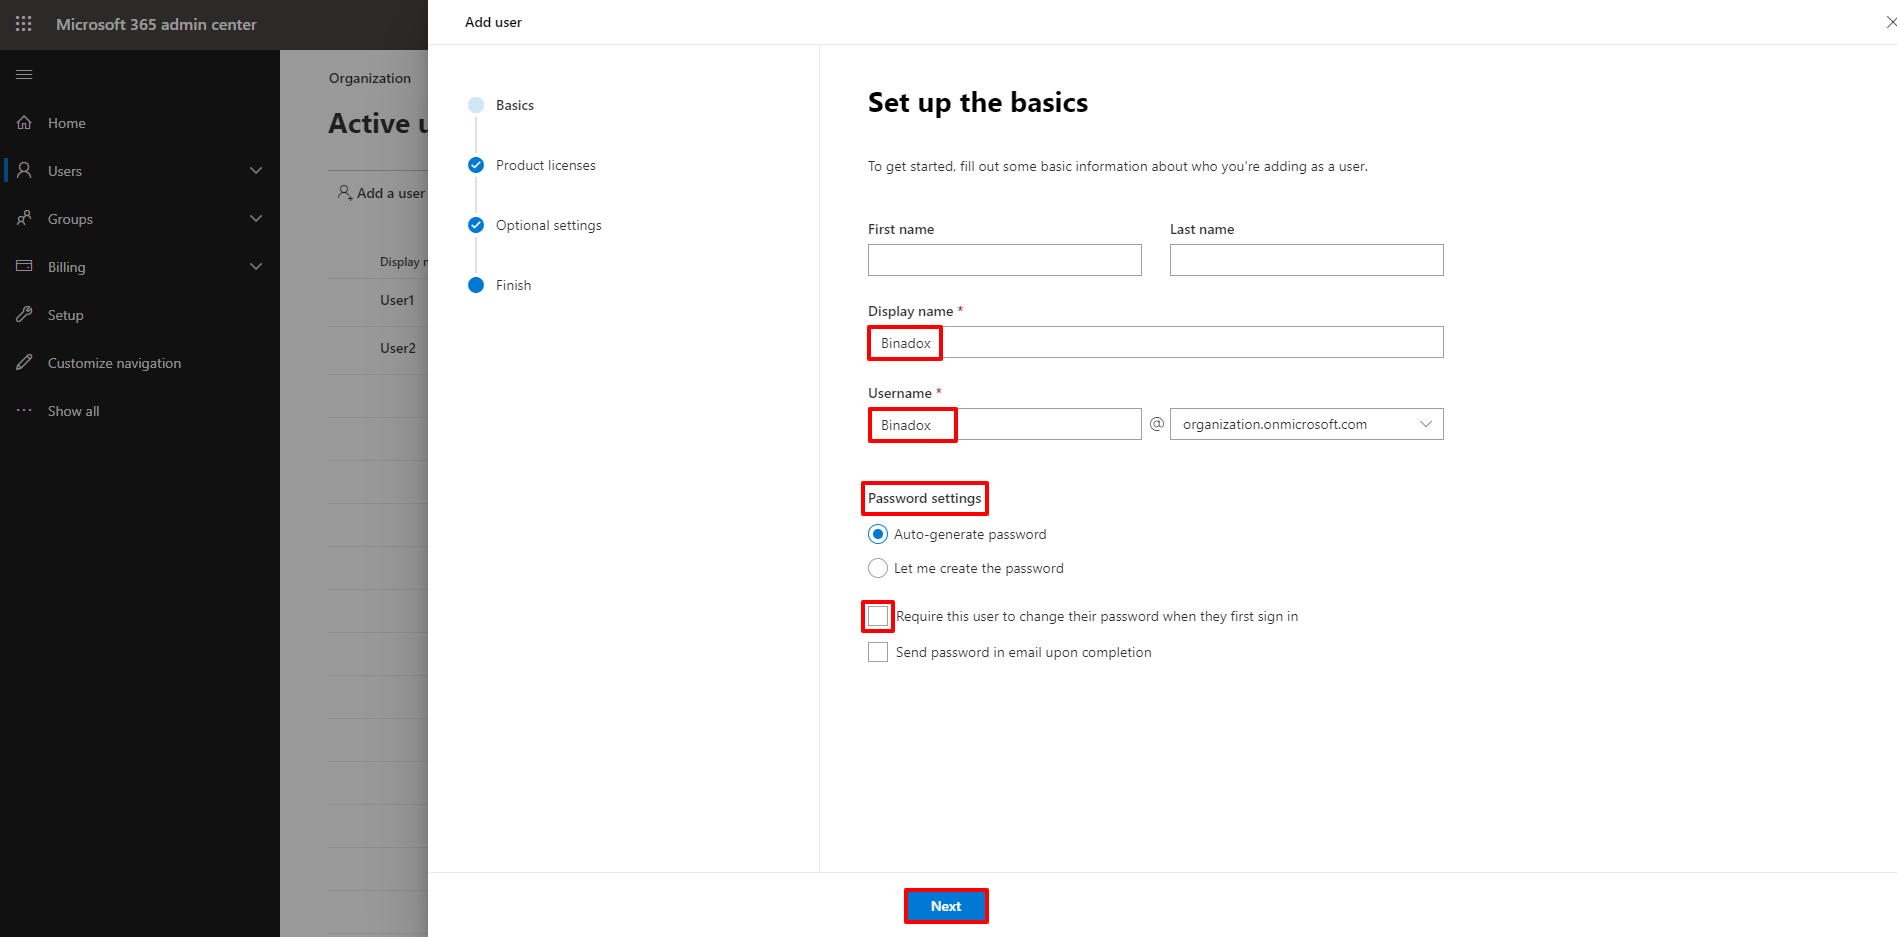
3. Fill in all the required fields in the Add user form.
Enter a display name and a username.
Choose the required Password settings.
Leave Require this user to change their password when they first sign in unchecked (so you do not have to log in to the Azure portal as a new user and create a new password to activate the account).
Click Next.
4. In the Product licenses view, select the location. Select the Create user without product license option. Click Next.
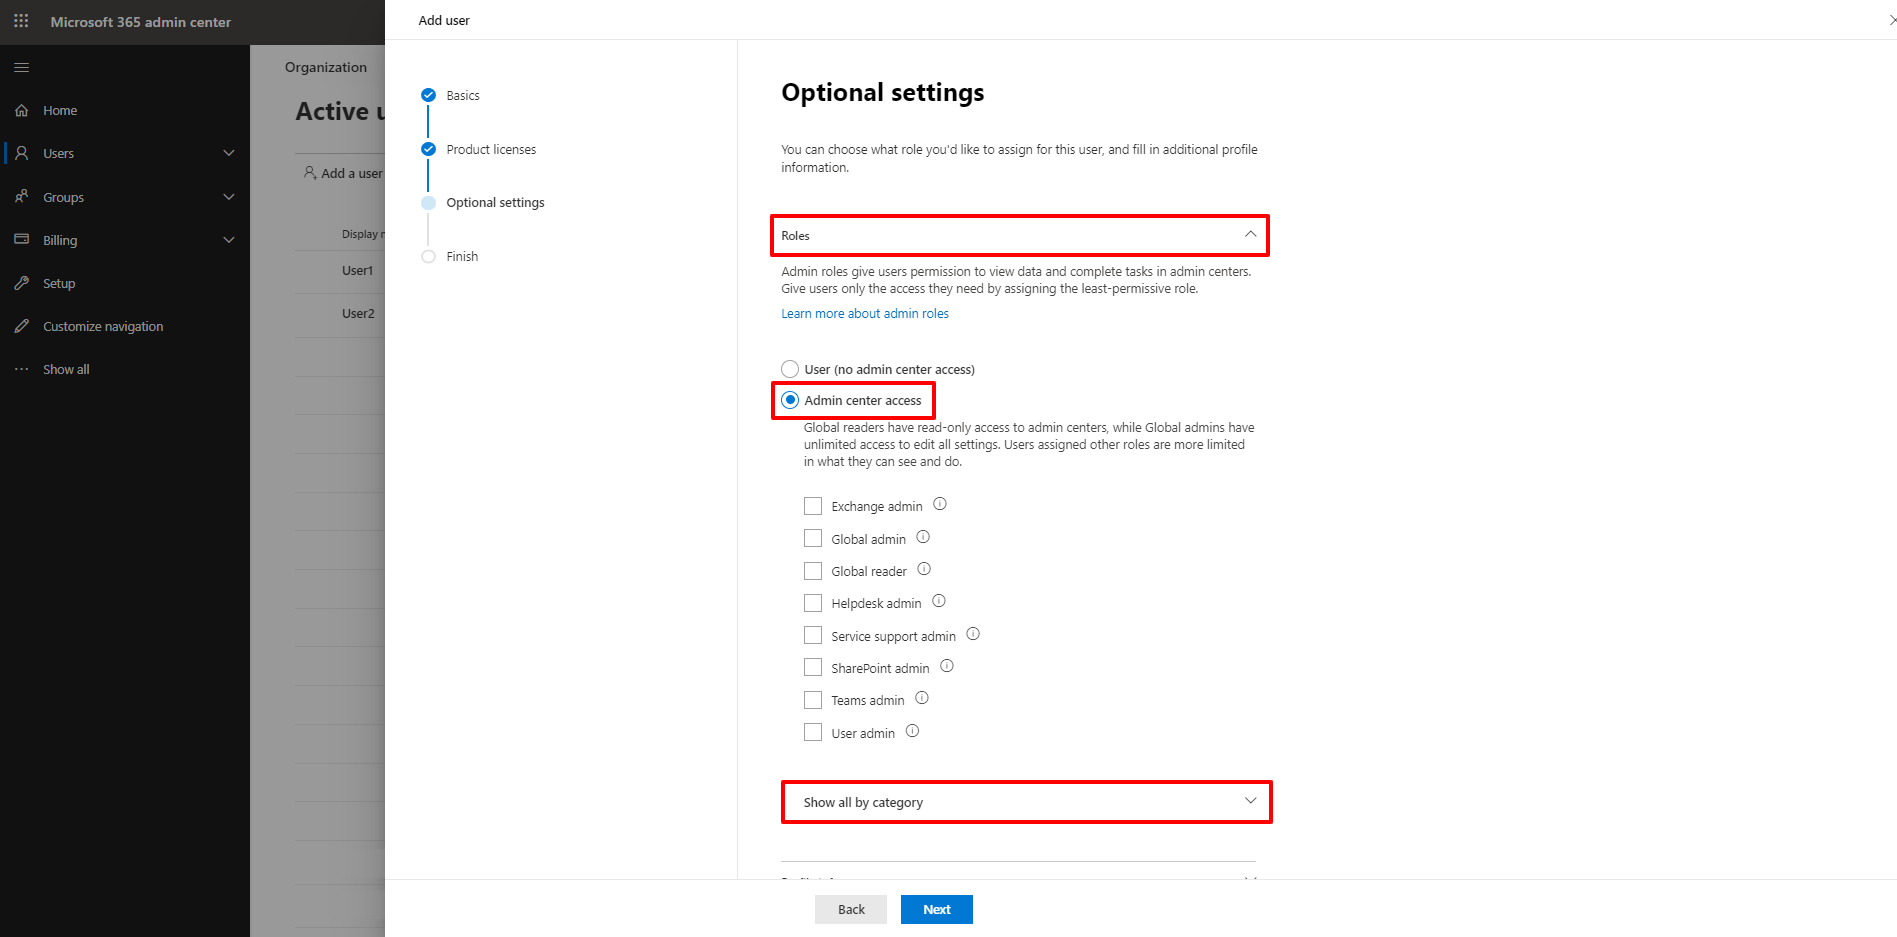
5. In the Optional settings view, click Roles. Select Admin center access. Click Show all by category.
6. Scroll down to the Other category. Select the Billing admin checkbox. Click Next.
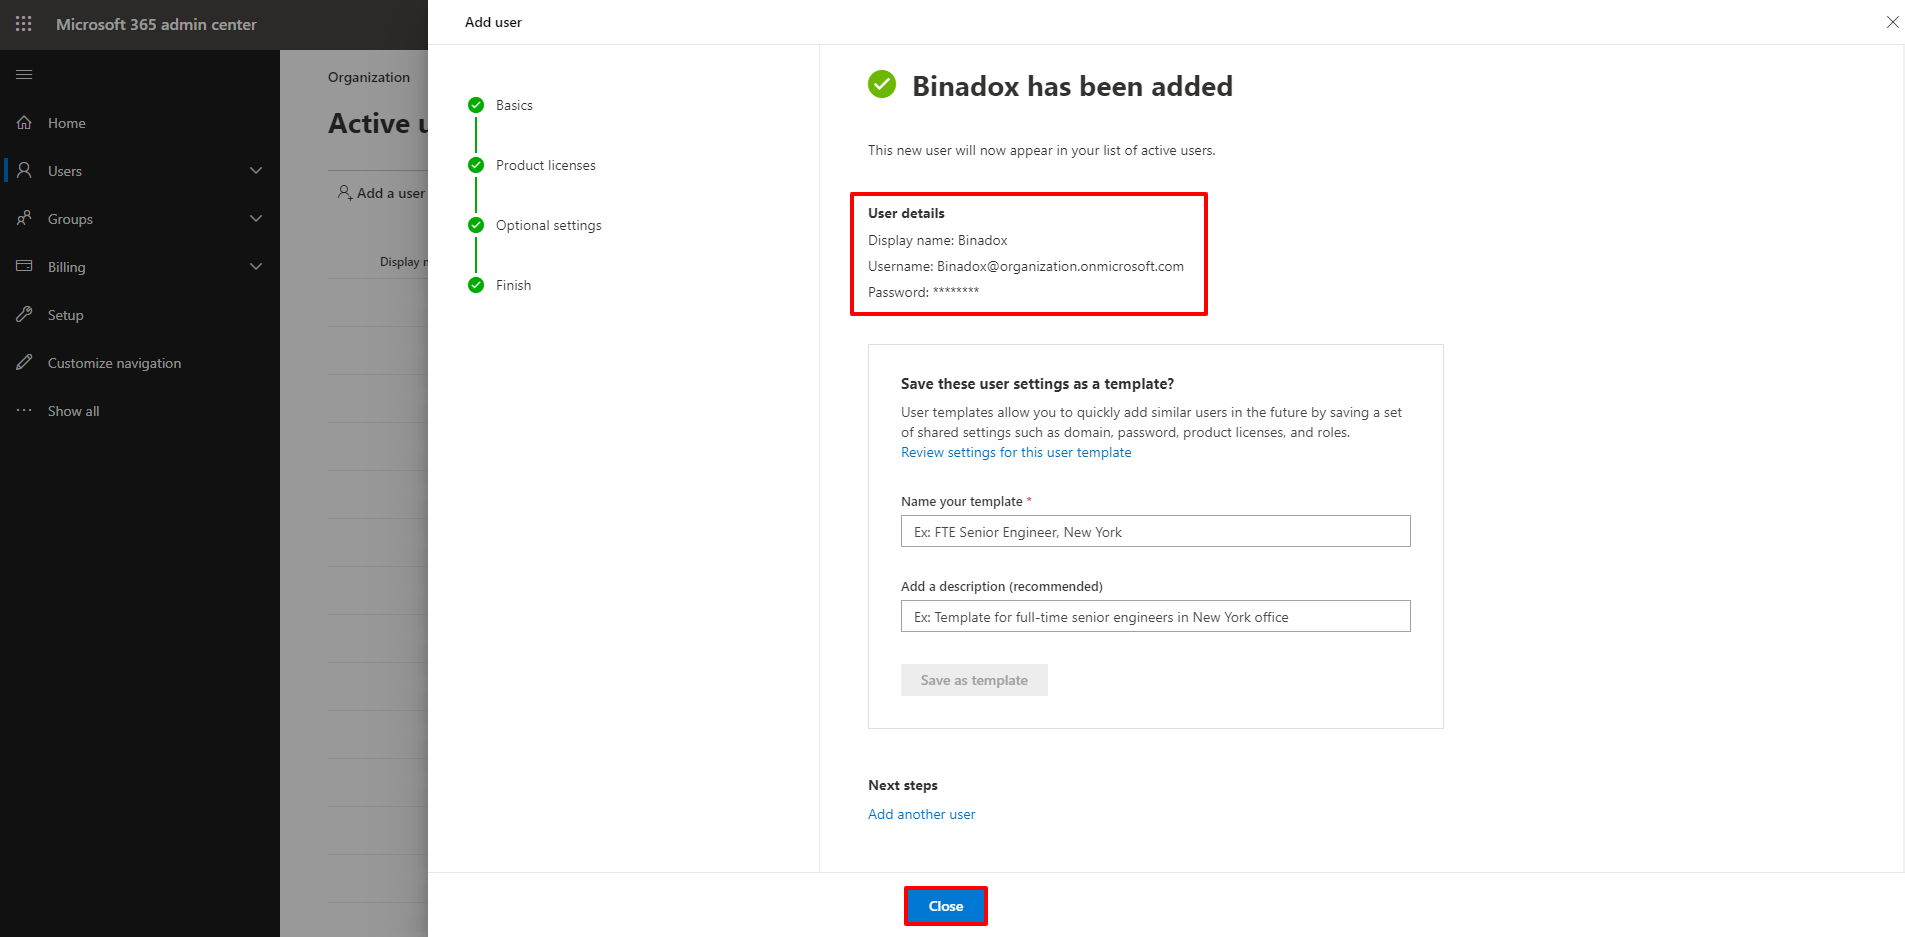
7. Review data and click Finish adding to add a new user.
8. Copy a username and a password. Click Close.
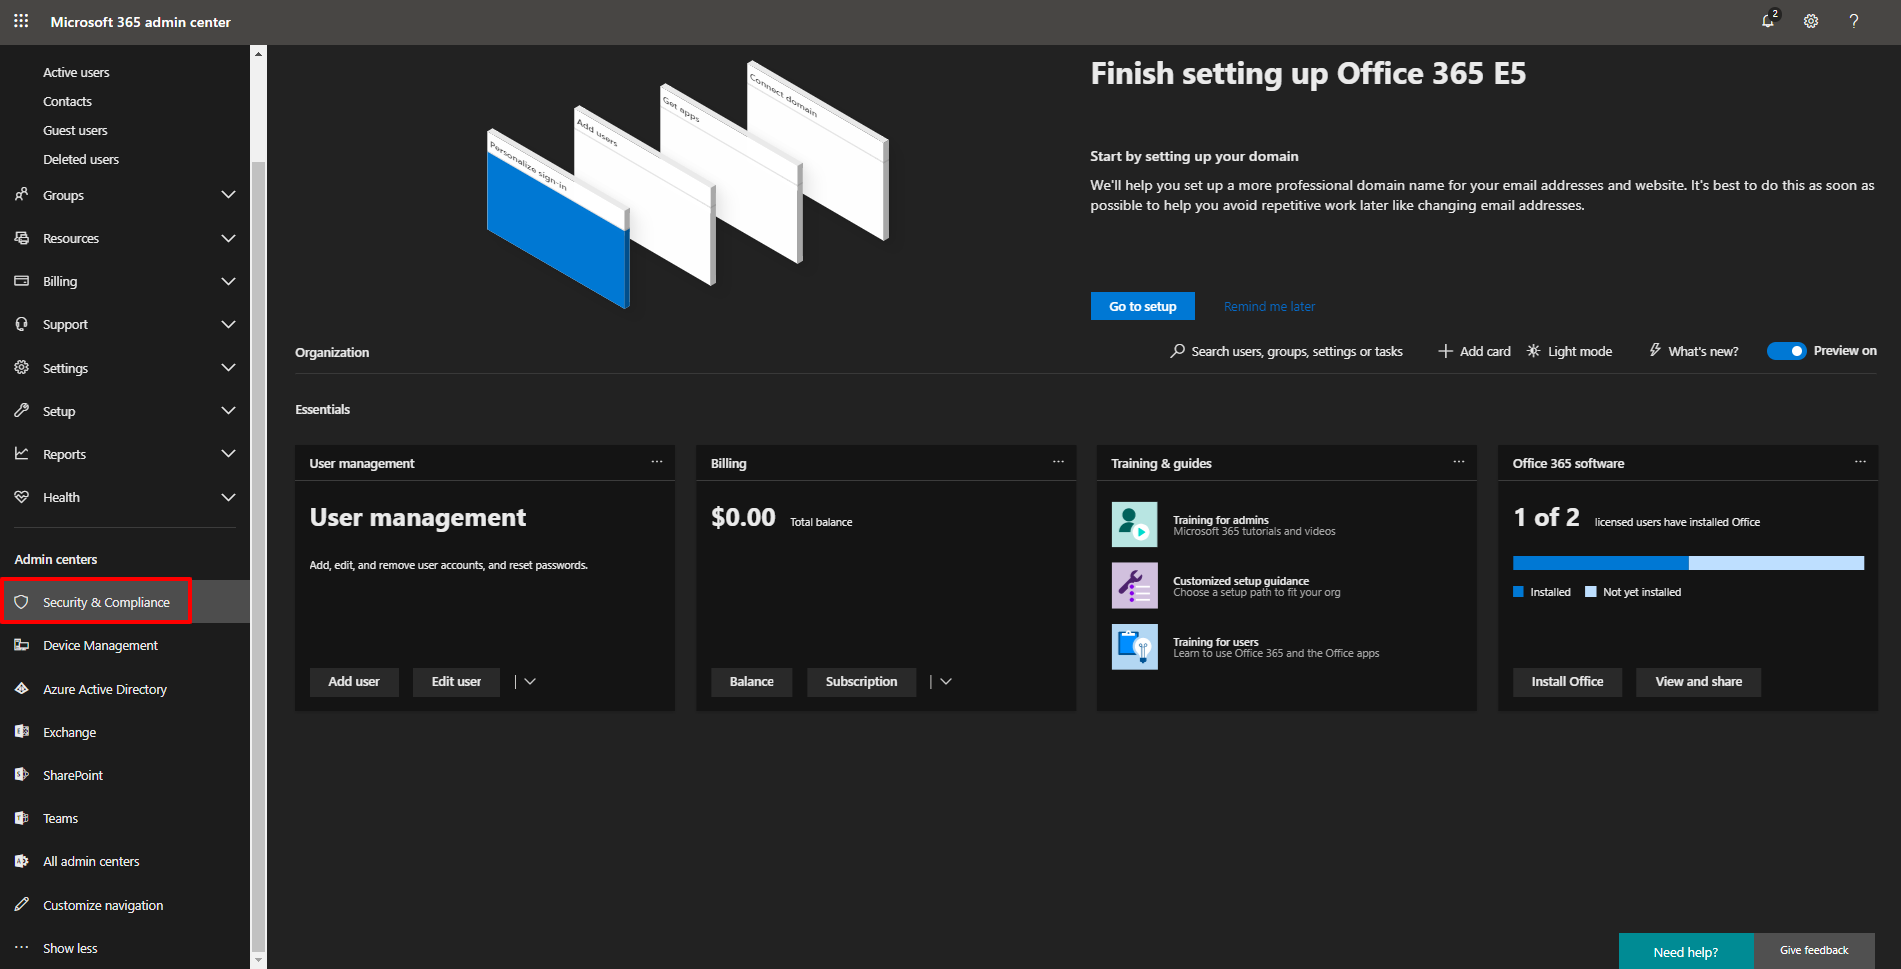
9. To specify the permission levels of the new user, click …Show all in the navigation pane on the left to open up the Admin centers section. Go to Security.
10. You will be redirected to the Microsoft Defender dashboard. In the navigation pane on the left, click Permissions. Select the Security Reader check-box in the list of role group names. In the Security Reader view that opens on the right, go to Members and click Edit.
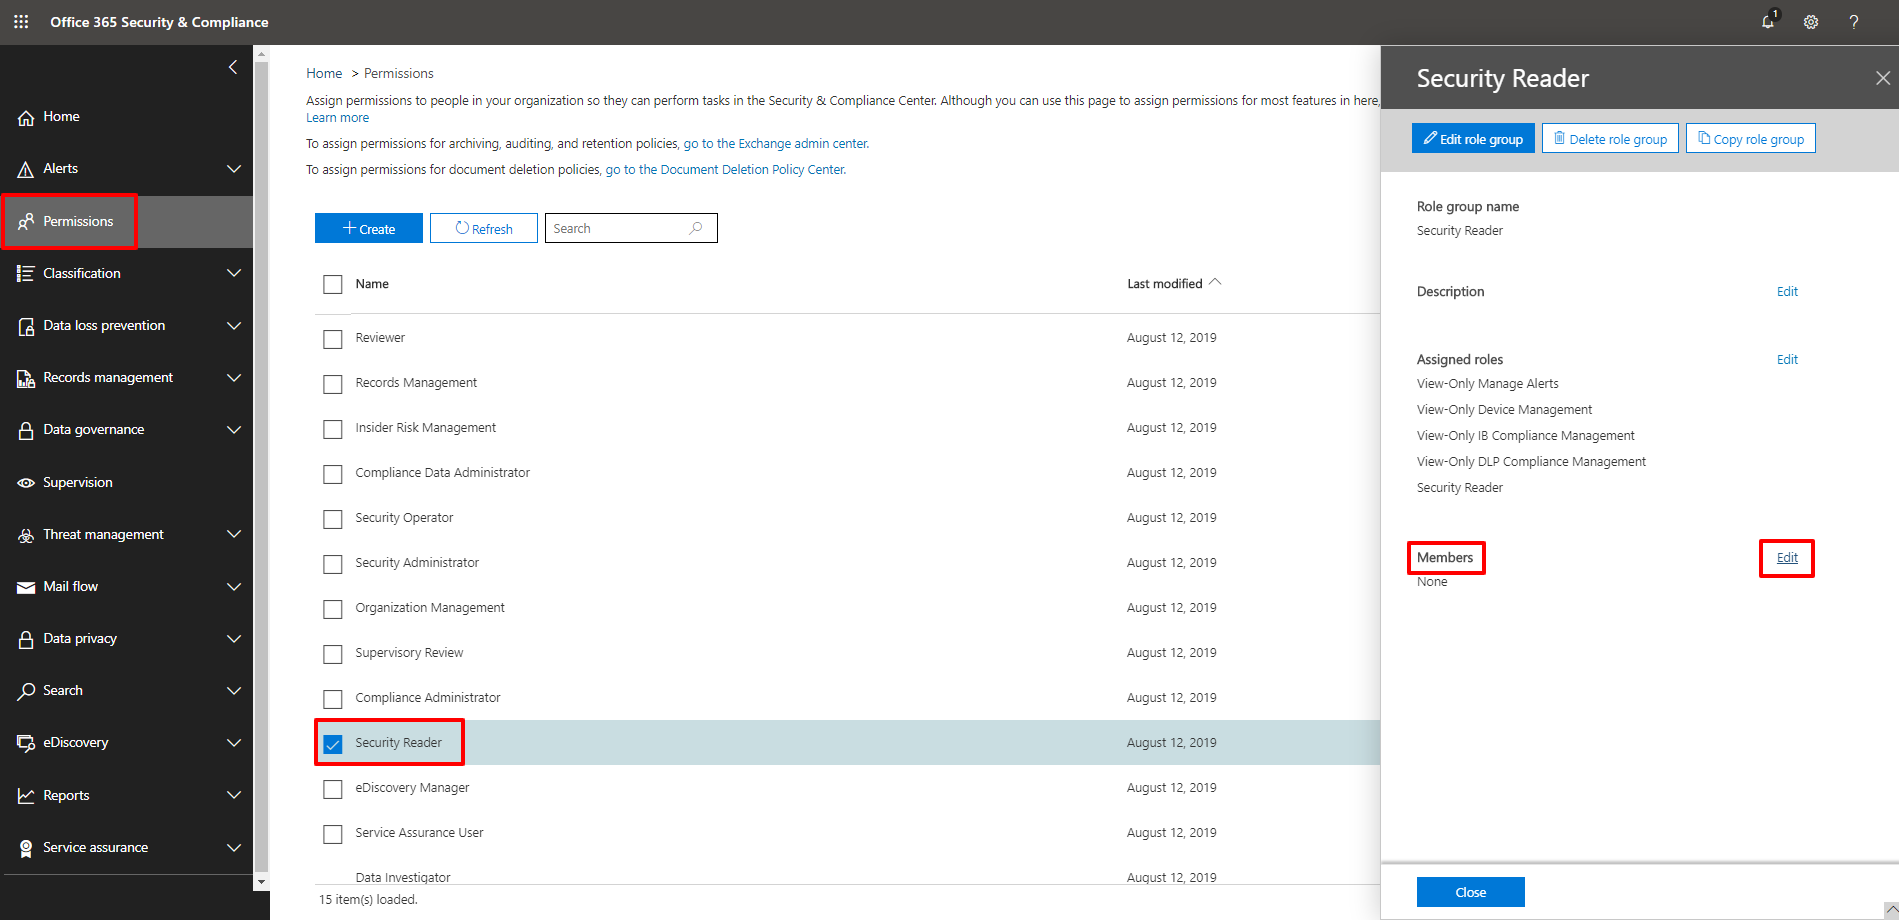
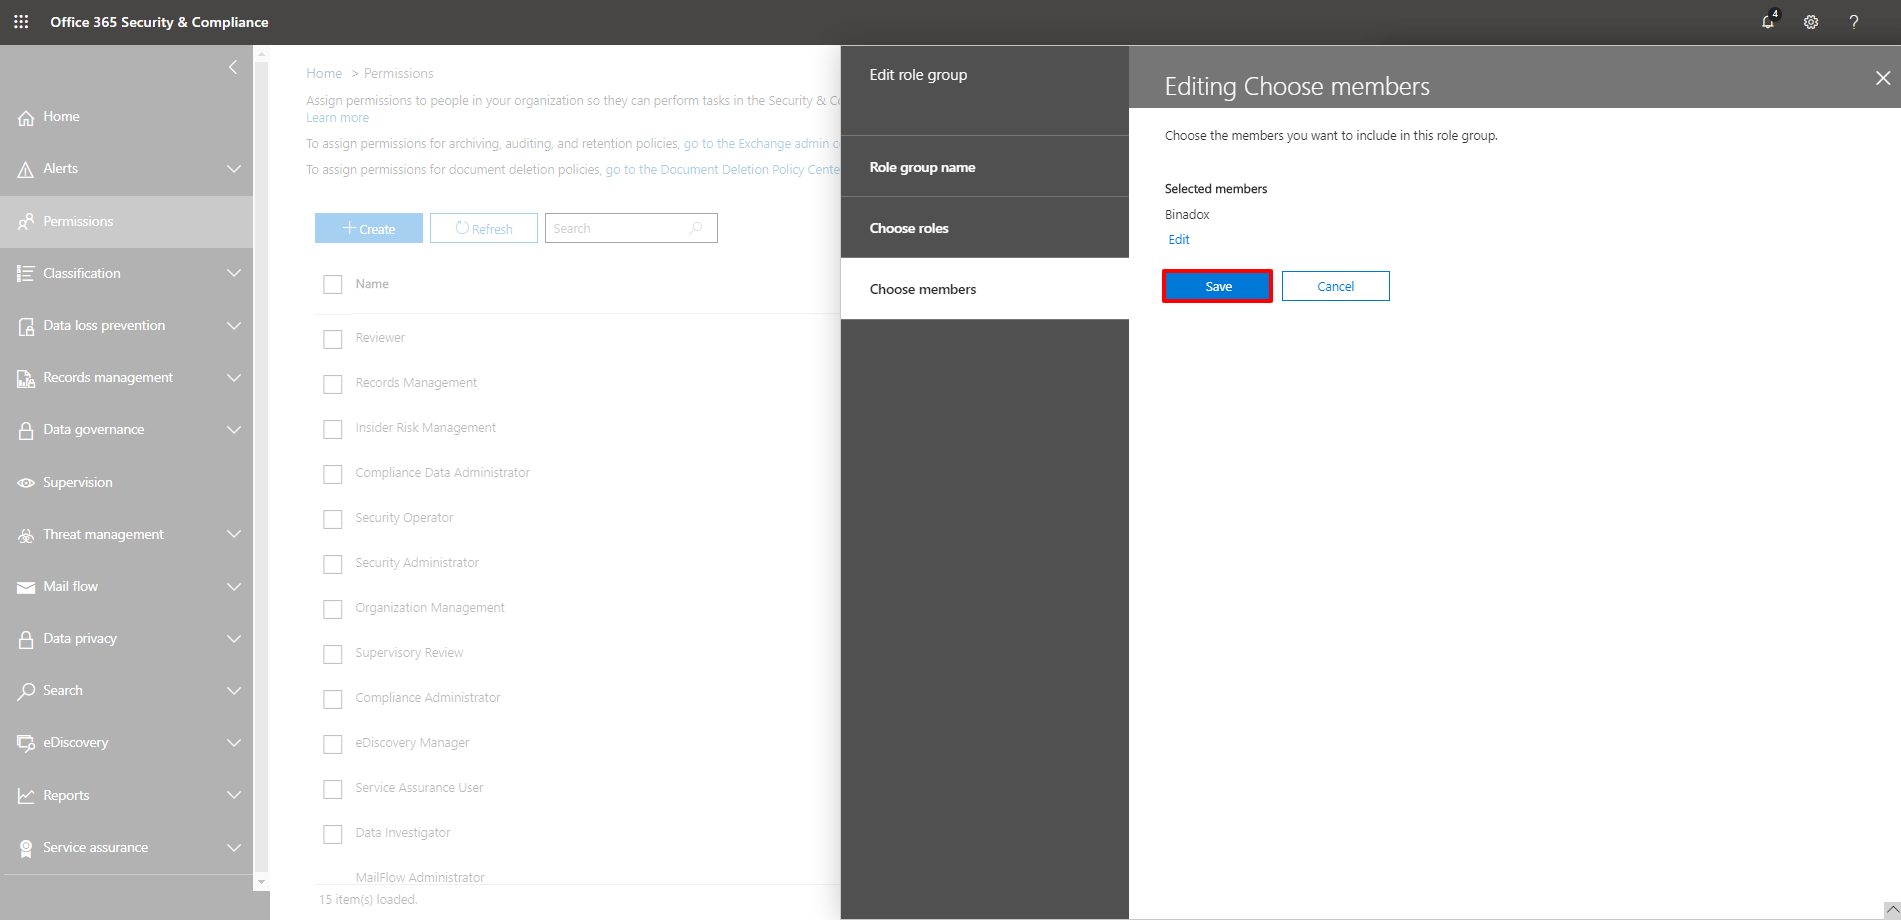
11. In the Editing Choose members view, click Edit to choose members.
12. In the Choose members view, click the + Add button to add the new user to the Security Reader role group.
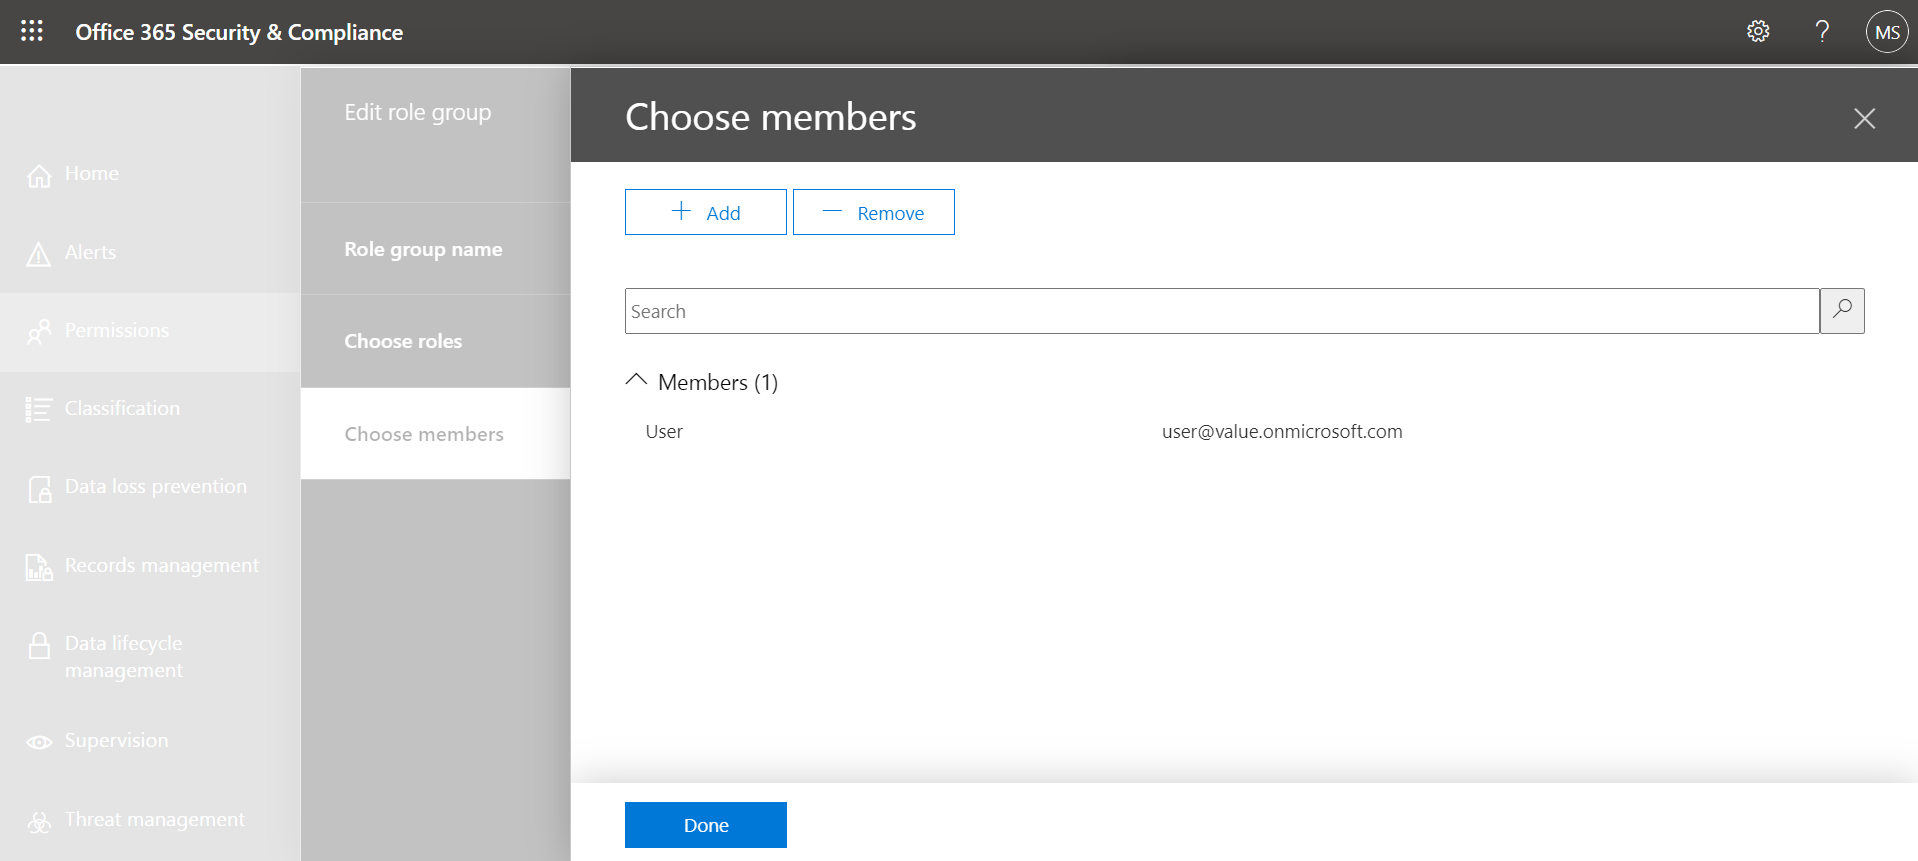
13. Select the new user from the Members list. Use the search box, if necessary. Click Add.
14. Click Done to add the user to the Security Reader role group.
15. Click Save to finish.
3. Disable Multi-Factor Authentication
Multi-Factor Authentication enabled for the user may disrupt the connection with Binadox. To disable it, do the following:
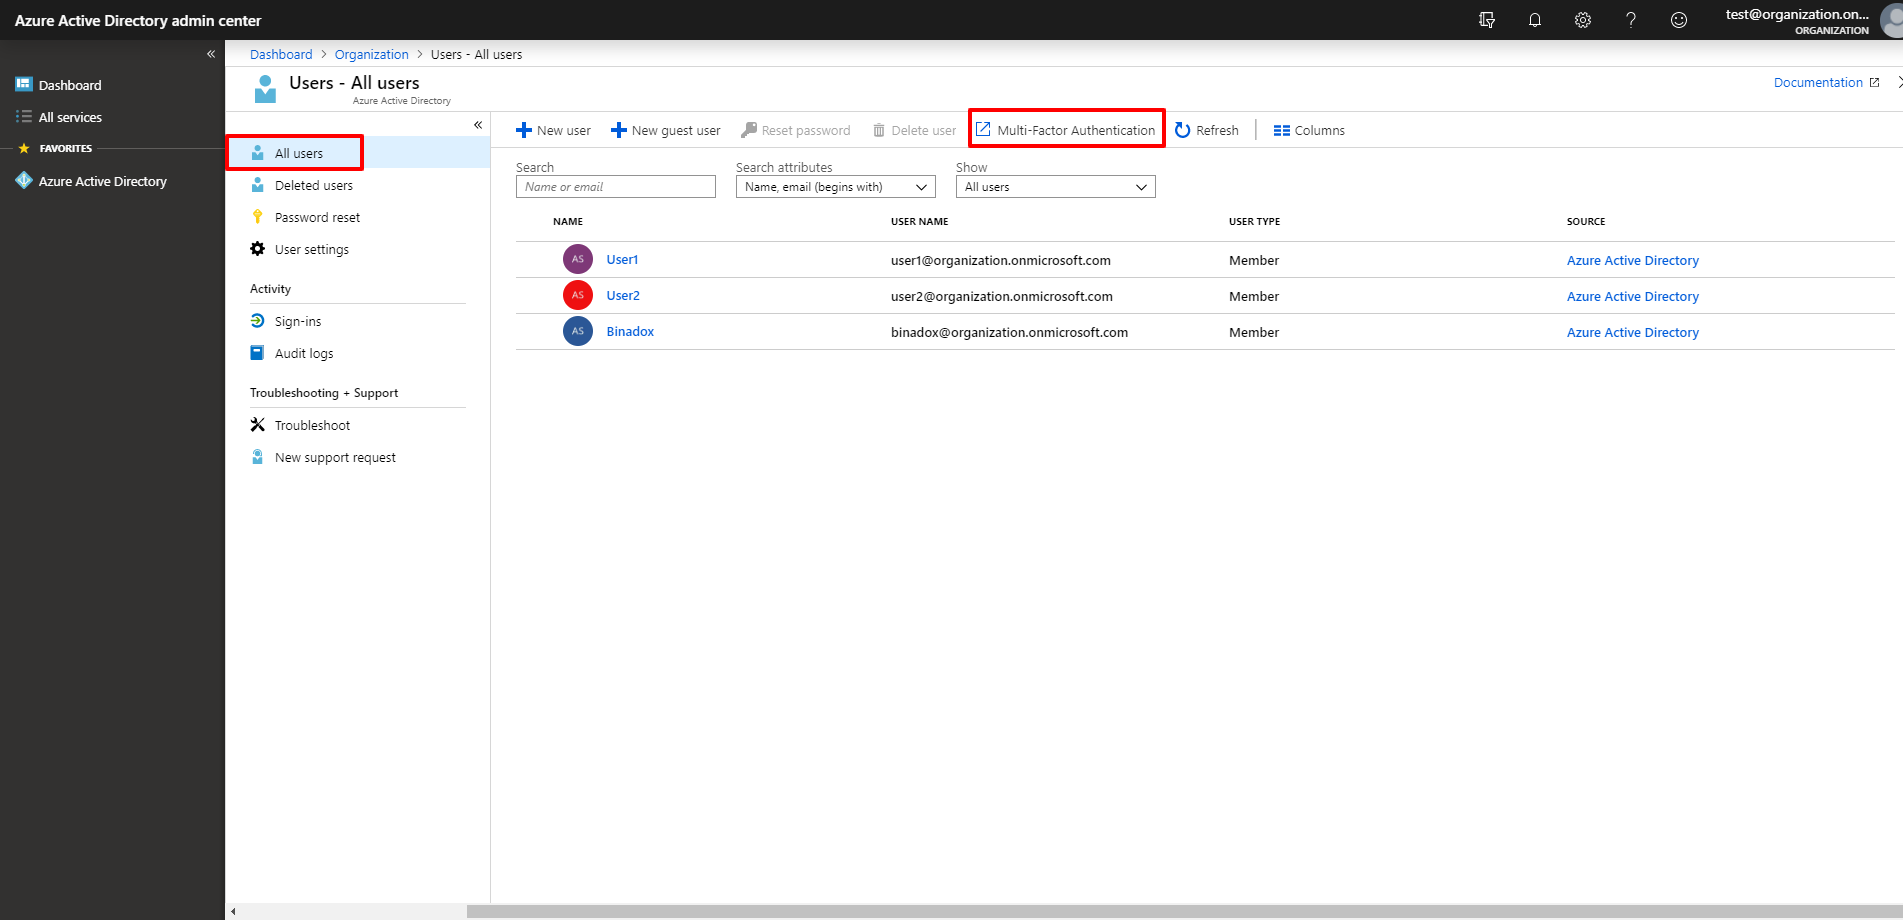
1. Log into the Microsoft Azure portal as a global administrator. In the navigation pane on the left, goto Azure Active Directory > Users.
2. Click All users in the navigation pane. In the All Users view, click Per-user Multi-Factor Authentication on the toolbar.
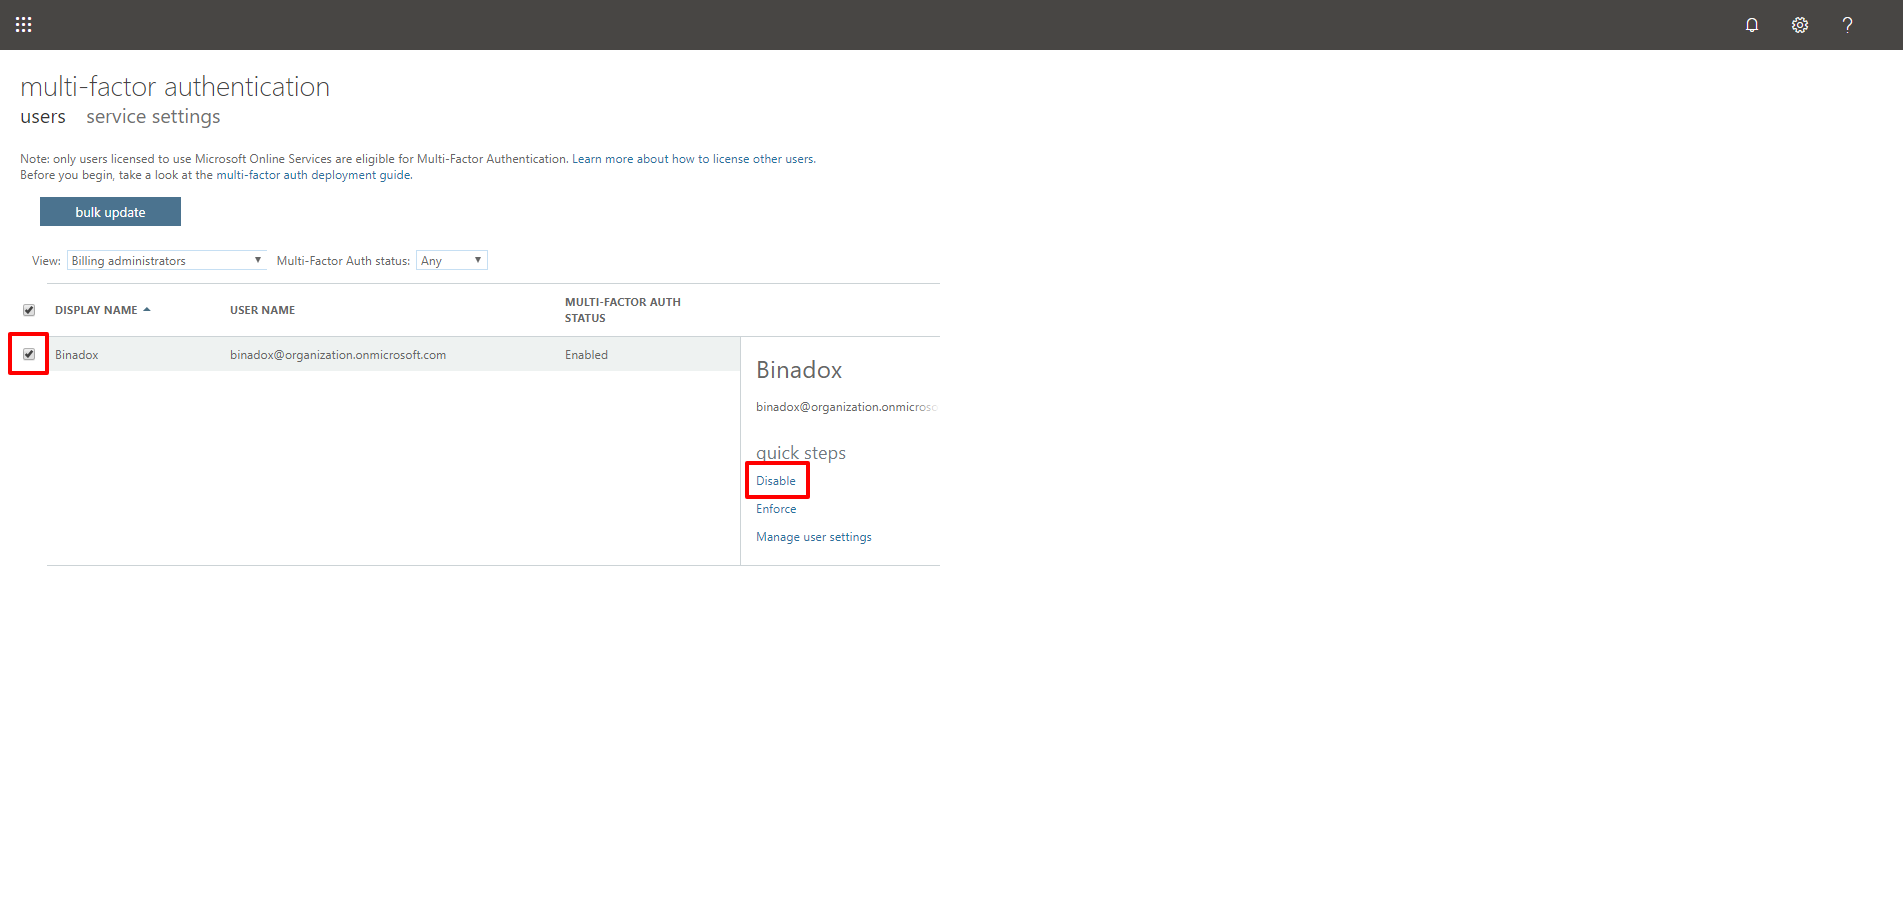
3. You will be redirected to the Multi-Factor Authentication view. Put the tick mark next to the name of the required user. In the appeared menu to the right, click the Disable option in the Quick Steps section. Click Yes in the appeared window to confirm the action.
4. Locate Integration Data on the Azure Portal
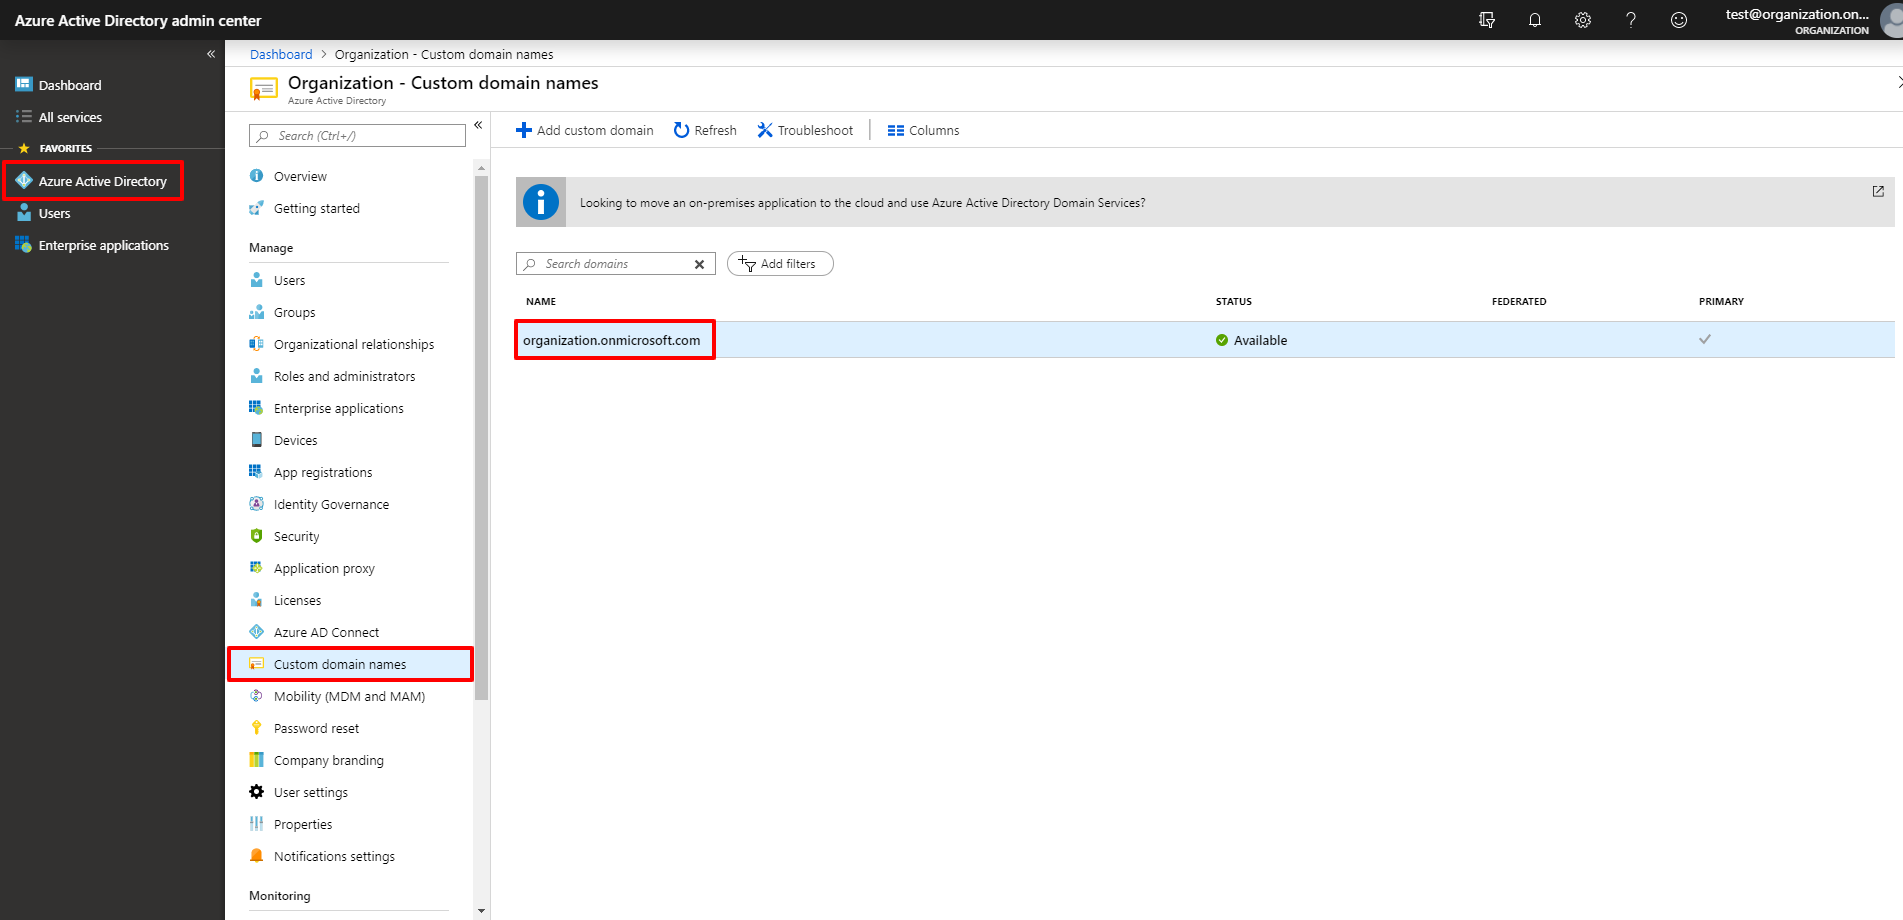
1. To find the Tenant domain, Application ID and Client Secret, sign in to the Microsoft Azure portal as a global administrator. Navigate to Azure Active Directory.
2. To locate the Tenant domain, click Custom domain names. Copy your tenant domain from the Name field (e.g. organization.onmicrosoft.com). You may also hover the mouse pointer over the profile information at the top right corner of the menu bar to see the tenant domain.
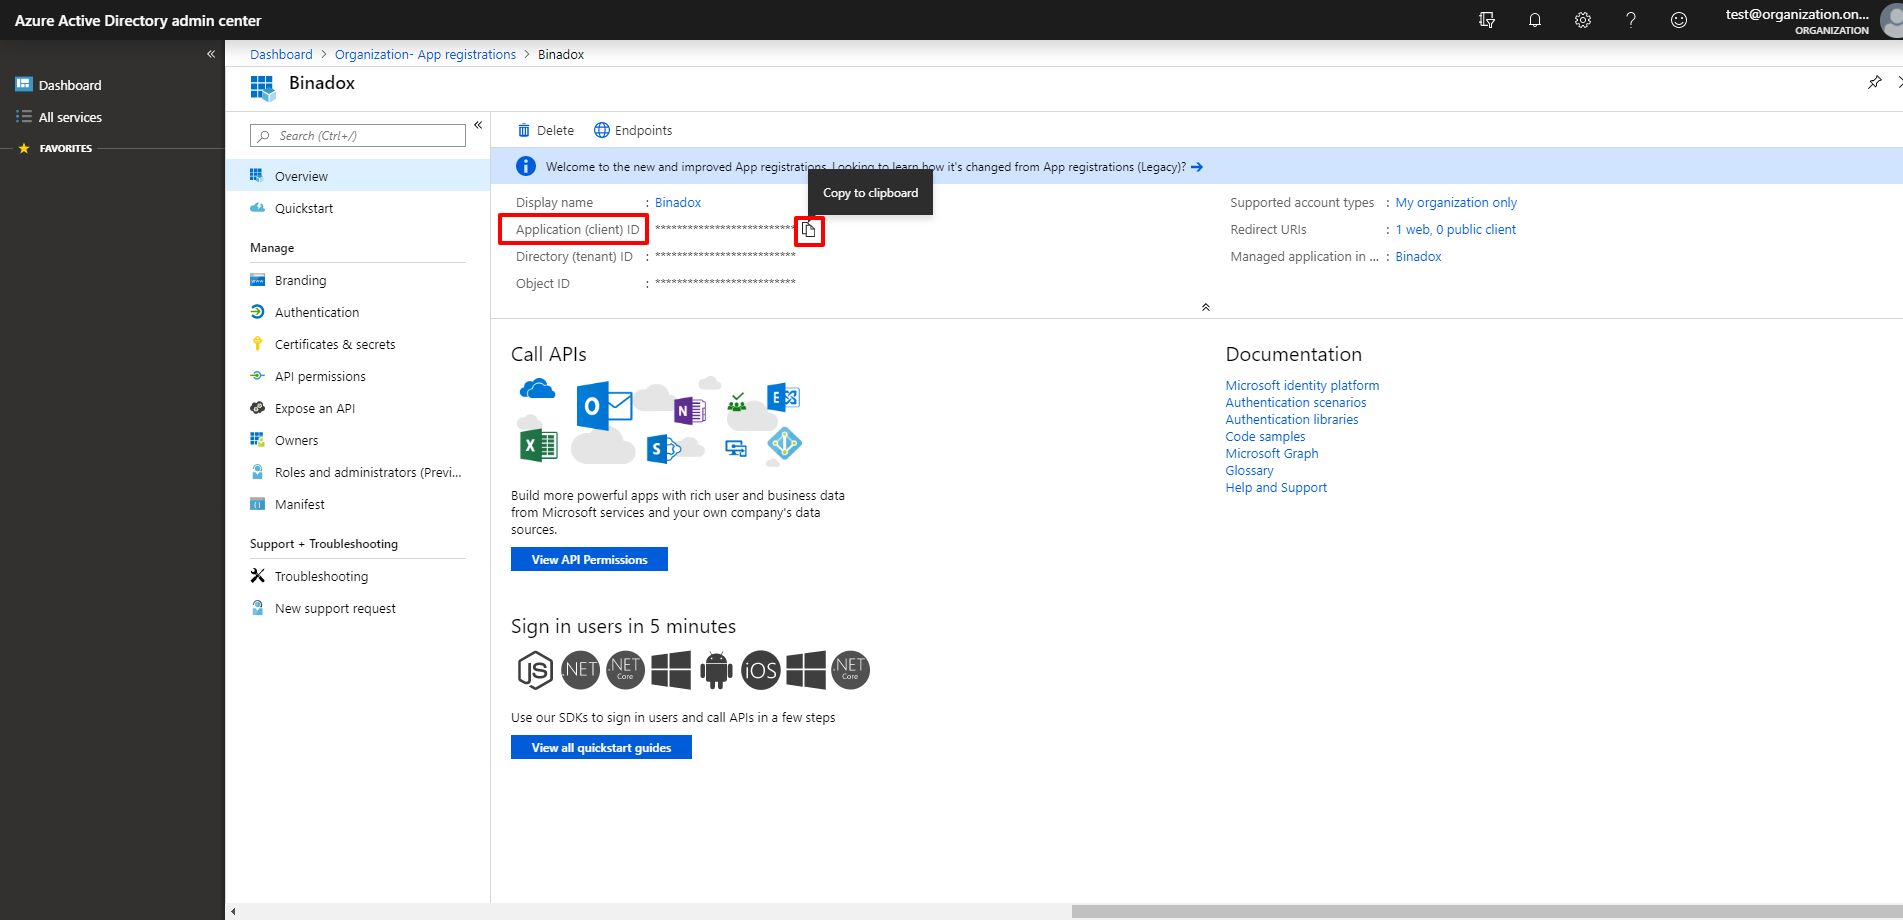
3. To locate an Application (client) ID, click Azure Active Directory > App registrations in the navigation pane on the left. Click on the name of the Binadox application. To quickly locate it, type in its name in the search bar.
4. To copy an Application (client) ID, hover the mouse pointer over the value. Click on the appeared icon to copy it to the clipboard.
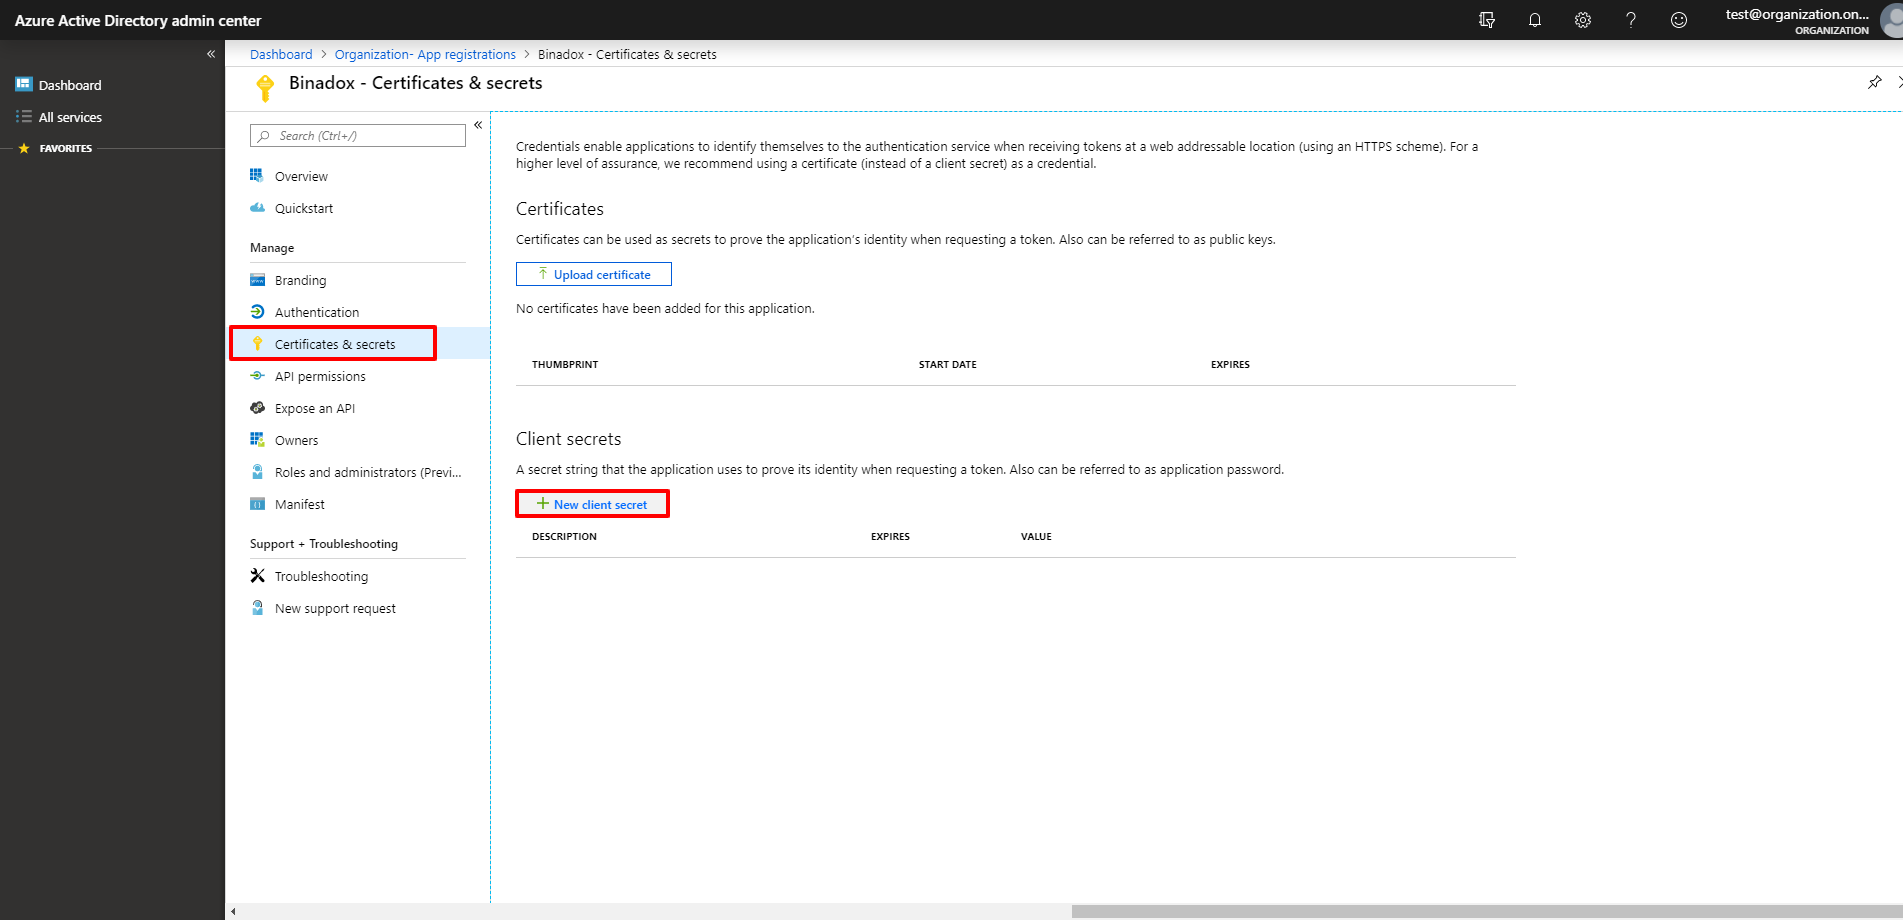
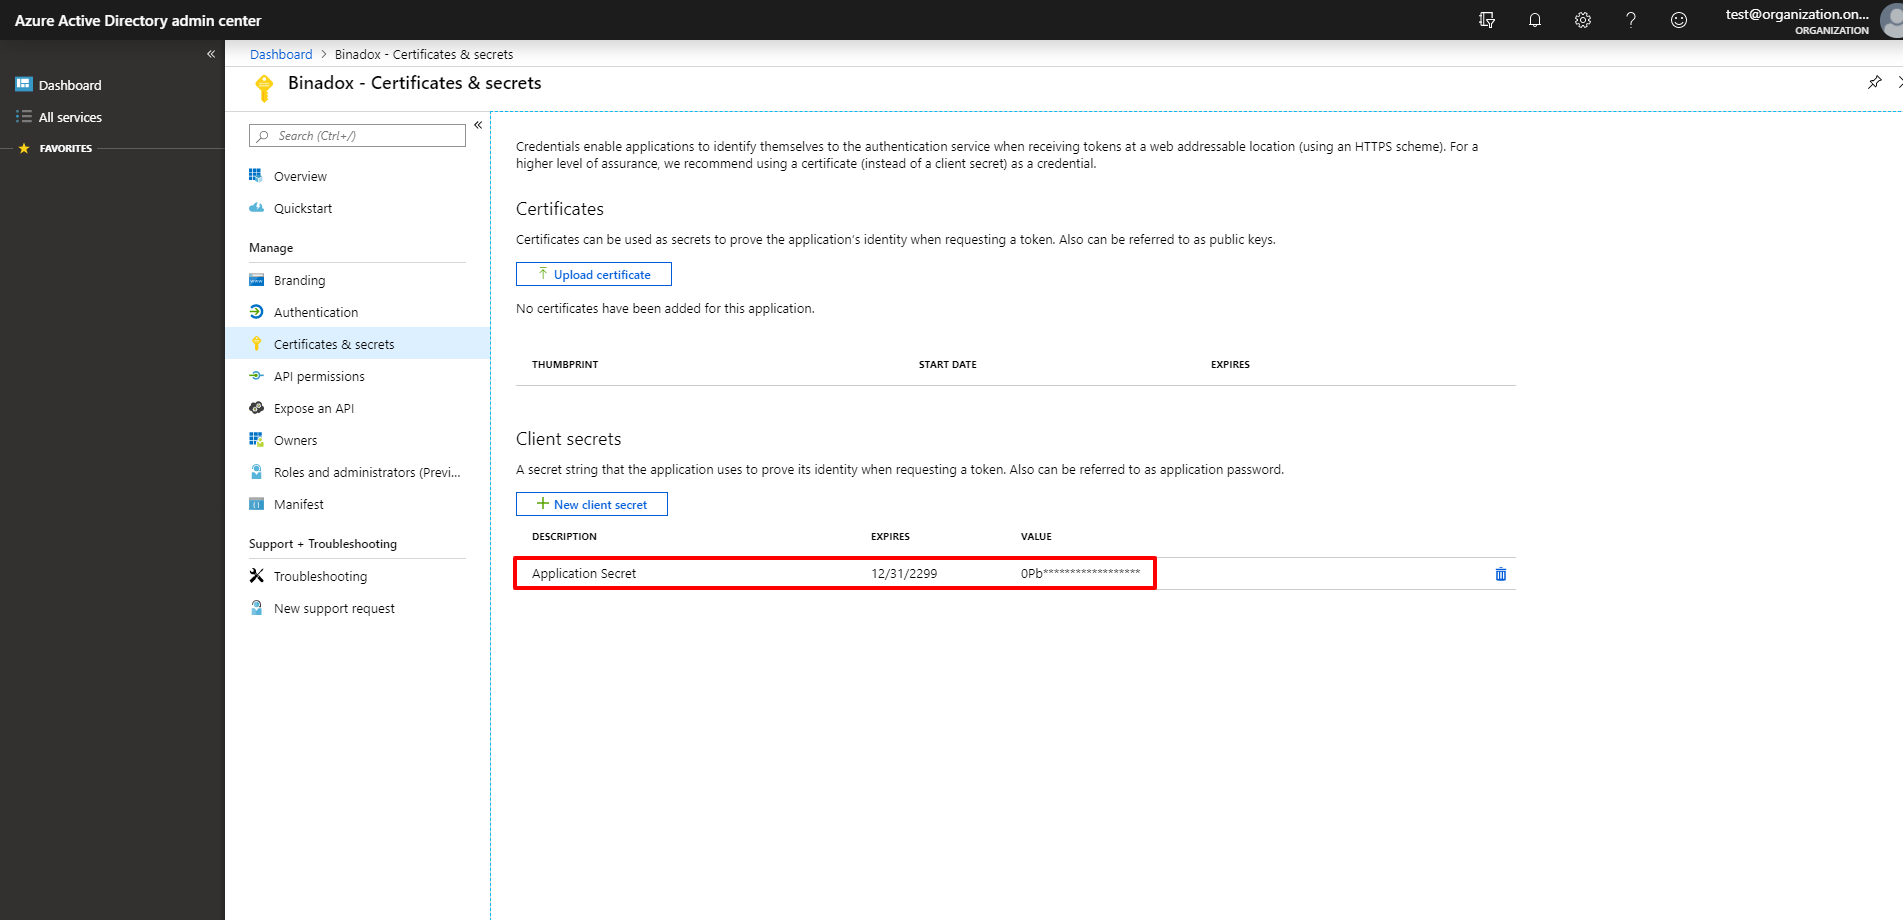
5. To generate a new Client Secret, go to the Certificates and secrets section and click the New client secret button.
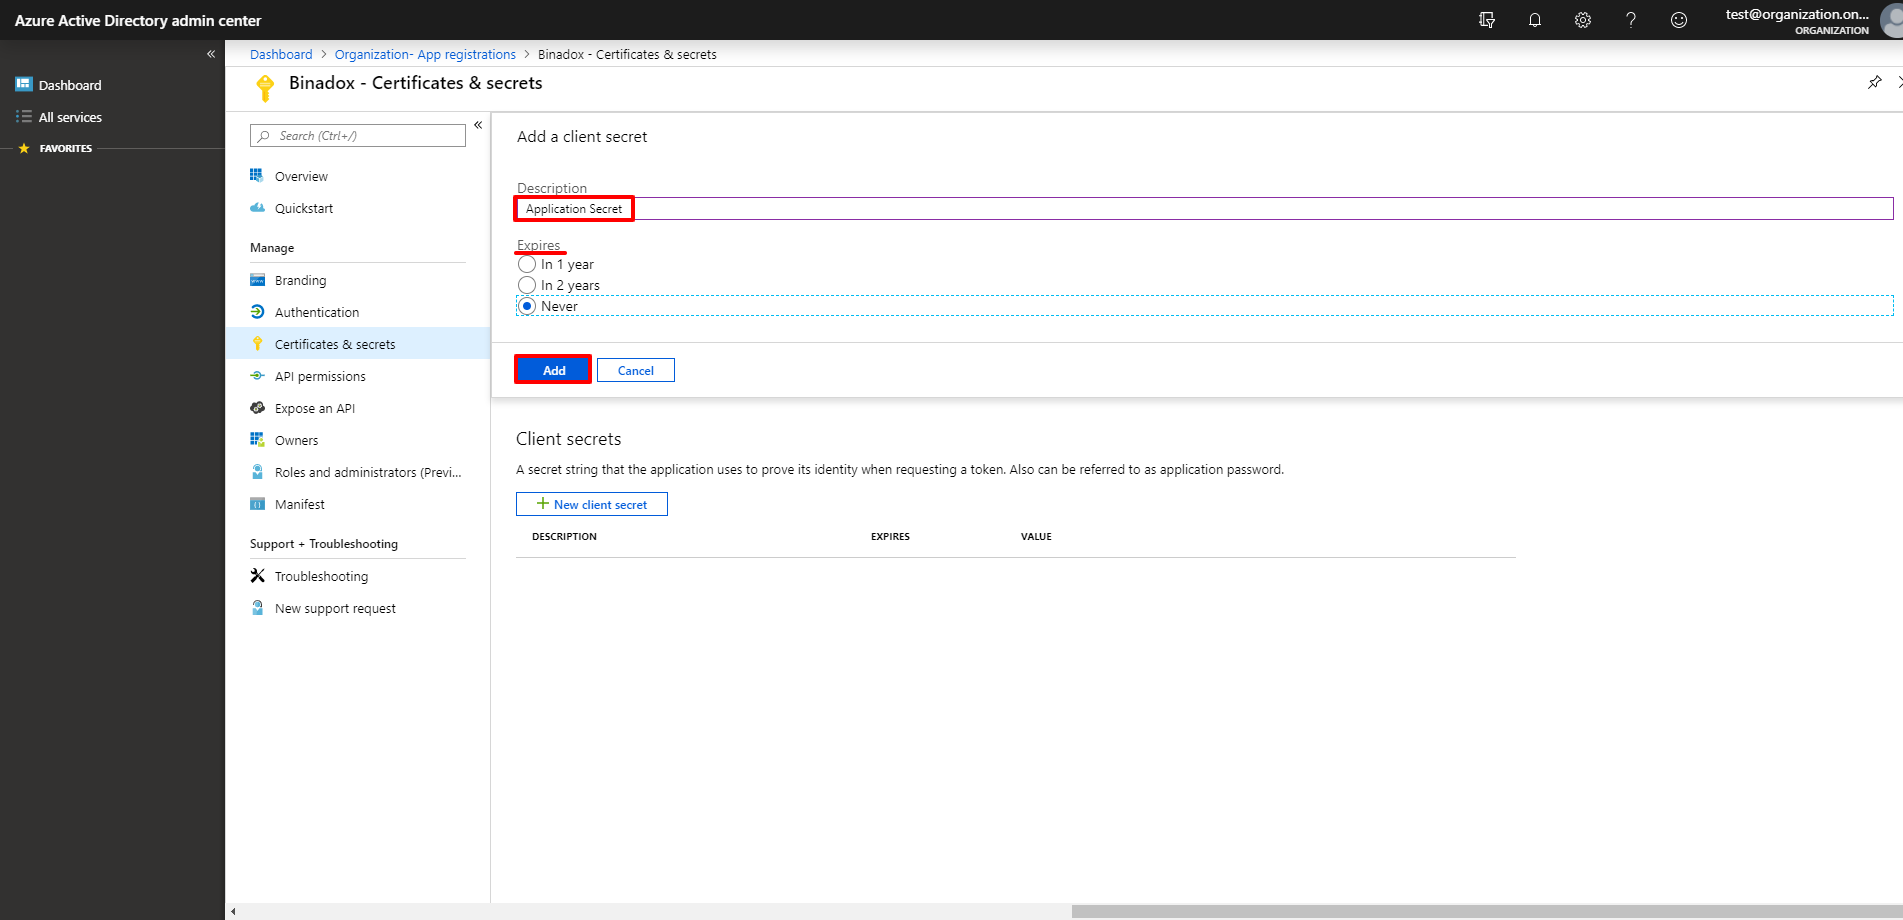
6. Make a Description for your client secret, select its duration in the Expires section and click the Add button.
7. Hover the mouse pointer over the value and click on the appeared icon to copy it to the clipboard.
5. Create New Connection for Office 365 in Binadox
1.Log into your Binadox account.
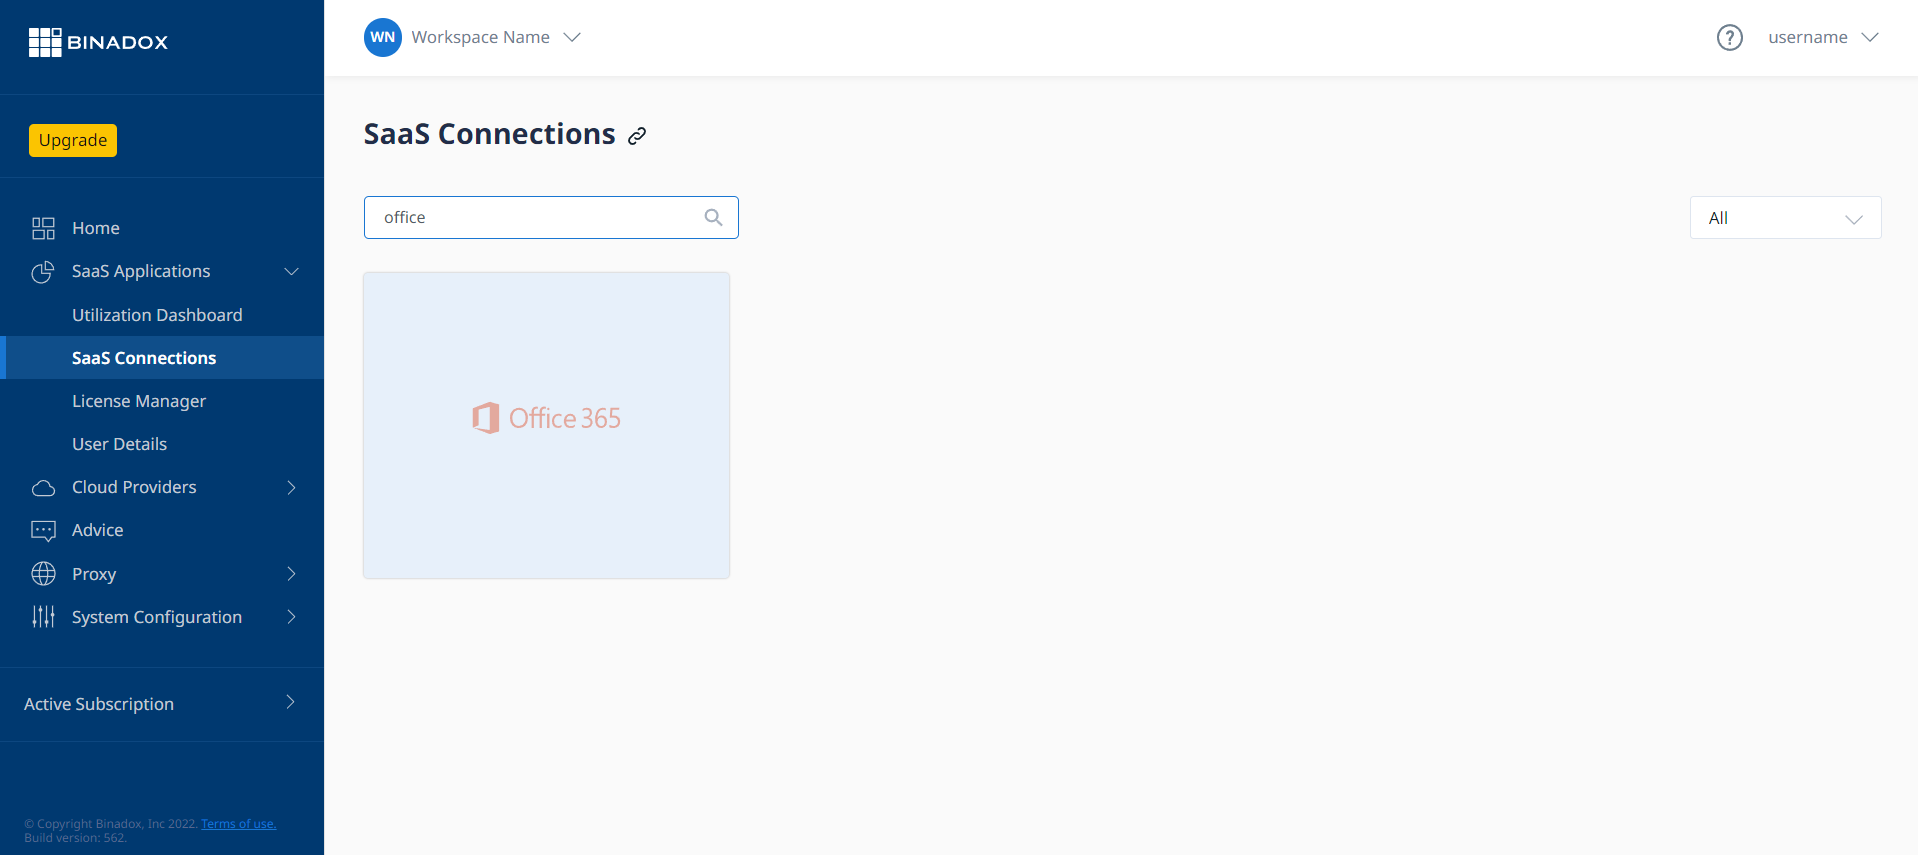
2. In the navigation pane on the left, click SaaS Connections. Click on the Office 365 icon. To quickly locate the Office 365 software in the list of supported applications, type in its name in the search bar.
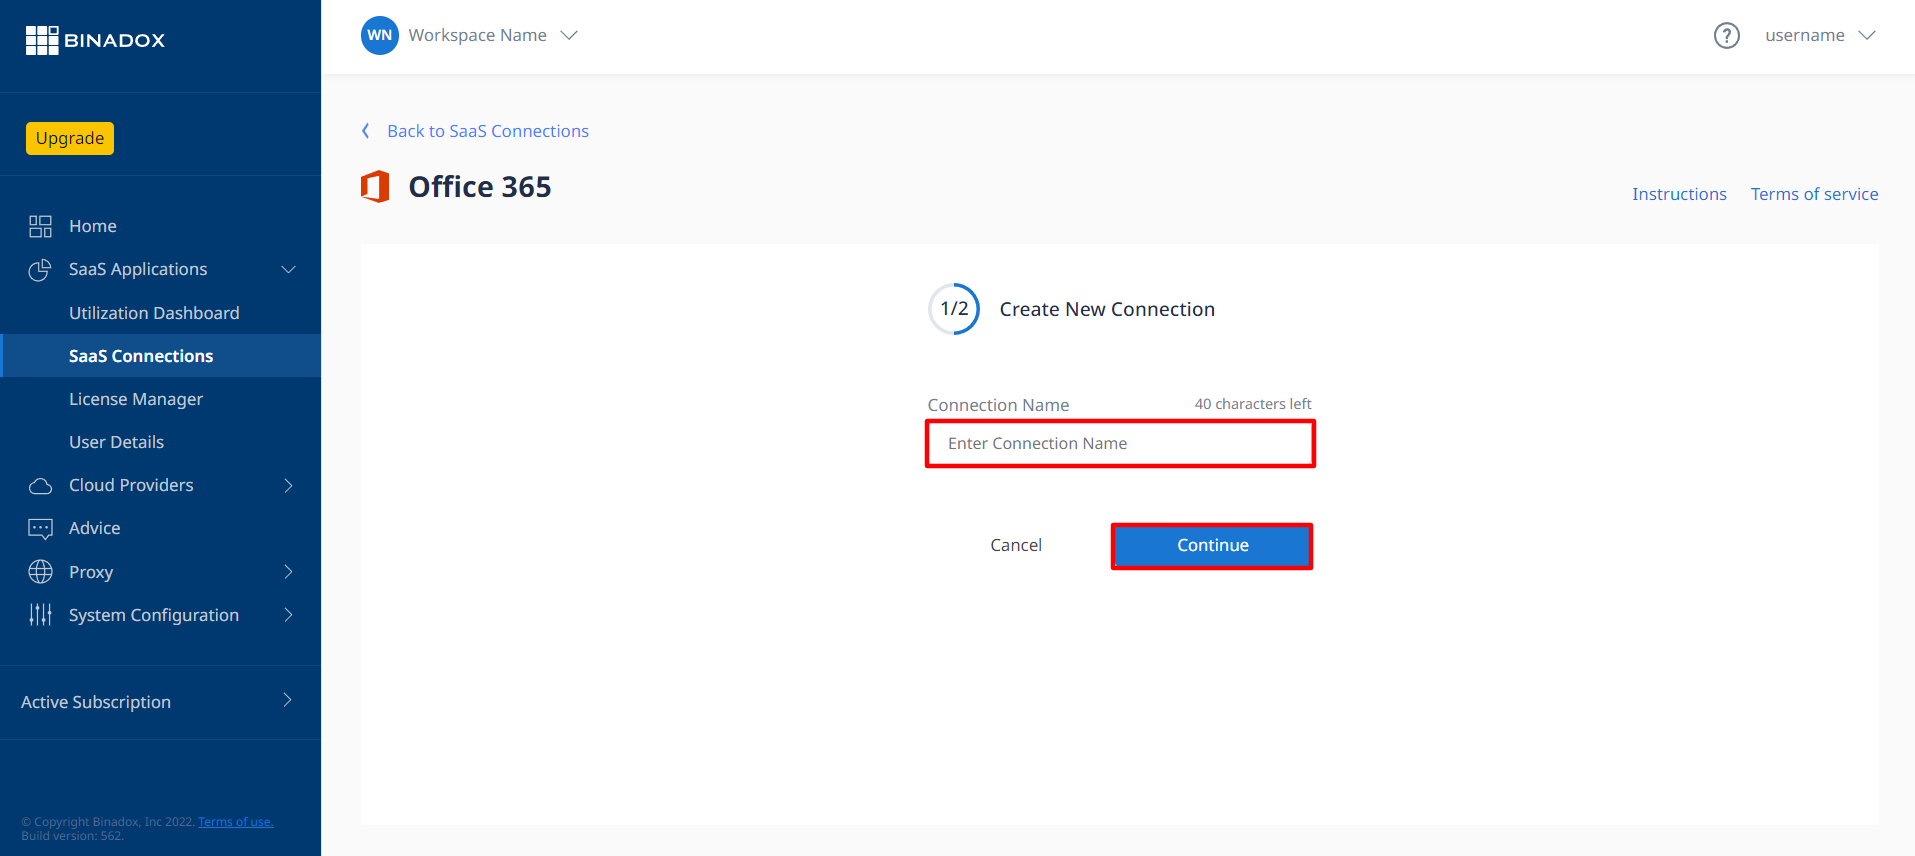
3. In the Office 365 view, type in the name of an instance in the Connection Instance Name field. Click Continue.
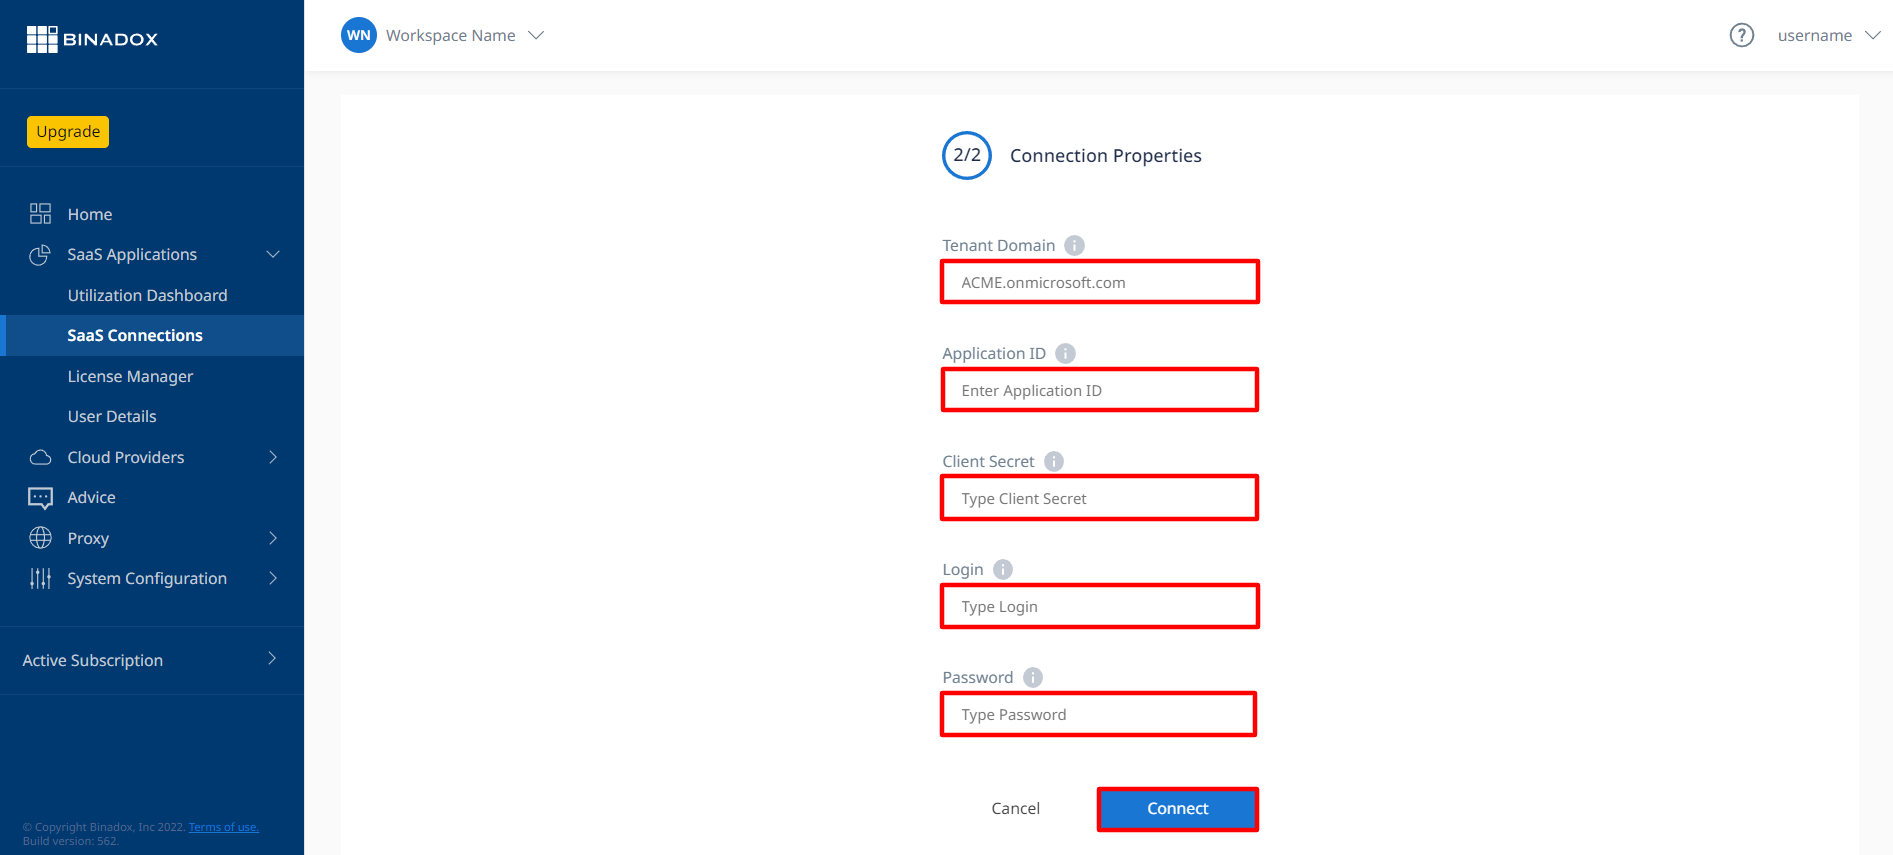
4. Fill in the required fields with parameters manually on the Microsoft Azure portal and in the Microsoft 365 Admin Center (see Clause 1 for step-by-step instructions). Click Connect.
5. You will be redirected to the Microsoft login page.
IMPORTANT: Admin permissions are required to grant Binadox access to read usage and cost data in the account. For this purpose, log in with administrator credentials.
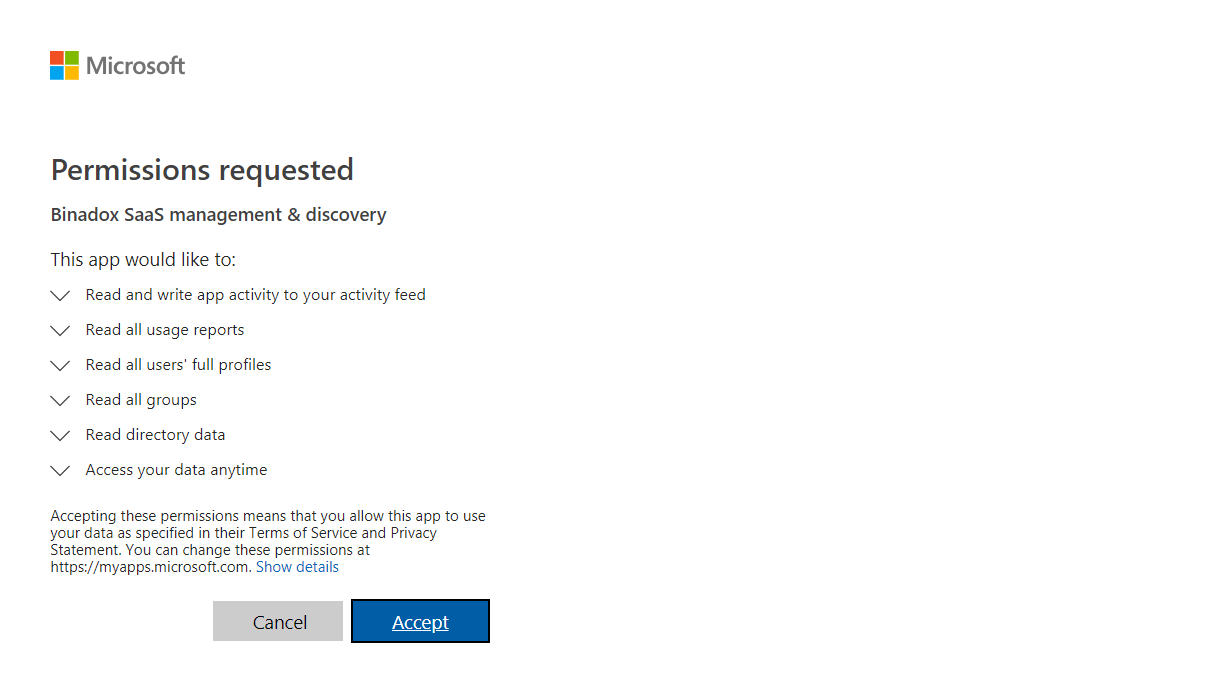
6. In the appeared Permissions requested window, click Accept to give Binadox permissions to analyze data for spend and usage optimization.
Office 365 connection with Binadox is established.
Integration of Cisco Webex, a cloud-based software platform for video conferencing, online meetings, screen sharing, and webinars, with the SaaS monitoring platform Binadox allows you to get Webex spend and utilization insights and drill-down to usage analysis of Webex features on a per-user basis, as well as to receive cost optimization recommendations.
Note: For usage and spend monitoring of Webex licenses on a per-user basis, administrator account credentials are required.
2. Integrate Webex with Binadox
To create new connection for your Webex account in Binadox, do the following:
1. Log into your Binadox account. Choose a workspace.
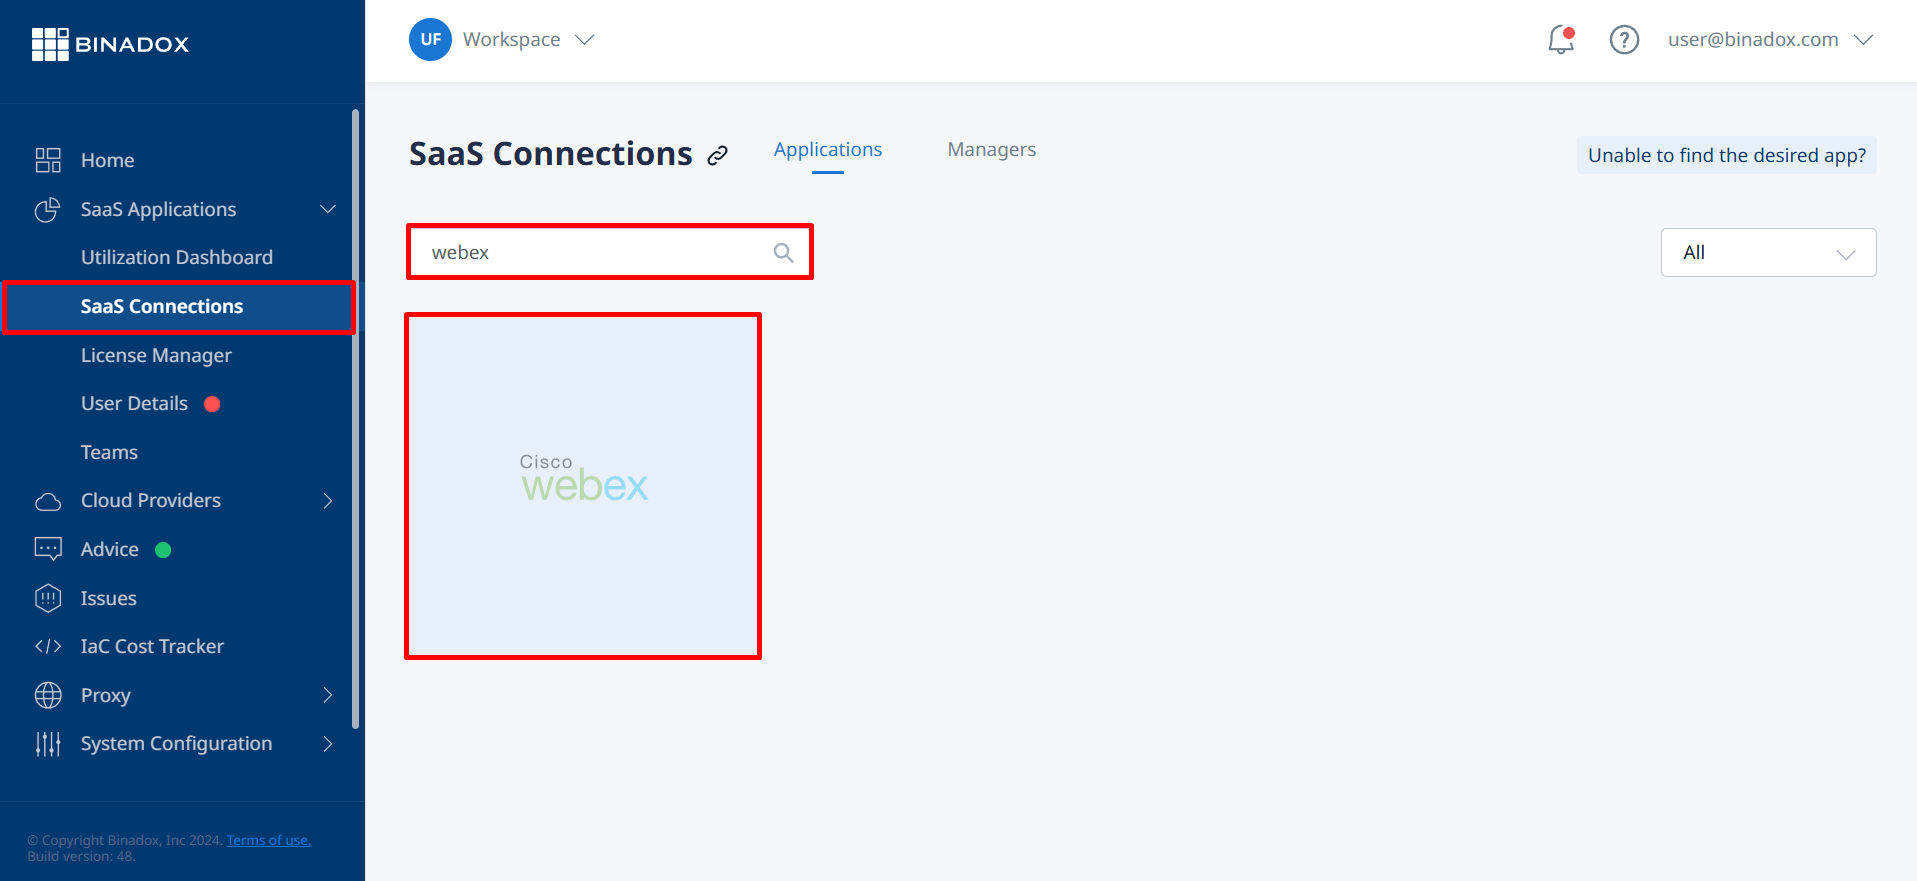
2. In the navigation pane on the left, click SaaS Connections. Click on the Webex icon. To quickly locate the Webex software in the list of supported applications, type in its name in the search bar.
Webex connection
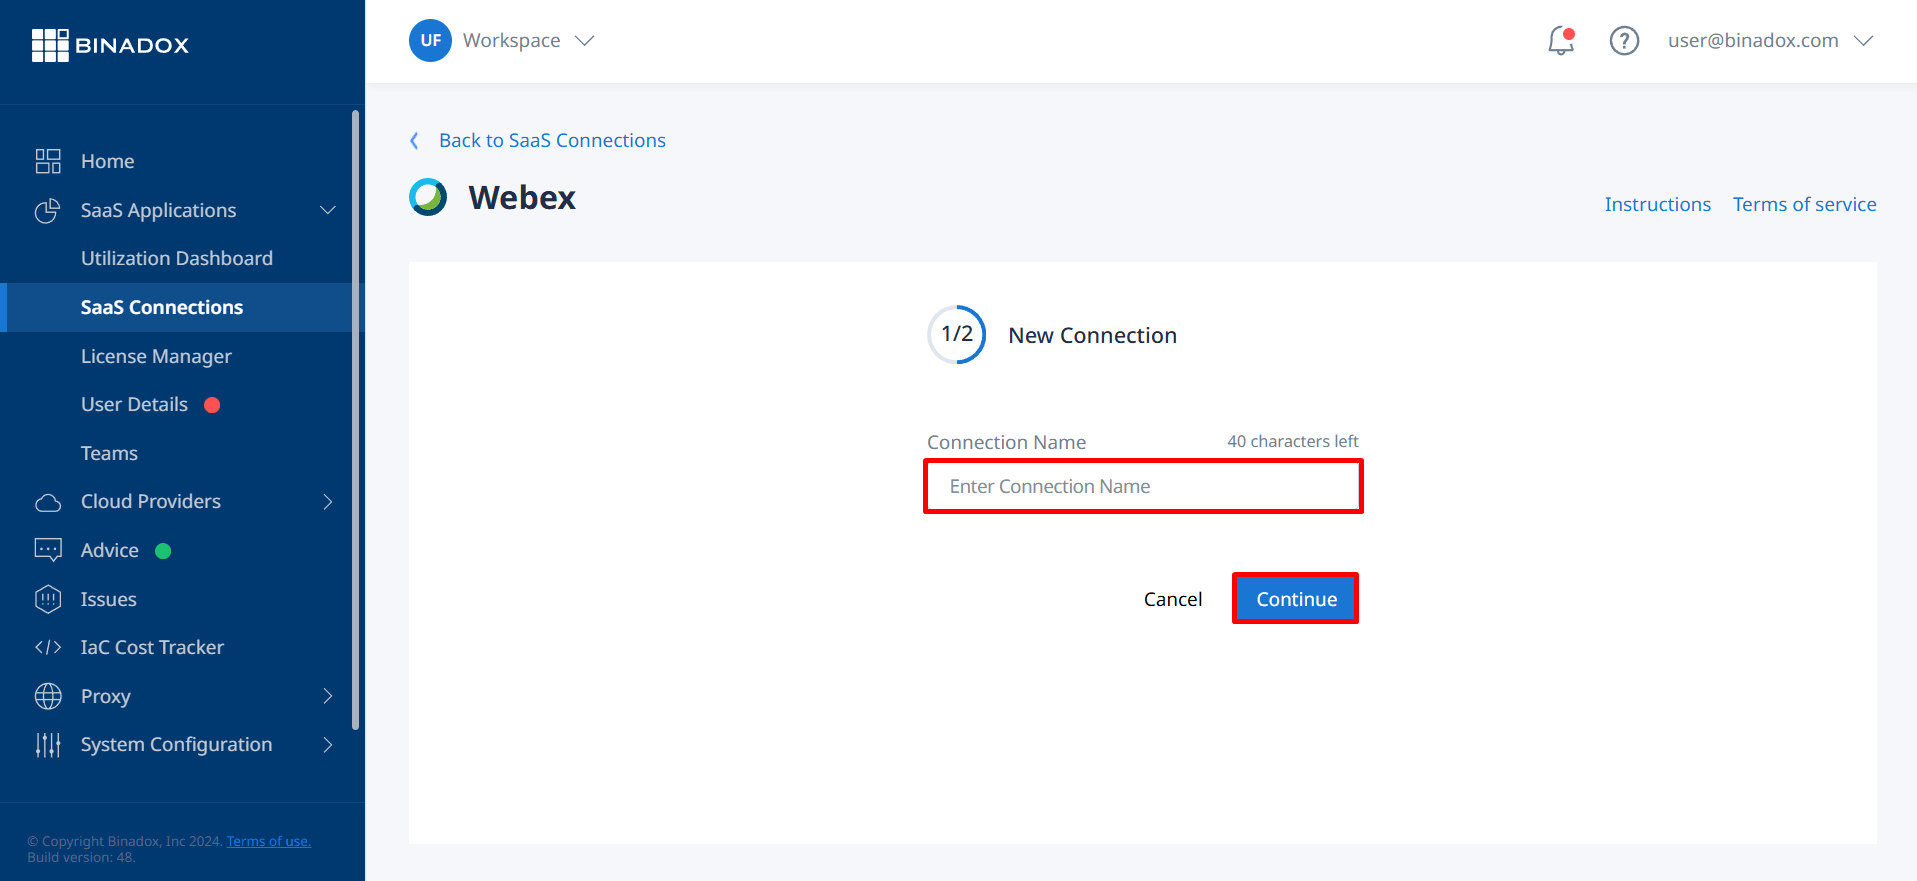
3. In the Webex connection screen, enter a unique name for this connection in the Connection Name field. Click Continue to proceed.
Connection Name
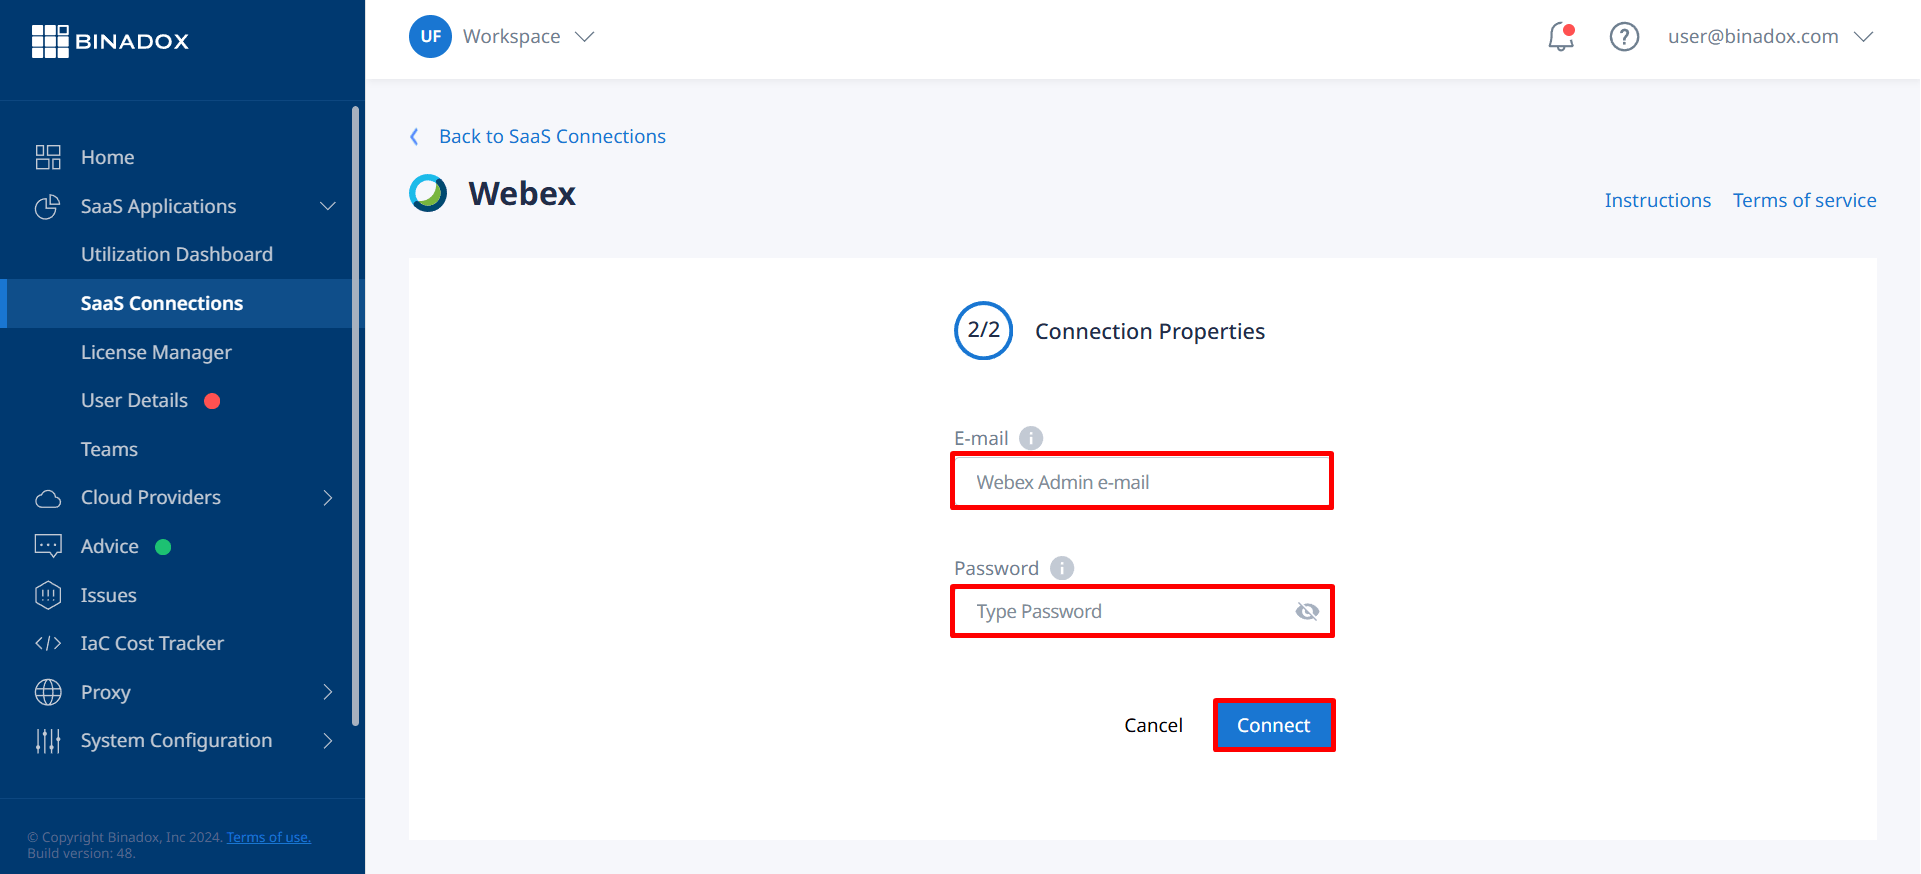
4. Fill in connection properties. Enter an e-mail address and a password used to log into the administrator account. Click Connect.
Webex connection properties
5. Upon successful Webex integration with Binadox, the connection status will switch into Connected.
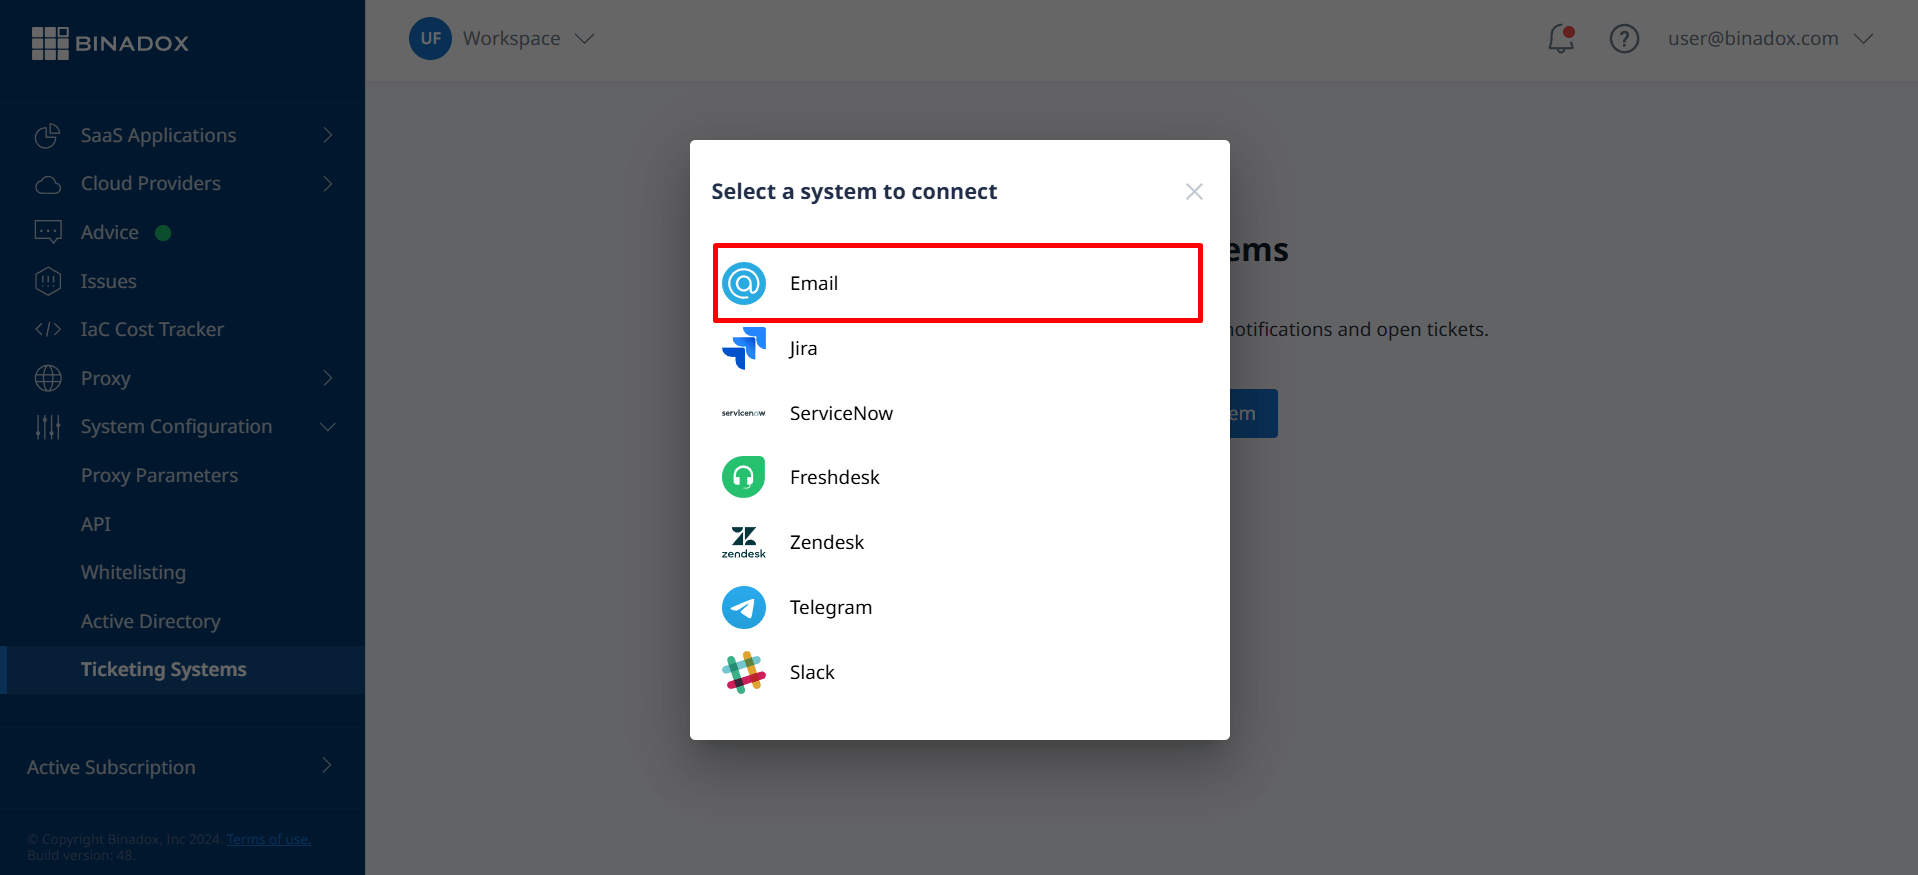
Binadox provides the E-mail Ticketing feature that sends Binadox notifications to the required email address. This guide demonstrates how to configure E-mail Ticketing on the Binadox platform to be proactively notified of overspend on SaaS applications or IaaS services, budget excess or any other unusual expenses detected by Binadox.
1. Log into your Binadox account.
2. In the navigation pane on the left, click System Configuration > Ticketing Sytems. Click Connect Ticketing system.
Connect Ticketing system
3. Select Email from the list.
Select a system to connect
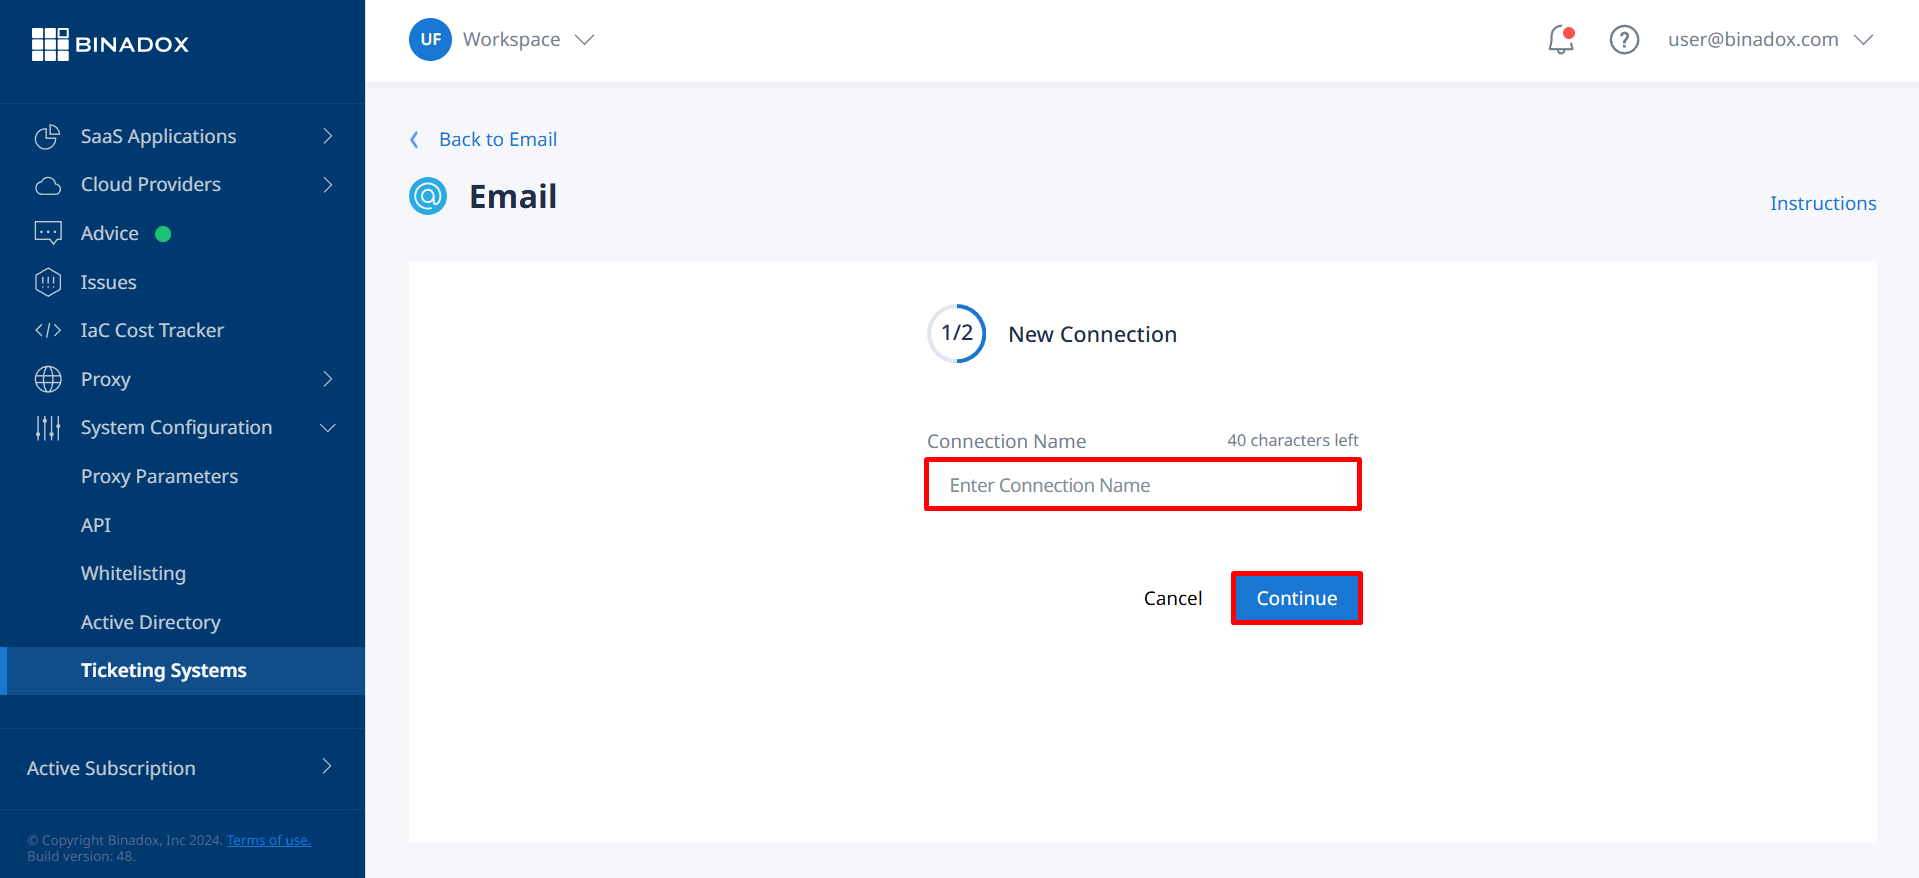
4. Create a meaningful connection name. Click Continue.
Connection name
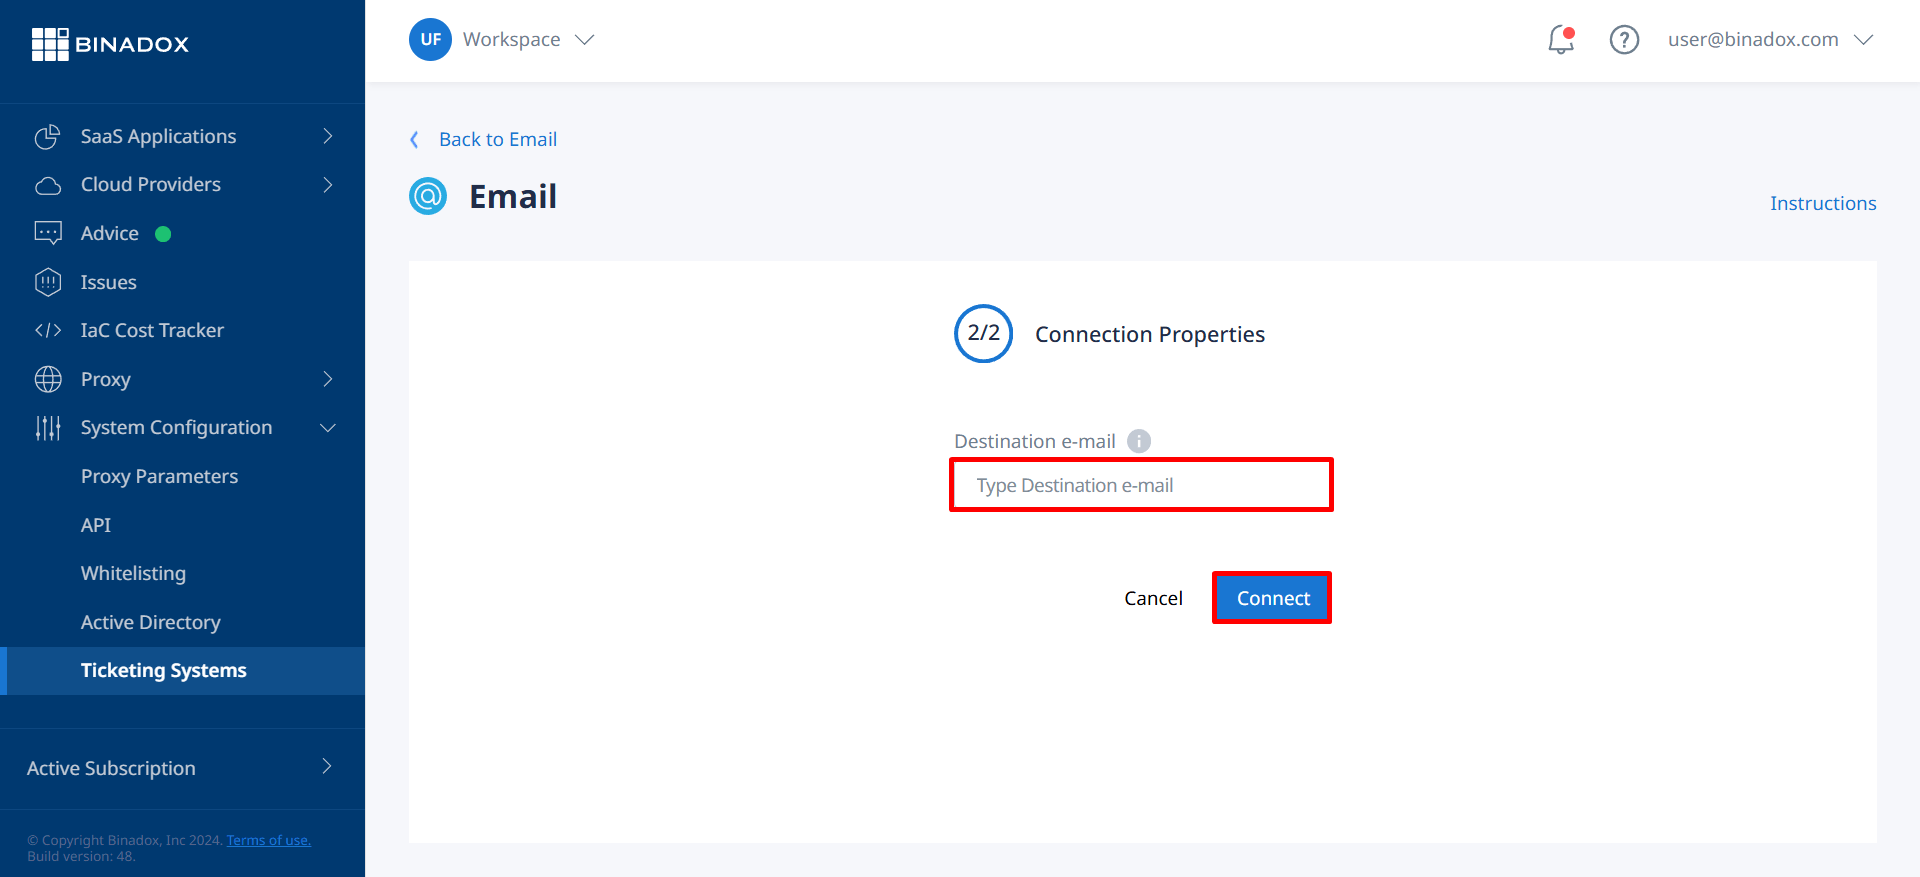
5. Enter an email address you would like to receive Binadox notifications to into the Destination E-mail field. Click Connect.
Destination email ticketing
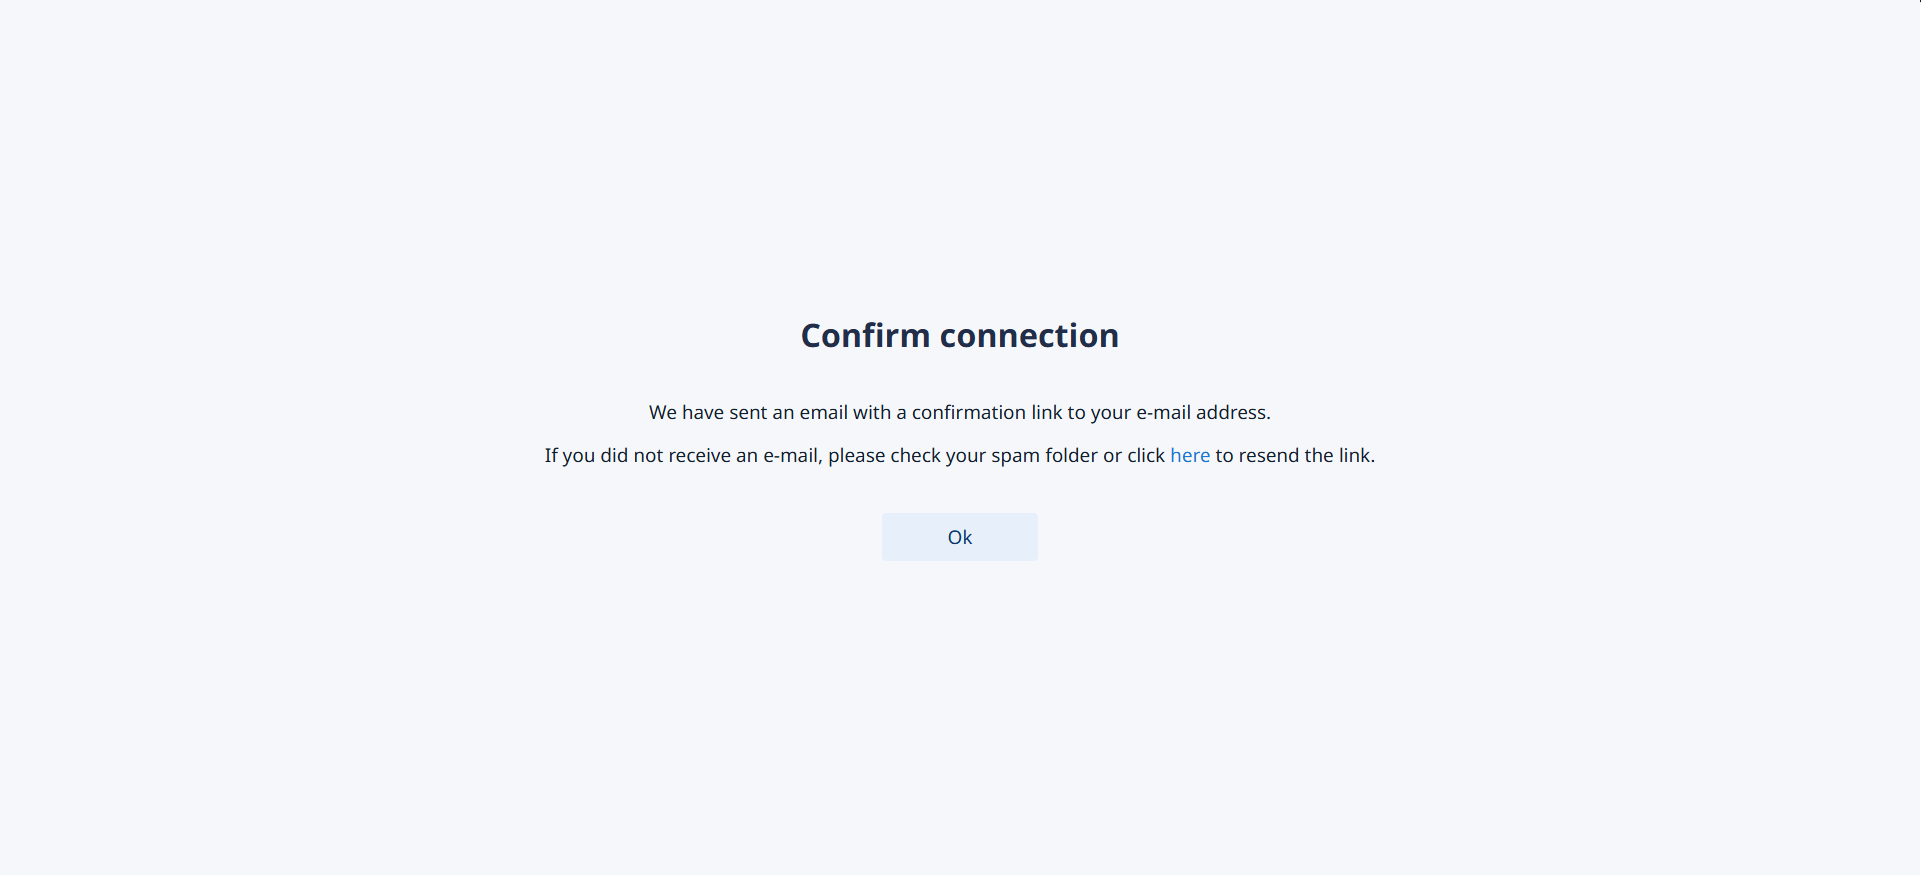
6. Confirm connection by the link from your e-mail address.
Confirm connection
7. Upon successful E-mail ticketing configuration, the connection status will switch into Connected.


~5 minutes read